一、Map集合
同学们,在前面几节课我们已经学习了Map集合的常用方法,以及遍历方式。
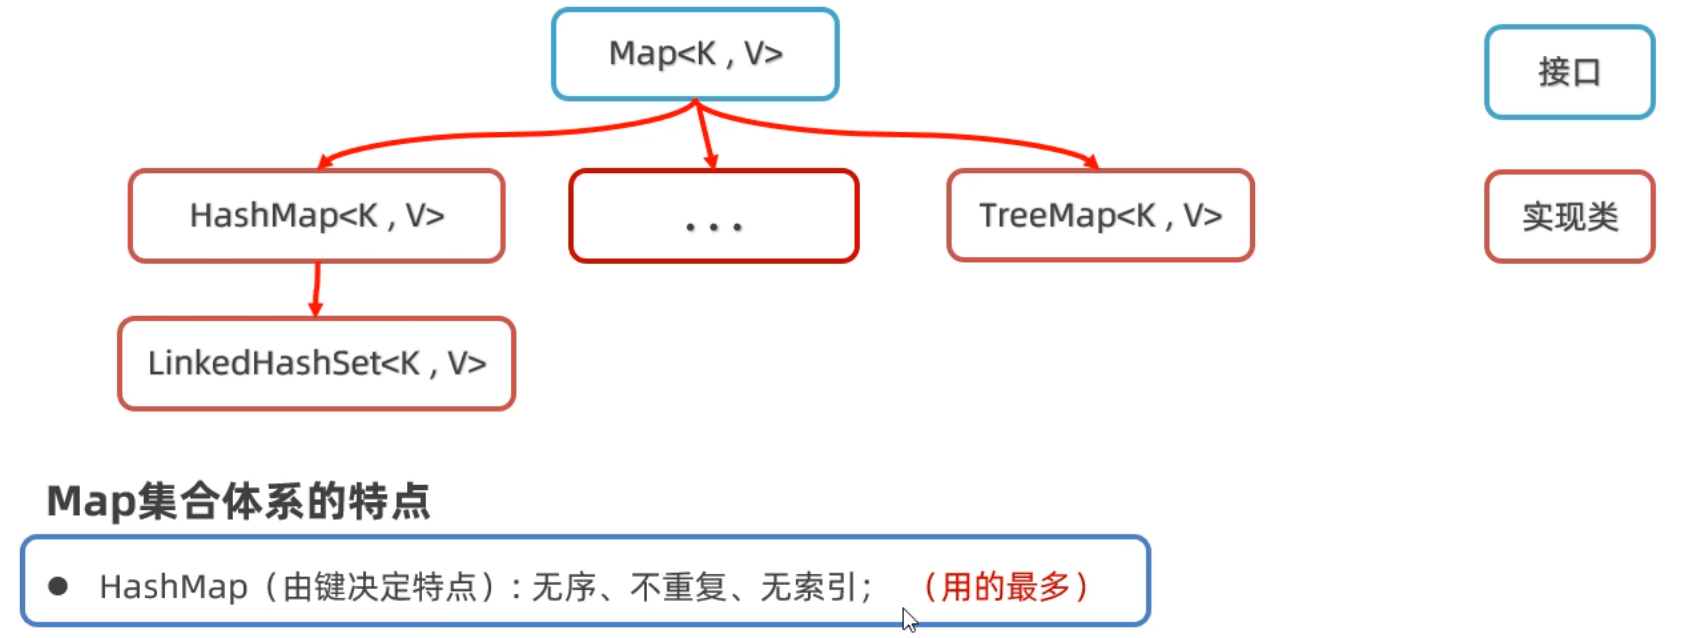
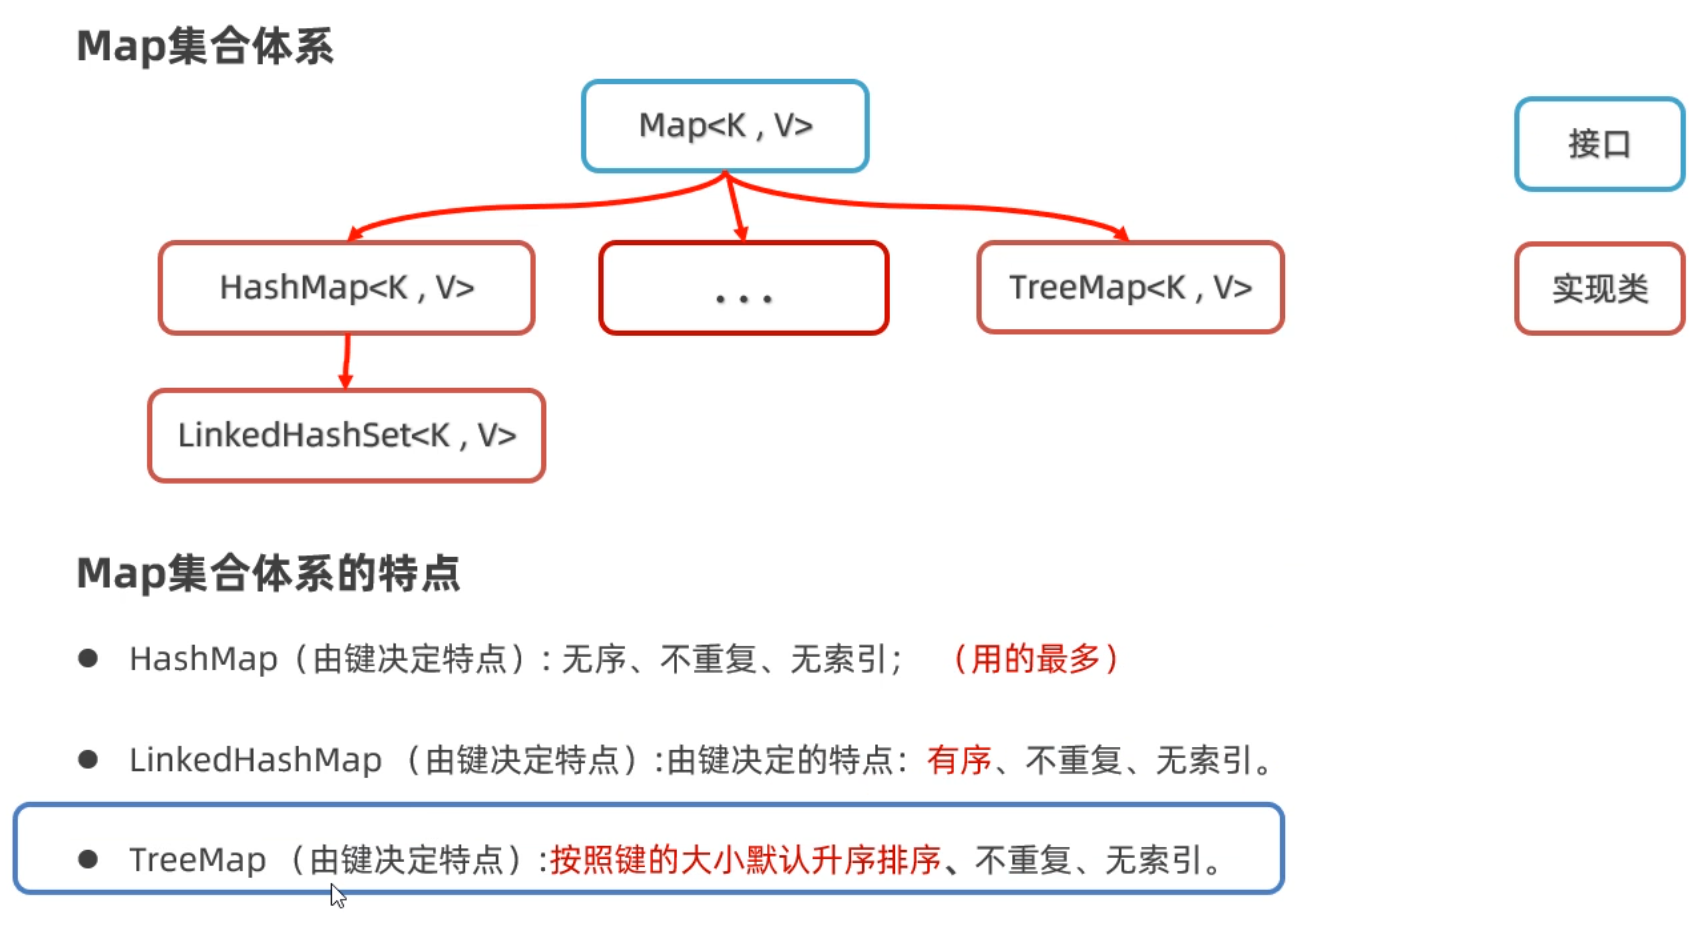
下面我们要学习的是Map接口下面的是三个实现类HashMap、LinkedHashMap、TreeMap。实际上这三个实现类并没有什么特有方法需要我们学习,它们的方法就是前面学习Map的方法。这里我们主要学习它们的底层原理。
1.1 HashMap
首先,我们学习HashMap集合的底层原理。前面我们学习过HashSet的底层原理,实际上HashMap底层原理和HashSet是一样的。为什么这么说呢?因为我们往HashSet集合中添加元素时,实际上是把元素作为添加添加到了HashMap集合中。
下面是Map集合的体系结构,HashMap集合的特点是由键决定的: 它的键是无序、不能重复,而且没有索引的。再各种Map集合中也是用得最多的一种集合。
刚才我们说,HashSet底层就是HashMap,我们可以看源码验证这一点,如下图所示,我们可以看到,创建HashSet集合时,底层帮你创建了HashMap集合;往HashSet集合中添加添加元素时,底层却是调用了Map集合的put方法把元素作为了键来存储。所以实际上根本没有什么HashSet集合,把HashMap的集合的值忽略不看就是HashSet集合。
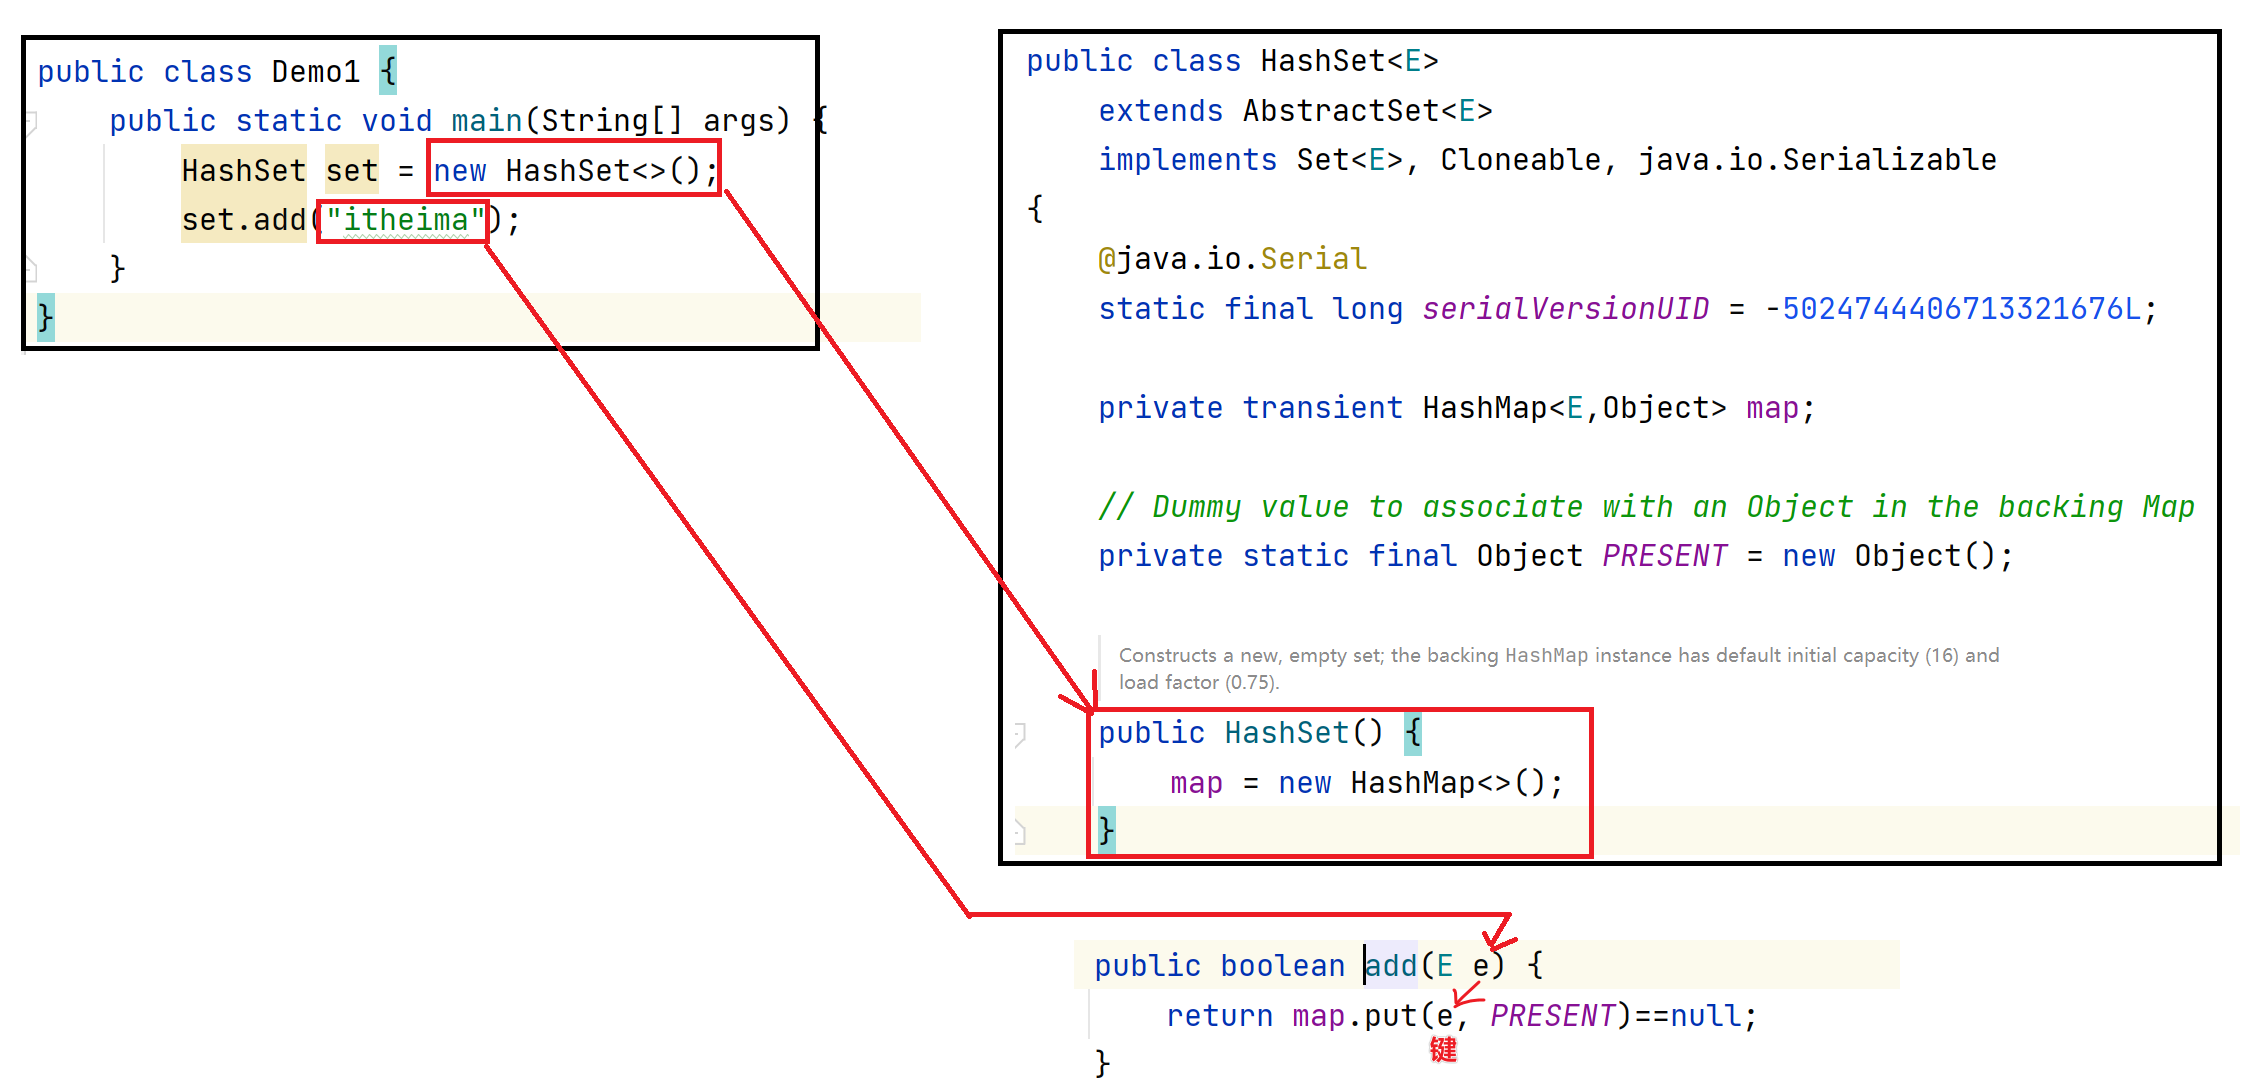
HashSet的原理我们之前已经学过了,所以HashMap是一样的,底层是哈希表结构。
1
2
3
4
5
6
7
8
9
10
11
12
13
14
15
16
17
18
19
20
21
22
23
24
25
26
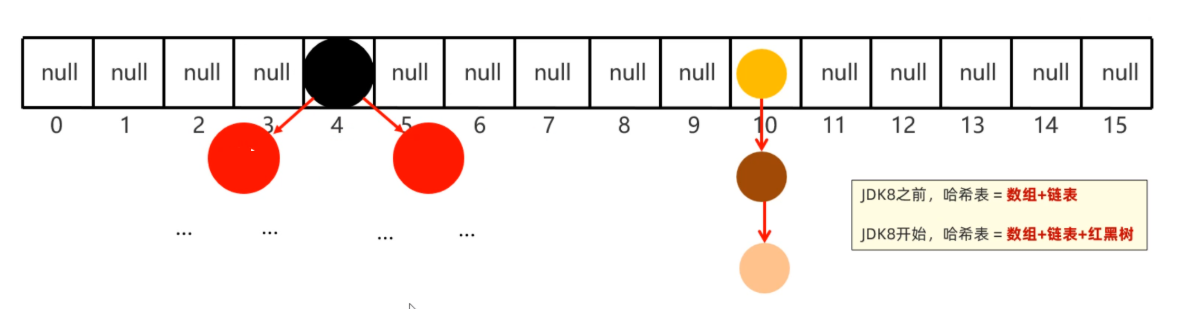
| HashMap底层数据结构: 哈希表结构
JDK8之前的哈希表 = 数组+链表
JDK8之后的哈希表 = 数组+链表+红黑树
哈希表是一种增删改查数据,性能相对都较好的数据结构
往HashMap集合中键值对数据时,底层步骤如下
第1步:当你第一次往HashMap集合中存储键值对时,底层会创建一个长度为16的数组
第2步:把键然后将键和值封装成一个对象,叫做Entry对象
第3步:再根据Entry对象的键计算hashCode值(和值无关)
第4步:利用hashCode值和数组的长度做一个类似求余数的算法,会得到一个索引位置
第5步:判断这个索引的位置是否为null,如果为null,就直接将这个Entry对象存储到这个索引位置
如果不为null,则还需要进行第6步的判断
第6步:继续调用equals方法判断两个对象键是否相同
如果equals返回false,则以链表的形式往下挂
如果equals方法true,则认为键重复,此时新的键值对会替换就的键值对。
HashMap底层需要注意这几点:
1.底层数组默认长度为16,如果数组中有超过12个位置已经存储了元素,则会对数组进行扩容2倍
数组扩容的加载因子是0.75,意思是:16*0.75=12
2.数组的同一个索引位置有多个元素、并且在8个元素以内(包括8),则以链表的形式存储
JDK7版本:链表采用头插法(新元素往链表的头部添加)
JDK8版本:链表采用尾插法(新元素我那个链表的尾部添加)
3.数组的同一个索引位置有多个元素、并且超过了8个,则以红黑树形式存储
|
从HashMap底层存储键值对的过程中我们发现:决定键是否重复依赖与两个方法,一个是hashCode方法、一个是equals方法。有两个键计算得到的hashCode值相同,并且两个键使用equals比较为true,就认为键重复。
所以,往Map集合中存储自定义对象作为键,为了保证键的唯一性,我们应该重写hashCode方法和equals方法。
比如有如下案例:往HashMap集合中存储Student对象作为键,学生的家庭住址当做值。要求,当学生对象的姓名和年龄相同时就认为键重复。
1
2
3
4
5
6
7
8
9
10
11
12
13
14
15
16
17
18
19
20
21
22
23
24
25
26
27
28
29
30
31
32
33
34
35
36
37
38
39
40
41
42
43
44
| public class Student implements Comparable<Student> {
private String name;
private int age;
private double height;
@Override
public int compareTo(Student o) {
return this.age - o.age;
}
@Override
public boolean equals(Object o) {
if (this == o) return true;
if (o == null || getClass() != o.getClass()) return false;
Student student = (Student) o;
return age == student.age && Double.compare(student.height, height) == 0 && Objects.equals(name, student.name);
}
@Override
public int hashCode() {
return Objects.hash(name, age, height);
}
public Student() {
}
public Student(String name, int age, double height) {
this.name = name;
this.age = age;
this.height = height;
}
@Override
public String toString() {
return "Student{" +
"name='" + name + '\'' +
", age=" + age +
", height=" + height +
'}';
}
}
|
写一个测试类,在测试类中,创建HashMap集合,键是Student类型,值是Stirng类型
1
2
3
4
5
6
7
8
9
10
11
12
13
|
public class Test1HashMap {
public static void main(String[] args) {
Map<Student, String> map = new HashMap<>();
map.put(new Student("蜘蛛精", 25, 168.5), "盘丝洞");
map.put(new Student("蜘蛛精", 25, 168.5), "水帘洞");
map.put(new Student("至尊宝", 23, 163.5), "水帘洞");
map.put(new Student("牛魔王", 28, 183.5), "牛头山");
System.out.println(map);
}
}
|
上面存储的键,有两个蜘蛛精,但是打印出只会有最后一个。

1.2 LinkedHashMap
学习完HashMap集合的特点,以及底层原理。接下来我们学习一下LinkedHashMap集合。
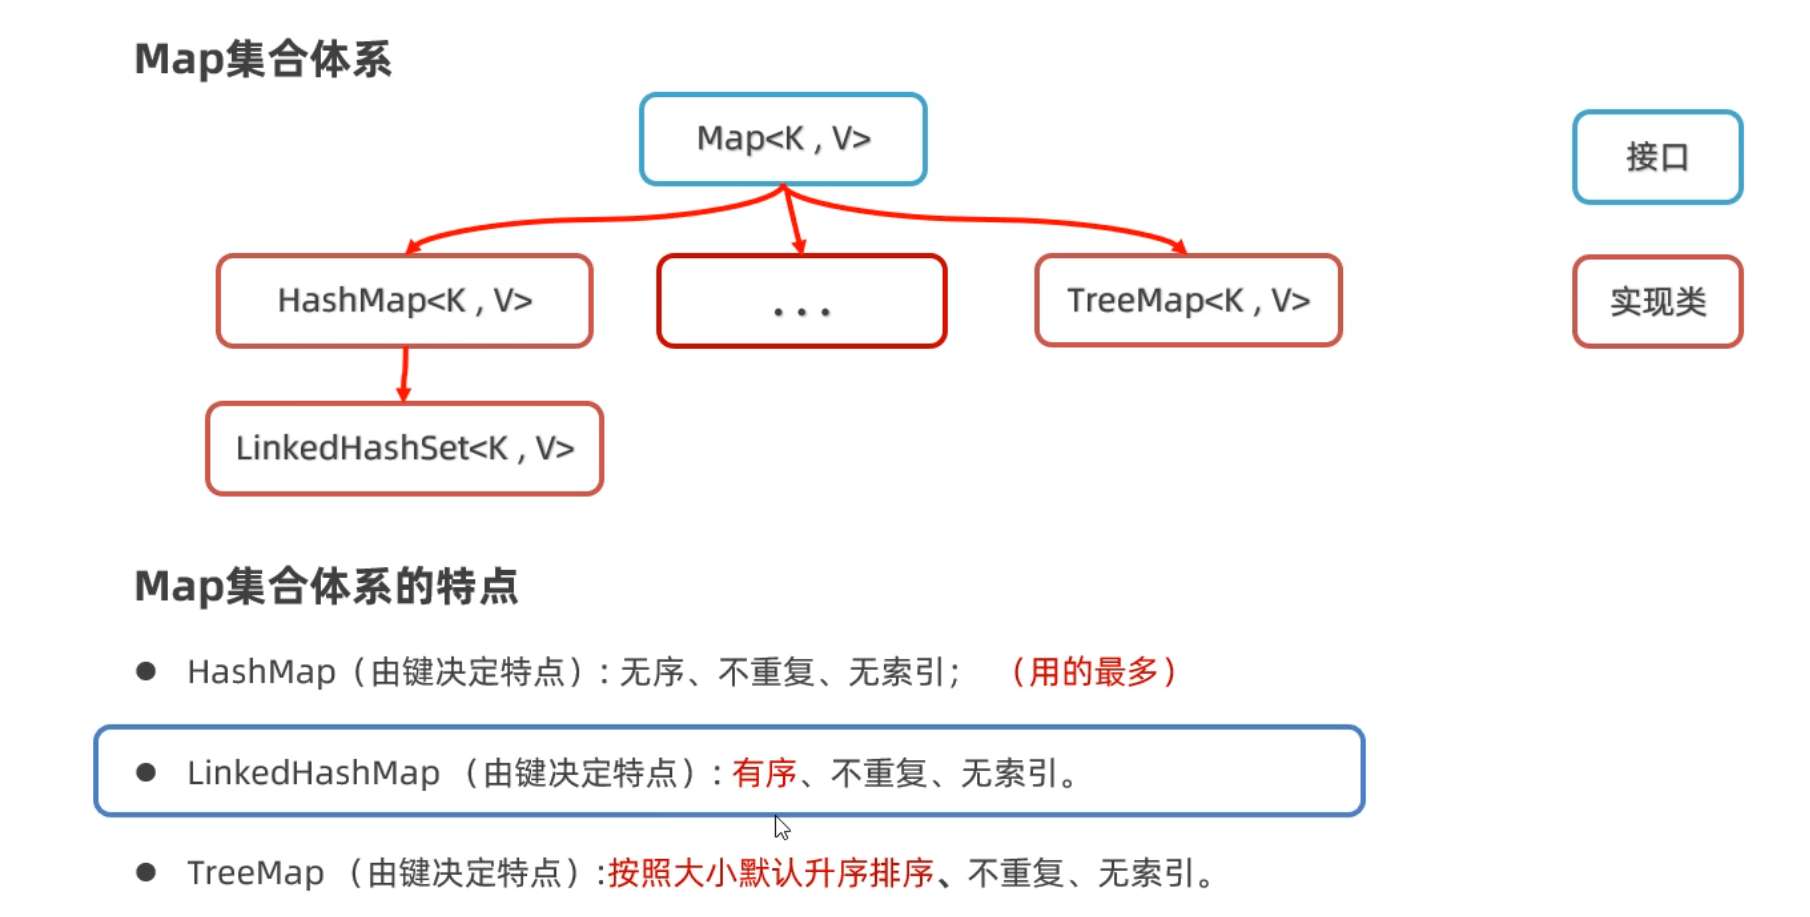
- LinkedHashMap集合的特点也是由键决定的:有序的、不重复、无索引。
1
2
3
4
5
6
7
8
9
10
11
12
13
14
15
|
public class Test2LinkedHashMap {
public static void main(String[] args) {
LinkedHashMap<String, Integer> map = new LinkedHashMap<>();
map.put("手表", 100);
map.put("手表", 220);
map.put("手机", 2);
map.put("Java", 2);
map.put(null, null);
System.out.println(map);
}
}
|
运行上面代码发现,如果是LinedHashMap集合键存储和取出的顺序是一样的

如果是HashMap,键存储和取出的顺序是不一致的

- LinkedHashMap的底层原理,和LinkedHashSet底层原理是一样的。底层多个一个双向链表来维护键的存储顺序。
取元素时,先取头节点元素,然后再依次取下一个几点,一直到尾结点。所以是有序的。

1.3 TreeMap
最后,我们再学习Map集合下面的另一个子类叫TreeMap。根据我们前面学习其他Map集合的经验,我们应该可以猜出TreeMap有什么特点。
- TreeMap集合的特点也是由键决定的,默认按照键的升序排列,键不重复,也是无索引的。
**排序方式1:**写一个Student类,让Student类实现Comparable接口
1
2
3
4
5
6
7
8
9
10
11
12
13
14
15
16
17
18
19
20
21
22
23
24
25
26
27
28
|
public class Student implements Comparable<Student>{
private String name;
private int age;
private double height;
public Student(){}
public Student(String name, int age, double height){
this.name=name;
this.age=age;
this.height=height;
}
@Override
public int compareTo(Student o) {
return this.age-o.age;
}
}
|
**排序方式2:**在创建TreeMap集合时,直接传递Comparator比较器对象。
1
2
3
4
5
6
7
8
9
10
11
12
13
14
15
16
17
18
19
|
public class Test3TreeMap {
public static void main(String[] args) {
Map<Student, String> map = new TreeMap<>(new Comparator<Student>() {
@Override
public int compare(Student o1, Student o2) {
return Double.compare(o1.getHeight(), o2.getHeight());
}
});
map.put(new Student("蜘蛛精", 25, 168.5), "盘丝洞");
map.put(new Student("蜘蛛精", 25, 168.5), "水帘洞");
map.put(new Student("至尊宝", 23, 163.5), "水帘洞");
map.put(new Student("牛魔王", 28, 183.5), "牛头山");
System.out.println(map);
}
}
|
这种方式都可以对TreeMap集合中的键排序。注意:只有TreeMap的键才能排序,HashMap键不能排序。
1.4 集合嵌套
各位同学,到现在为止我们把Map集合和Collection集合的都已经学习完了。但是在实际开发中可能还会存在一种特殊的用法。就是把一个集合当做元素,存储到另一个集合中去,我们把这种用法称之为集合嵌套。
下面通过一个案例给大家演示一下
1
2
3
4
5
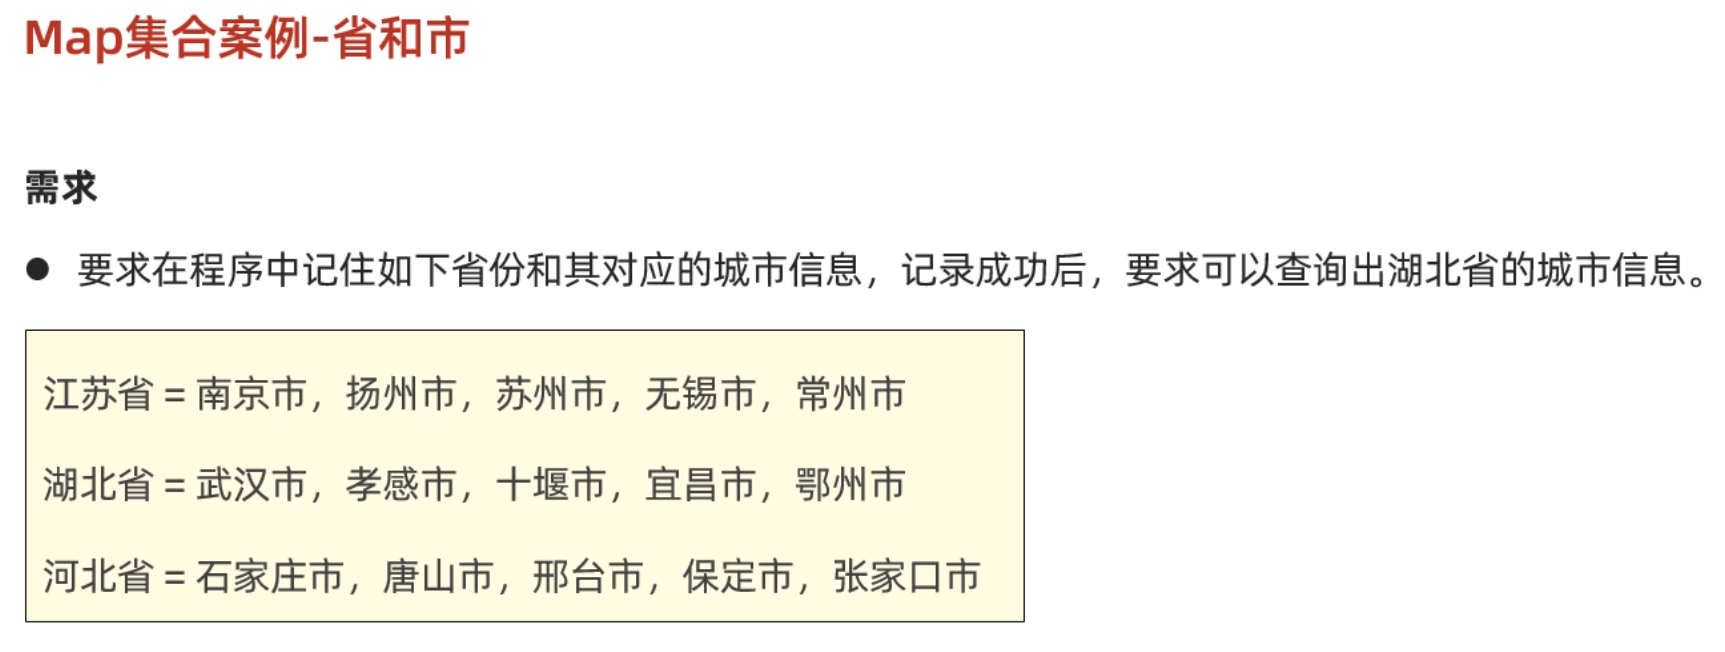
| 1.从需求中我们可以看到,有三个省份,每一个省份有多个城市
我们可以用一个Map集合的键表示省份名称,而值表示省份有哪些城市
2.而又因为一个身份有多个城市,同一个省份的多个城市可以再用一个List集合来存储。
所以Map集合的键是String类型,而指是List集合类型
HashMap<String, List<String>> map = new HashMap<>();
|
1
2
3
4
5
6
7
8
9
10
11
12
13
14
15
16
17
18
19
20
21
22
23
24
25
26
27
28
29
30
31
32
33
34
|
public class Test {
public static void main(String[] args) {
Map<String, List<String>> map = new HashMap<>();
List<String> cities1 = new ArrayList<>();
Collections.addAll(cities1, "南京市","扬州市","苏州市" ,"无锡市","常州市");
map.put("江苏省", cities1);
List<String> cities2 = new ArrayList<>();
Collections.addAll(cities2, "武汉市","孝感市","十堰市","宜昌市","鄂州市");
map.put("湖北省", cities2);
List<String> cities3 = new ArrayList<>();
Collections.addAll(cities3, "石家庄市","唐山市", "邢台市", "保定市", "张家口市");
map.put("河北省", cities3);
System.out.println(map);
List<String> cities = map.get("湖北省");
for (String city : cities) {
System.out.println(city);
}
map.forEach((p, c) -> {
System.out.println(p + "----->" + c);
});
}
}
|
二、JDK8新特性(Stream流)
各位同学,接下来我们学习一个全新的知识,叫做Stream流(也叫Stream API)。它是从JDK8以后才有的一个新特性,是专业用于对集合或者数组进行便捷操作的。有多方便呢?我们用一个案例体验一下,然后再详细学习。
2.1 Stream流体验
案例需求:有一个List集合,元素有"张三丰","张无忌","周芷若","赵敏","张强",找出姓张,且是3个字的名字,存入到一个新集合中去。
1
2
3
| List<String> names = new ArrayList<>();
Collections.addAll(names, "张三丰","张无忌","周芷若","赵敏","张强");
System.out.println(names);
|
1
2
3
4
5
6
7
8
|
List<String> list = new ArrayList<>();
for (String name : names) {
if(name.startsWith("张") && name.length() == 3){
list.add(name);
}
}
System.out.println(list);
|
- 用Stream流来做,代码是这样的(ps: 是不是想流水线一样,一句话就写完了)
1
2
| List<String> list2 = names.stream().filter(s -> s.startsWith("张")).filter(a -> a.length()==3).collect(Collectors.toList());
System.out.println(list2);
|
先不用知道这里面每一句话是什么意思,具体每一句话的含义,待会再一步步学习。现在只是体验一下。
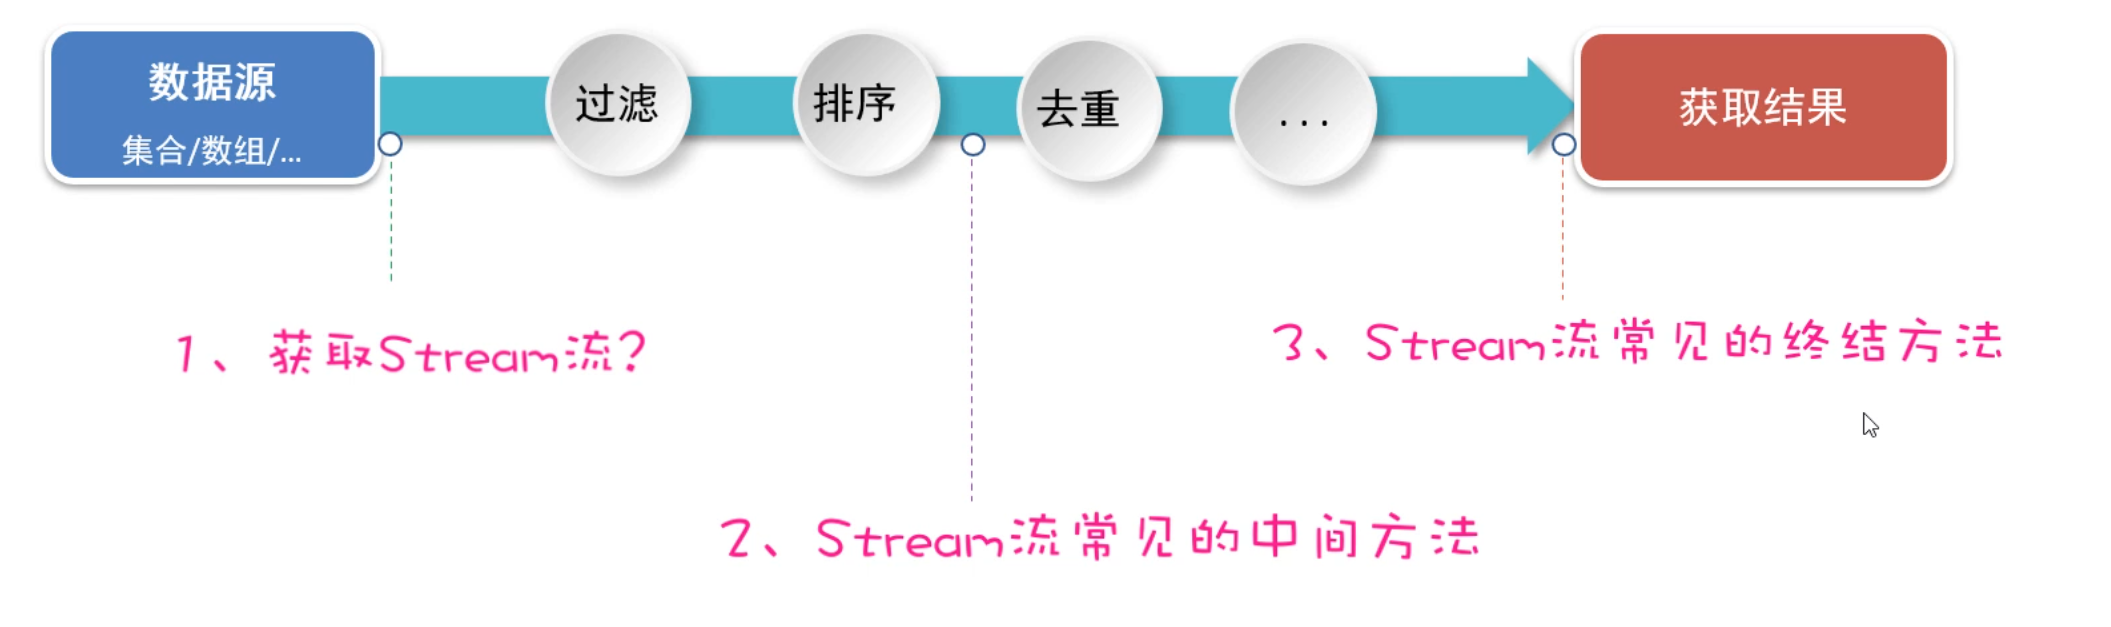
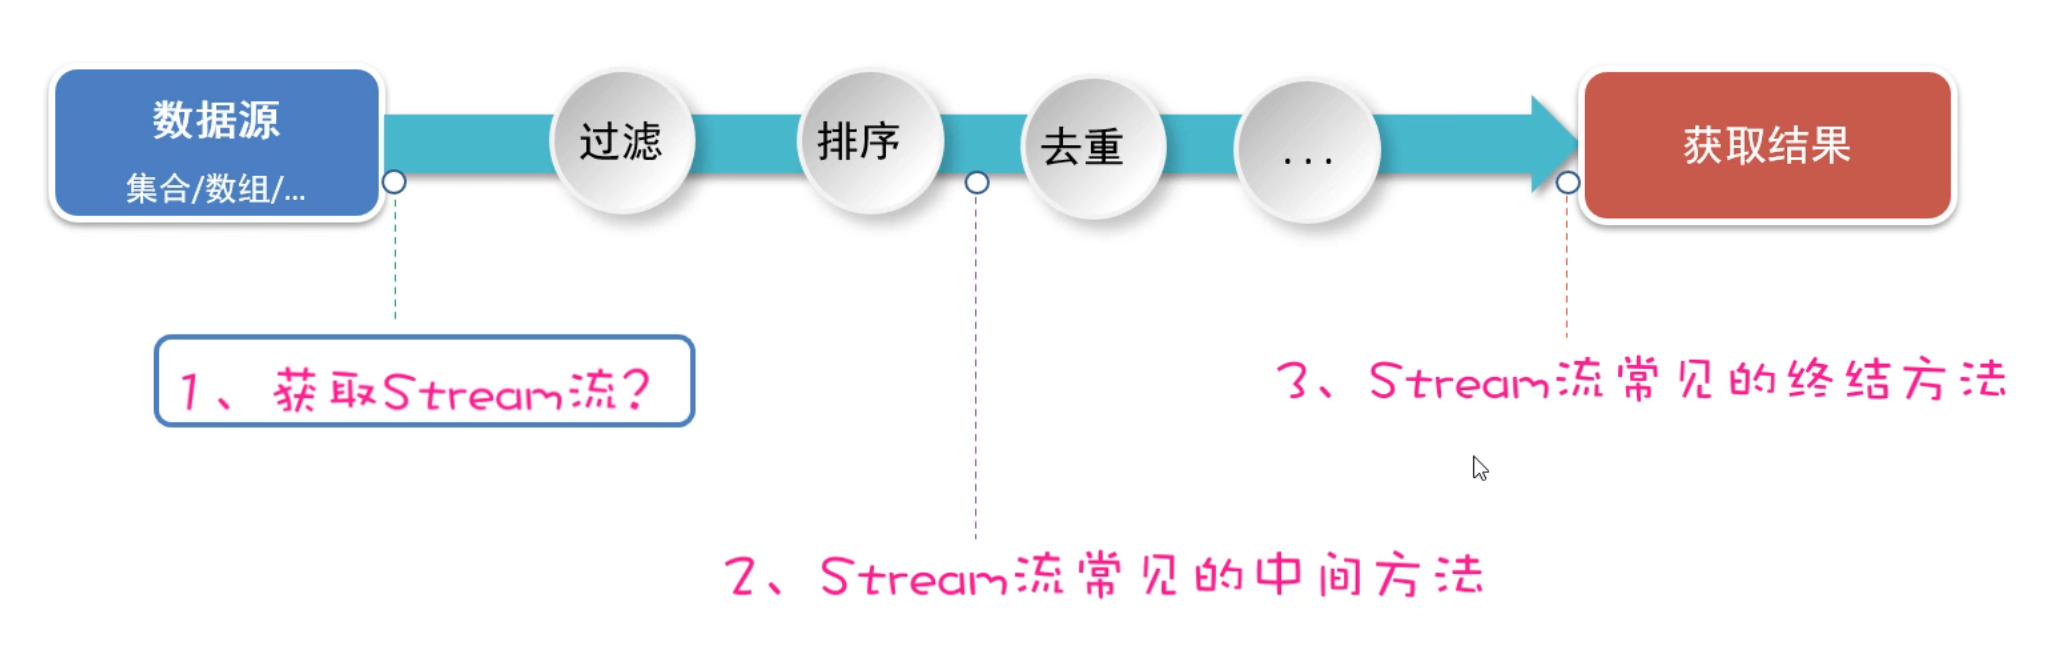
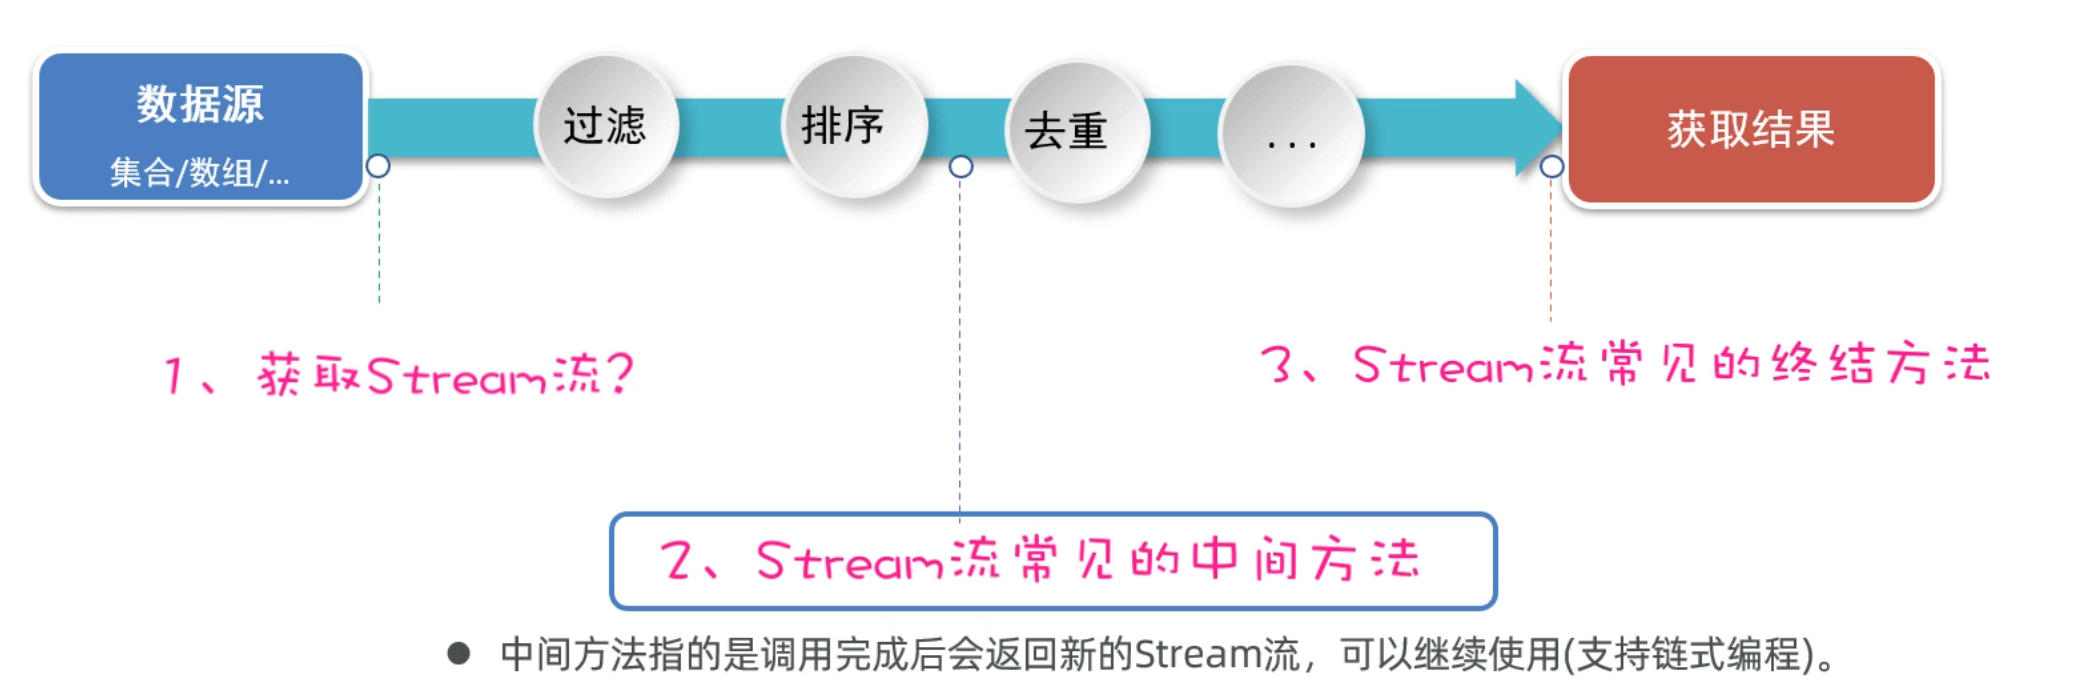
学习Stream流我们接下来,会按照下面的步骤来学习。
2.2 Stream流的创建
好,接下来我们正式来学习Stream流。先来学习如何创建Stream流、或者叫获取Stream流。
1
2
3
4
5
| 主要掌握下面四点:
1、如何获取List集合的Stream流?
2、如何获取Set集合的Stream流?
3、如何获取Map集合的Stream流?
4、如何获取数组的Stream流?
|
直接上代码演示
1
2
3
4
5
6
7
8
9
10
11
12
13
14
15
16
17
18
19
20
21
22
23
24
25
26
27
28
29
30
31
32
33
34
35
36
37
38
39
40
41
|
public class StreamTest2 {
public static void main(String[] args) {
List<String> names = new ArrayList<>();
Collections.addAll(names, "张三丰","张无忌","周芷若","赵敏","张强");
Stream<String> stream = names.stream();
Set<String> set = new HashSet<>();
Collections.addAll(set, "刘德华","张曼玉","蜘蛛精","马德","德玛西亚");
Stream<String> stream1 = set.stream();
stream1.filter(s -> s.contains("德")).forEach(s -> System.out.println(s));
Map<String, Double> map = new HashMap<>();
map.put("古力娜扎", 172.3);
map.put("迪丽热巴", 168.3);
map.put("马尔扎哈", 166.3);
map.put("卡尔扎巴", 168.3);
Set<String> keys = map.keySet();
Stream<String> ks = keys.stream();
Collection<Double> values = map.values();
Stream<Double> vs = values.stream();
Set<Map.Entry<String, Double>> entries = map.entrySet();
Stream<Map.Entry<String, Double>> kvs = entries.stream();
kvs.filter(e -> e.getKey().contains("巴"))
.forEach(e -> System.out.println(e.getKey()+ "-->" + e.getValue()));
String[] names2 = {"张翠山", "东方不败", "唐大山", "独孤求败"};
Stream<String> s1 = Arrays.stream(names2);
Stream<String> s2 = Stream.of(names2);
}
}
|
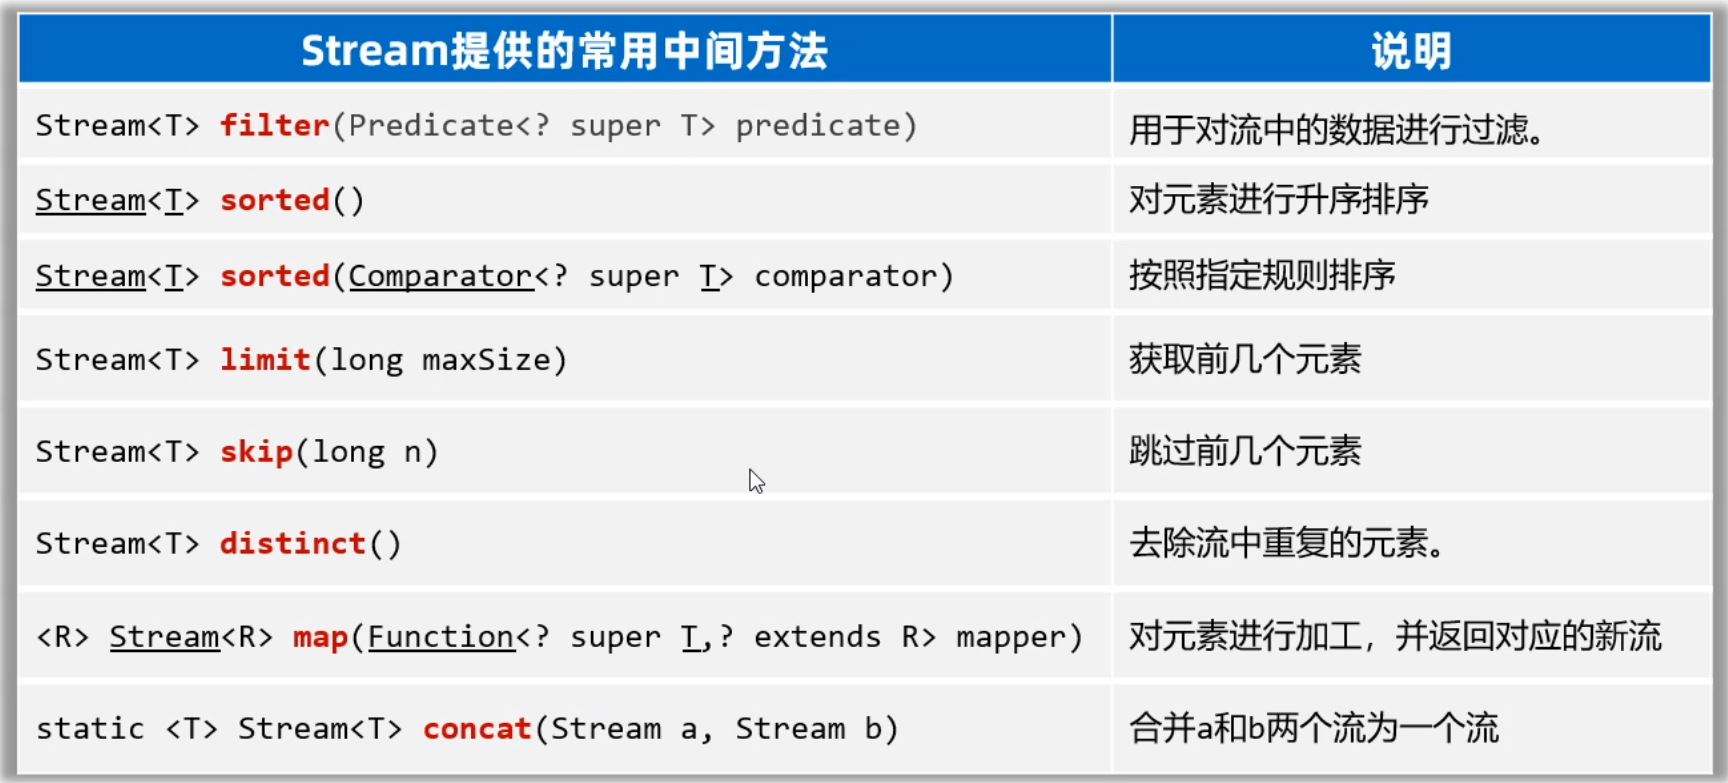
2.3 Stream流中间方法
在上一节,我们学习了创建Stream流的方法。接下来我们再来学习,Stream流中间操作的方法。
中间方法指的是:调用完方法之后其结果是一个新的Stream流,于是可以继续调用方法,这样一来就可以支持链式编程(或者叫流式编程)。
话不多说,直接上代码演示
1
2
3
4
5
6
7
8
9
10
11
12
13
14
15
16
17
18
19
20
21
22
23
24
25
26
27
28
29
30
31
32
33
34
35
36
37
38
39
40
41
42
43
44
45
46
|
public class StreamTest3 {
public static void main(String[] args) {
List<Double> scores = new ArrayList<>();
Collections.addAll(scores, 88.5, 100.0, 60.0, 99.0, 9.5, 99.6, 25.0);
scores.stream().filter(s -> s >= 60).sorted().forEach(s -> System.out.println(s));
List<Student> students = new ArrayList<>();
Student s1 = new Student("蜘蛛精", 26, 172.5);
Student s2 = new Student("蜘蛛精", 26, 172.5);
Student s3 = new Student("紫霞", 23, 167.6);
Student s4 = new Student("白晶晶", 25, 169.0);
Student s5 = new Student("牛魔王", 35, 183.3);
Student s6 = new Student("牛夫人", 34, 168.5);
Collections.addAll(students, s1, s2, s3, s4, s5, s6);
students.stream().filter(s -> s.getAge() >= 23 && s.getAge() <= 30)
.sorted((o1, o2) -> o2.getAge() - o1.getAge())
.forEach(s -> System.out.println(s));
students.stream().sorted((o1, o2) -> Double.compare(o2.getHeight(), o1.getHeight()))
.limit(3).forEach(System.out::println);
System.out.println("-----------------------------------------------");
students.stream().sorted((o1, o2) -> Double.compare(o2.getHeight(), o1.getHeight()))
.skip(students.size() - 2).forEach(System.out::println);
students.stream().filter(s -> s.getHeight() > 168).map(Student::getName)
.distinct().forEach(System.out::println);
students.stream().filter(s -> s.getHeight() > 168)
.distinct().forEach(System.out::println);
Stream<String> st1 = Stream.of("张三", "李四");
Stream<String> st2 = Stream.of("张三2", "李四2", "王五");
Stream<String> allSt = Stream.concat(st1, st2);
allSt.forEach(System.out::println);
}
}
|
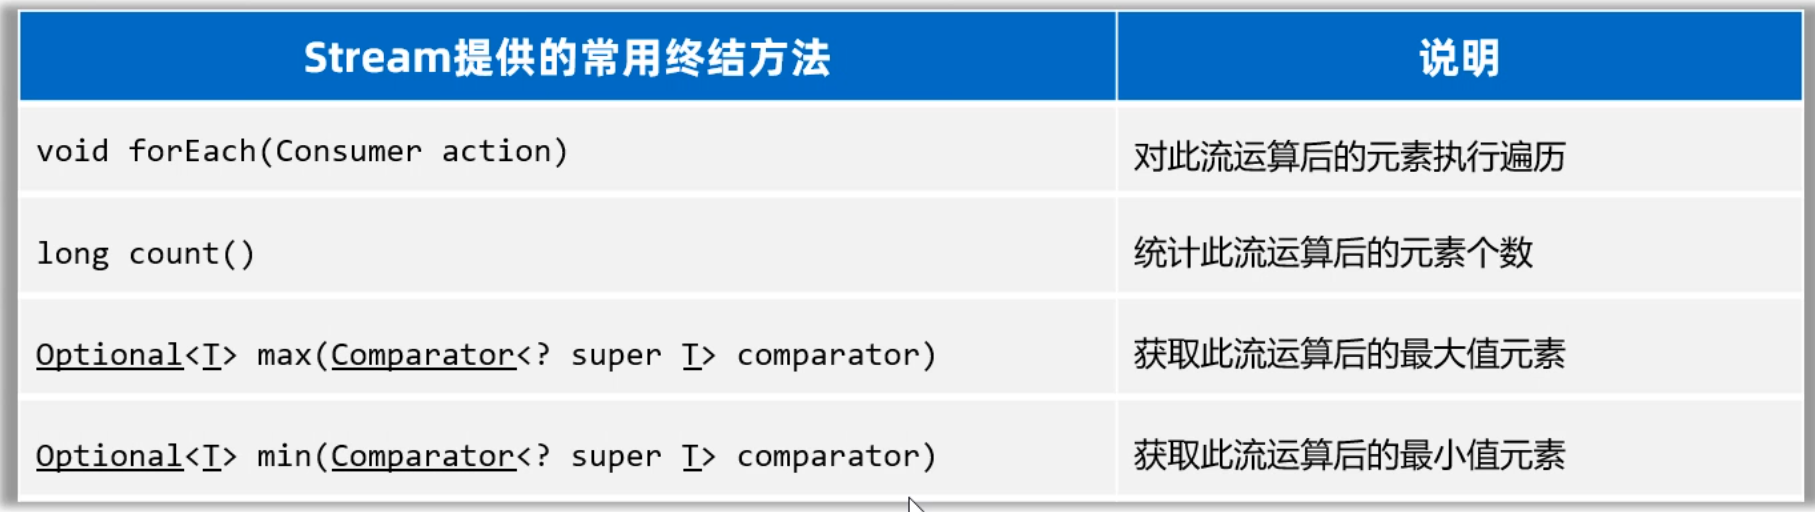
2.5 Stream流终结方法
最后,我们再学习Stream流的终结方法。这些方法的特点是,调用完方法之后,其结果就不再是Stream流了,所以不支持链式编程。

我列举了下面的几个终结方法,接下来用几个案例来一个一个给同学们演示。
话不多说,直接上代码
1
2
3
4
5
6
7
8
9
10
11
12
13
14
15
16
17
18
19
20
21
22
23
24
25
26
27
28
29
30
31
32
33
34
35
36
37
38
39
40
41
42
43
44
|
public class StreamTest4 {
public static void main(String[] args) {
List<Student> students = new ArrayList<>();
Student s1 = new Student("蜘蛛精", 26, 172.5);
Student s2 = new Student("蜘蛛精", 26, 172.5);
Student s3 = new Student("紫霞", 23, 167.6);
Student s4 = new Student("白晶晶", 25, 169.0);
Student s5 = new Student("牛魔王", 35, 183.3);
Student s6 = new Student("牛夫人", 34, 168.5);
Collections.addAll(students, s1, s2, s3, s4, s5, s6);
long size = students.stream().filter(s -> s.getHeight() > 168).count();
System.out.println(size);
Student s = students.stream().max((o1, o2) -> Double.compare(o1.getHeight(), o2.getHeight())).get();
System.out.println(s);
Student ss = students.stream().min((o1, o2) -> Double.compare(o1.getHeight(), o2.getHeight())).get();
System.out.println(ss);
List<Student> students1 = students.stream().filter(a -> a.getHeight() > 170).collect(Collectors.toList());
System.out.println(students1);
Set<Student> students2 = students.stream().filter(a -> a.getHeight() > 170).collect(Collectors.toSet());
System.out.println(students2);
Map<String, Double> map =
students.stream().filter(a -> a.getHeight() > 170)
.distinct().collect(Collectors.toMap(a -> a.getName(), a -> a.getHeight()));
System.out.println(map);
Student[] arr = students.stream().filter(a -> a.getHeight() > 170).toArray(len -> new Student[len]);
System.out.println(Arrays.toString(arr));
}
}
|
到这里,关于Stream流的操常见操作我们就已经学习完了。当然Stream流还有一些其他的方法,同学们遇到了也可以自己再研究一下。
三、File类
接下来,我们要学习的知识是一个File类。但是在讲这个知识点之前,我想先和同学们聊点别的,聊完之后再回过来学习File你会更容易理解一些。
而现在要学习的File类,它的就用来表示当前系统下的文件(也可以是文件夹),通过File类提供的方法可以获取文件大小、判断文件是否存在、创建文件、创建文件夹等。

**但是需要我们注意:**File对象只能对文件进行操作,不能操作文件中的内容。
3.1 File对象的创建
学习File类和其他类一样,第一步是创建File类的对象。 想要创建对象,我们得看File类有哪些构造方法。

下面我们演示一下,File类创建对象的代码
1
| 需求我们注意的是:路径中"\"要写成"\\", 路径中"/"可以直接用
|
1
2
3
4
5
6
7
8
9
10
11
12
13
14
15
16
17
18
19
20
21
22
23
24
25
26
27
28
|
public class FileTest1 {
public static void main(String[] args) {
File f1 = new File("D:" + File.separator +"resource" + File.separator + "ab.txt");
System.out.println(f1.length());
File f2 = new File("D:/resource");
System.out.println(f2.length());
File f3 = new File("D:/resource/aaaa.txt");
System.out.println(f3.length());
System.out.println(f3.exists());
File f4 = new File("file-io-app\\src\\itheima.txt");
System.out.println(f4.length());
}
}
|
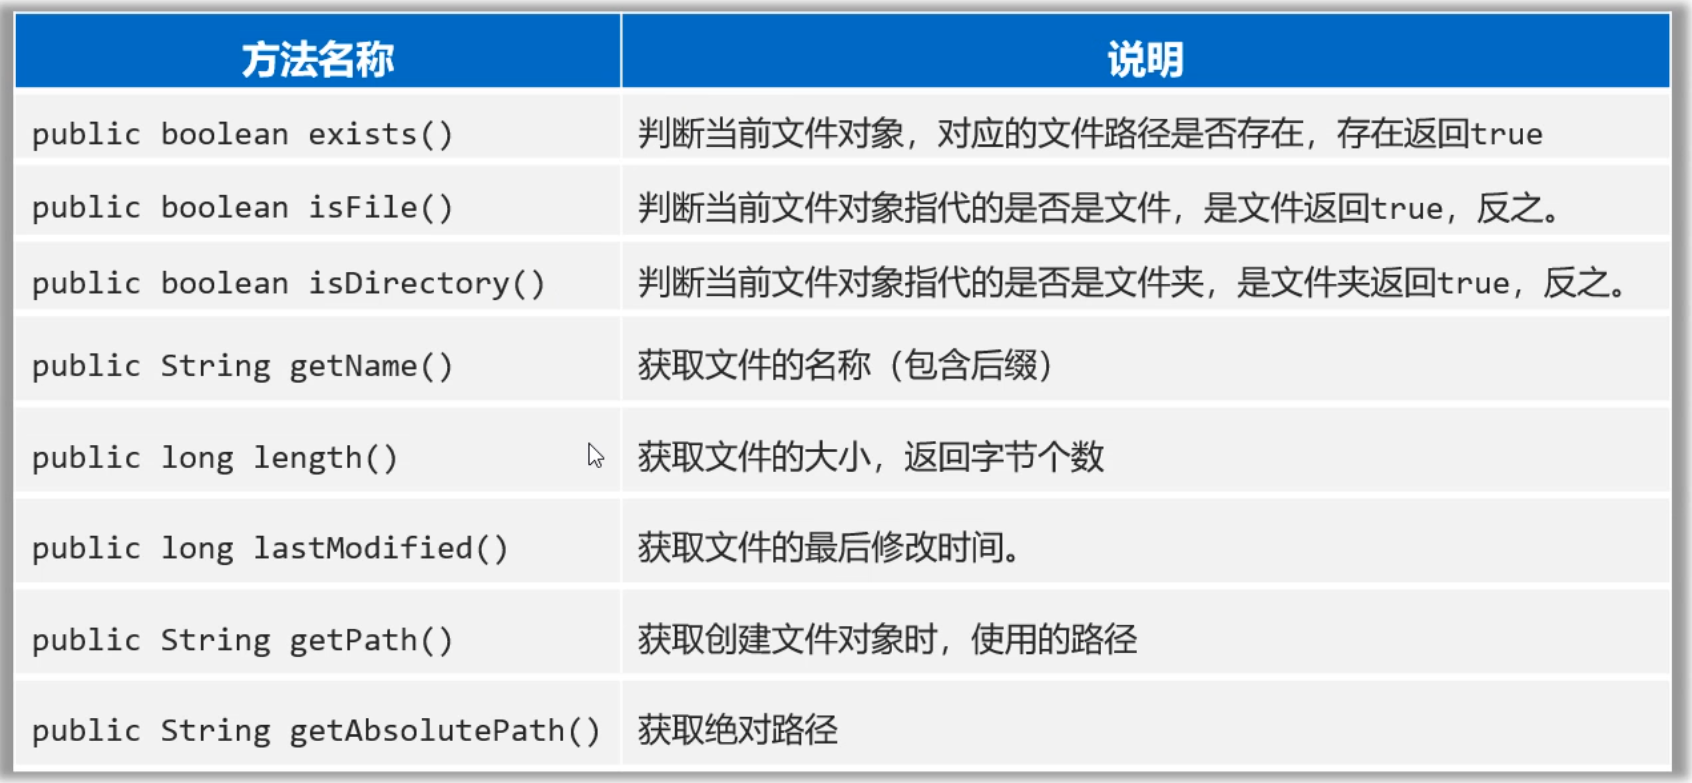
3.2 File判断和获取方法
各位同学,刚才我们创建File对象的时候,会传递一个文件路径过来。但是File对象封装的路径是存在还是不存在,是文件还是文件夹其实是不清楚的。好在File类提供了方法可以帮我们做判断。
话不多少,直接上代码
1
2
3
4
5
6
7
8
9
10
11
12
13
14
15
16
17
18
19
|
public class FileTest2 {
public static void main(String[] args) throws UnsupportedEncodingException {
File f1 = new File("D:/resource/ab.txt");
System.out.println(f1.exists());
System.out.println(f1.isFile());
System.out.println(f1.isDirectory());
}
}
|
除了判断功能还有一些获取功能,看代码
1
2
3
4
5
6
7
8
9
10
11
12
13
14
15
16
17
18
19
20
21
22
| File f1 = new File("D:/resource/ab.txt");
System.out.println(f1.getName());
System.out.println(f1.length());
long time = f1.lastModified();
SimpleDateFormat sdf = new SimpleDateFormat("yyyy/MM/dd HH:mm:ss");
System.out.println(sdf.format(time));
File f2 = new File("D:\\resource\\ab.txt");
File f3 = new File("file-io-app\\src\\itheima.txt");
System.out.println(f2.getPath());
System.out.println(f3.getPath());
System.out.println(f2.getAbsolutePath());
System.out.println(f3.getAbsolutePath());
|
3.3 创建和删除方法
刚才有同学问老师,我们不能不用Java代码创建一个文件或者文件夹呀?答案是有的,不光可以创建还可以删除。
File类提供了创建和删除文件的方法,话不多少,看代码。
1
2
3
4
5
6
7
8
9
10
11
12
13
14
15
16
17
18
19
20
21
22
23
24
|
public class FileTest3 {
public static void main(String[] args) throws Exception {
File f1 = new File("D:/resource/itheima2.txt");
System.out.println(f1.createNewFile());
File f2 = new File("D:/resource/aaa");
System.out.println(f2.mkdir());
File f3 = new File("D:/resource/bbb/ccc/ddd/eee/fff/ggg");
System.out.println(f3.mkdirs());
System.out.println(f1.delete());
System.out.println(f2.delete());
File f4 = new File("D:/resource");
System.out.println(f4.delete());
}
}
|
需要注意的是:
1
2
3
| 1.mkdir(): 只能创建单级文件夹、
2.mkdirs(): 才能创建多级文件夹
3.delete(): 文件可以直接删除,但是文件夹只能删除空的文件夹,文件夹有内容删除不了。
|
3.4 遍历文件夹方法
有人说,想获取到一个文件夹中的内容,有没有方法呀?也是有的,下面我们就学习两个这样的方法。

话不多少上代码,演示一下
1
2
3
4
5
6
7
8
9
10
11
12
13
14
15
16
17
18
19
20
21
22
23
|
public class FileTest4 {
public static void main(String[] args) {
File f1 = new File("D:\\course\\待研发内容");
String[] names = f1.list();
for (String name : names) {
System.out.println(name);
}
File[] files = f1.listFiles();
for (File file : files) {
System.out.println(file.getAbsolutePath());
}
File f = new File("D:/resource/aaa");
File[] files1 = f.listFiles();
System.out.println(Arrays.toString(files1));
}
}
|
这里需要注意几个问题
1
2
3
4
5
| 1.当主调是文件时,或者路径不存在时,返回null
2.当主调是空文件夹时,返回一个长度为0的数组
3.当主调是一个有内容的文件夹时,将里面所有一级文件和文件夹路径放在File数组中,并把数组返回
4.当主调是一个文件夹,且里面有隐藏文件时,将里面所有文件和文件夹的路径放在FIle数组中,包含隐藏文件
5.当主调是一个文件夹,但是没有权限访问时,返回null
|
关于遍历文件夹的基本操作就学习完了。 但是有同学如果想要获取文件夹中子文件夹的内容,那目前还做不到。但是学习下面了下面的递归知识就,很容易做到了。
四、递归
各位同学,为了获取文件夹中子文件夹的内容,我们就需要学习递归这个知识点。但是递归是什么意思,我们需要单独讲一下。学习完递归是什么,以及递归的执行流程之后,我们再回过头来用递归来找文件夹中子文件夹的内容。
4.1 递归算法引入
1
2
3
4
5
6
7
8
9
10
11
12
13
14
15
16
17
18
19
20
21
22
23
24
25
|
public class RecursionTest1 {
public static void main(String[] args) {
test1();
}
public static void test1(){
System.out.println("----test1---");
test1();
}
public static void test2(){
System.out.println("---test2---");
test3();
}
public static void test3(){
test2();
}
}
|
如果直接执行上面的代码,会进入死循环,最终导致栈内存溢出

以上只是用代码演示了一下,递归的形式。在下一节,在通过一个案例来给同学们讲一讲递归的执行流程。
4.2 递归算法的执行流程
为了弄清楚递归的执行流程,接下来我们通过一个案例来学习一下。
案例需求:计算n的阶乘,比如5的阶乘 = 1 * 2 * 3 * 4 * 5 ; 6 的阶乘 = 1 * 2 * 3 * 4 * 5 * 6
分析需求用递归该怎么做
1
2
3
4
5
6
7
8
9
10
| 假设f(n)表示n的阶乘,那么我们可以推导出下面的式子
f(5) = 1+2+3+4+5
f(5) = f(4)+5
f(4) = f(3)+4
f(3) = f(2)+3
f(2) = f(1)+2
f(1) = 1
总结规律:
除了f(1) = 1; 出口
其他的f(n) = f(n-1)+n
|
我们可以把f(n)当做一个方法,那么方法的写法如下
1
2
3
4
5
6
7
8
9
10
11
12
13
14
15
16
17
18
|
public class RecursionTest2 {
public static void main(String[] args) {
System.out.println("5的阶乘是:" + f(5));
}
public static int f(int n){
if(n == 1){
return 1;
}else {
return f(n - 1) * n;
}
}
}
|
这个代码的执行流程,我们用内存图的形式来分析一下,该案例中递归调用的特点是:一层一层调用,再一层一层往回返。

4.3 递归文件搜索
学习完递归算法执行流程后,最后我们回过头来。再来看一下,如果使用递归来遍历文件夹。
案例需求:在D:\\判断下搜索QQ.exe这个文件,然后直接输出。
1
2
3
4
5
6
| 1.先调用文件夹的listFiles方法,获取文件夹的一级内容,得到一个数组
2.然后再遍历数组,获取数组中的File对象
3.因为File对象可能是文件也可能是文件夹,所以接下来就需要判断
判断File对象如果是文件,就获取文件名,如果文件名是`QQ.exe`则打印,否则不打印
判断File对象如果是文件夹,就递归执行1,2,3步骤
所以:把1,2,3步骤写成方法,递归调用即可。
|
代码如下:
1
2
3
4
5
6
7
8
9
10
11
12
13
14
15
16
17
18
19
20
21
22
23
24
25
26
27
28
29
30
31
32
33
34
35
36
37
38
39
40
41
42
43
|
public class RecursionTest3 {
public static void main(String[] args) throws Exception {
searchFile(new File("D:/") , "QQ.exe");
}
public static void searchFile(File dir, String fileName) throws Exception {
if(dir == null || !dir.exists() || dir.isFile()){
return;
}
File[] files = dir.listFiles();
if(files != null && files.length > 0){
for (File f : files) {
if(f.isFile()){
if(f.getName().contains(fileName)){
System.out.println("找到了:" + f.getAbsolutePath());
Runtime runtime = Runtime.getRuntime();
runtime.exec(f.getAbsolutePath());
}
}else {
searchFile(f, fileName);
}
}
}
}
}
|