一、Set系列集合
1.1 认识Set集合的特点
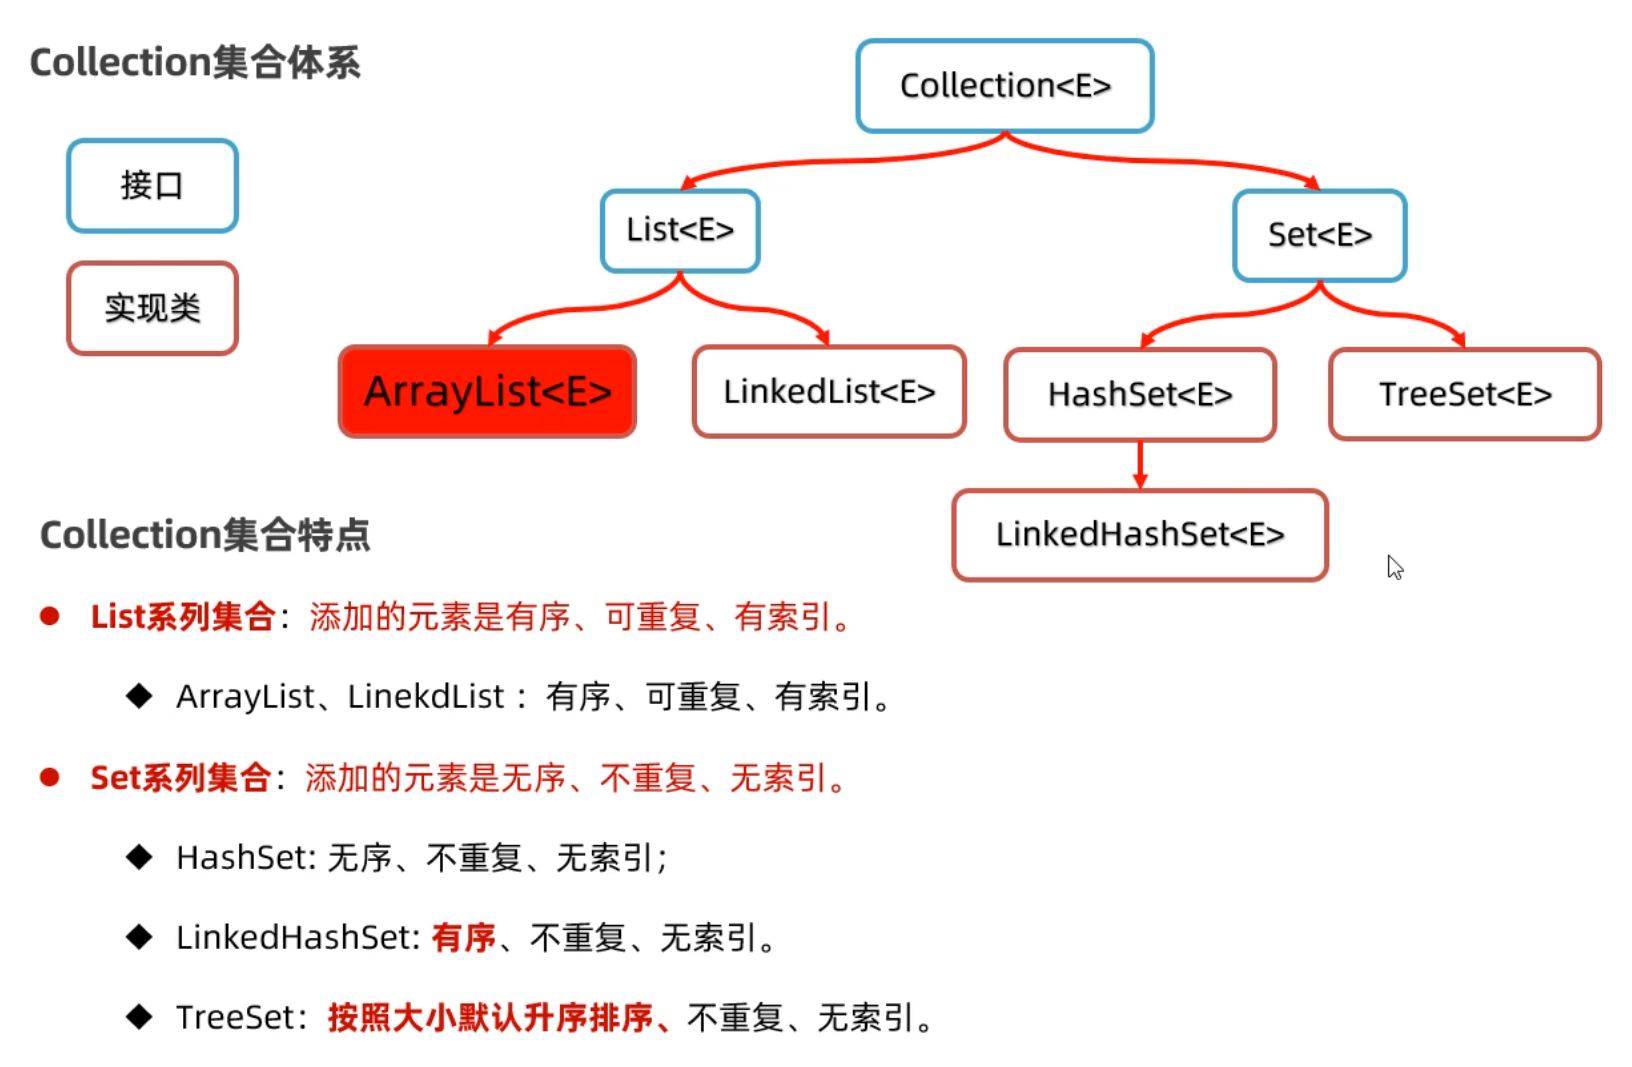
Set集合是属于Collection体系下的另一个分支,它的特点如下图所示
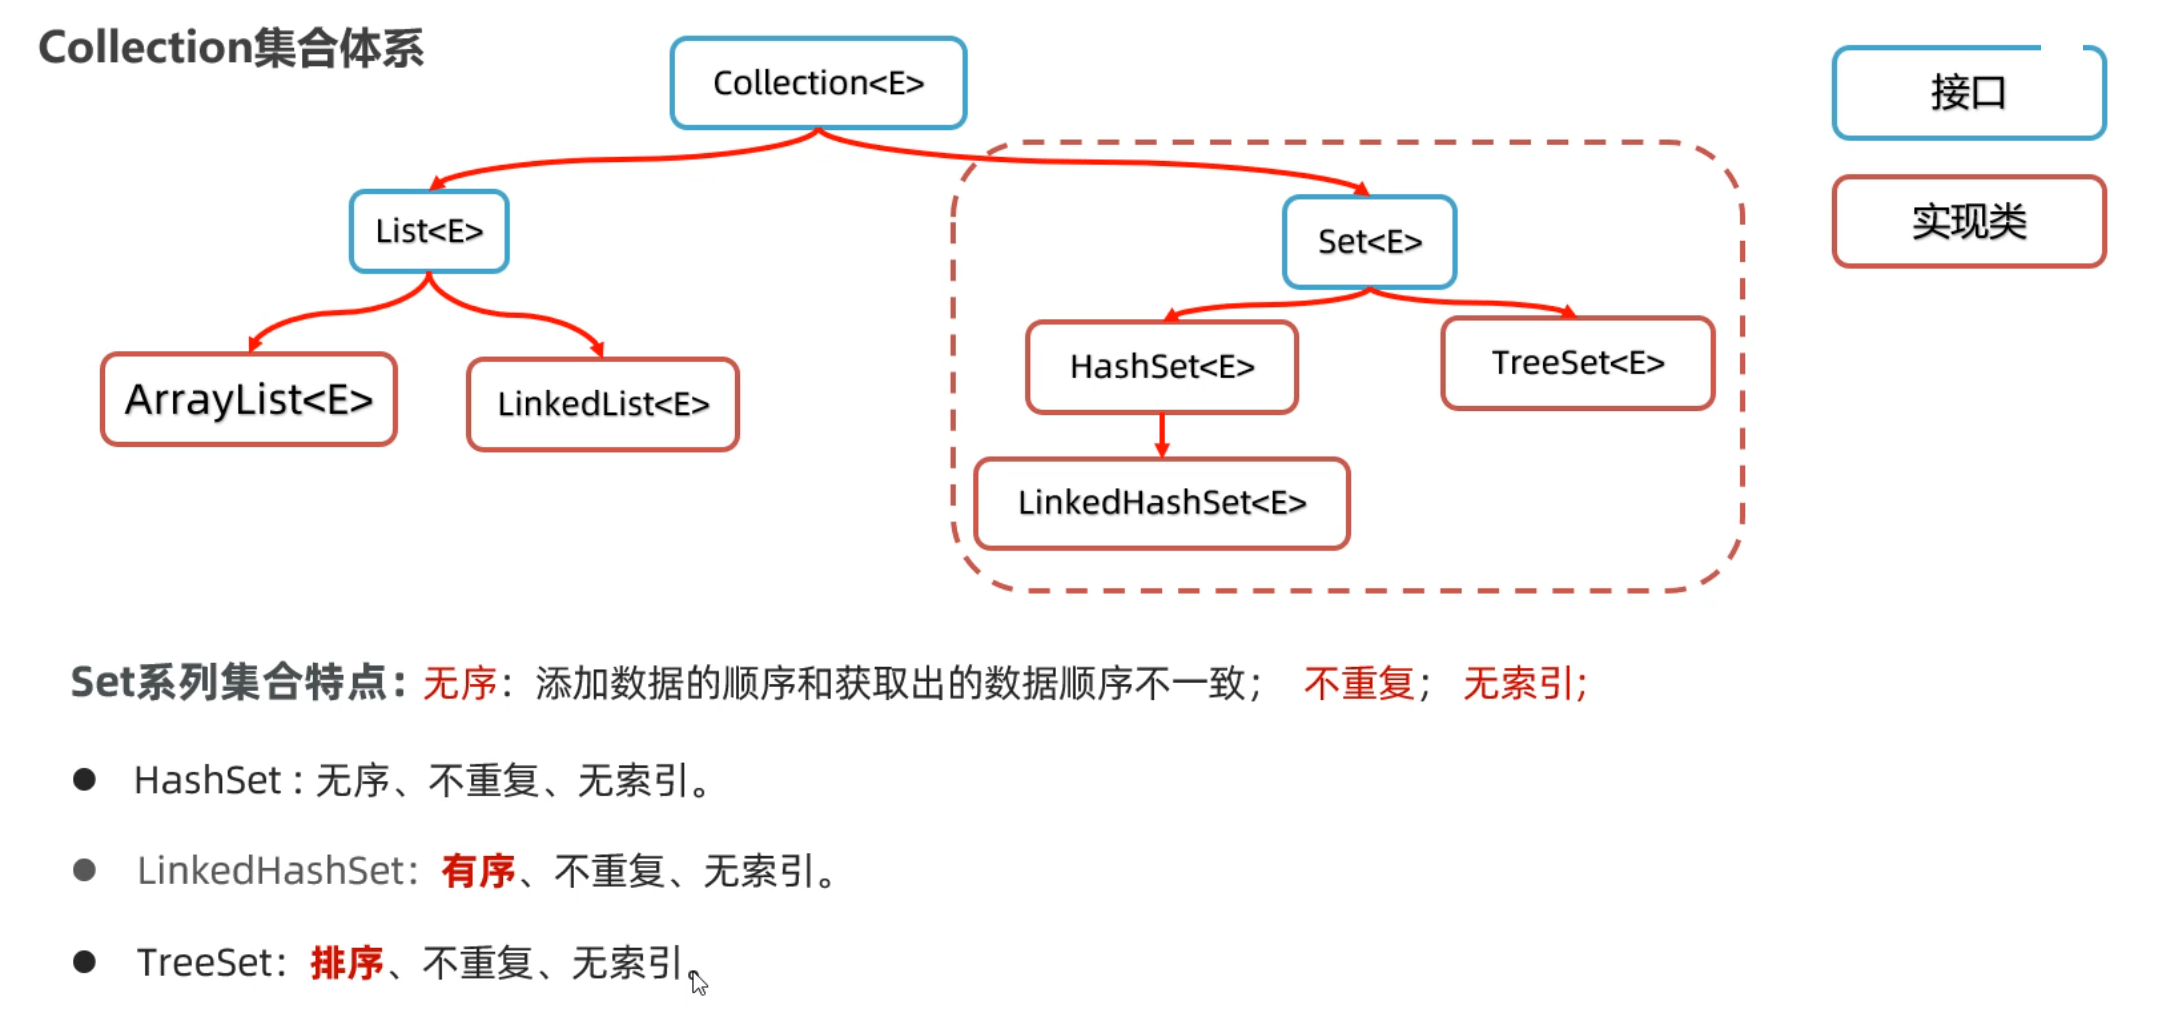
下面我们用代码简单演示一下,每一种Set集合的特点。
1
2
3
4
5
6
7
8
9
10
11
|
Set<Integer> set = new TreeSet<>();
set.add(666);
set.add(555);
set.add(555);
set.add(888);
set.add(888);
set.add(777);
set.add(777);
System.out.println(set);
|
1.2 HashSet集合底层原理
接下来,为了让同学们更加透彻的理解HashSet为什么可以去重,我们来看一下它的底层原理。
HashSet集合底层是基于哈希表实现的,哈希表根据JDK版本的不同,也是有点区别的
- JDK8以前:哈希表 = 数组+链表
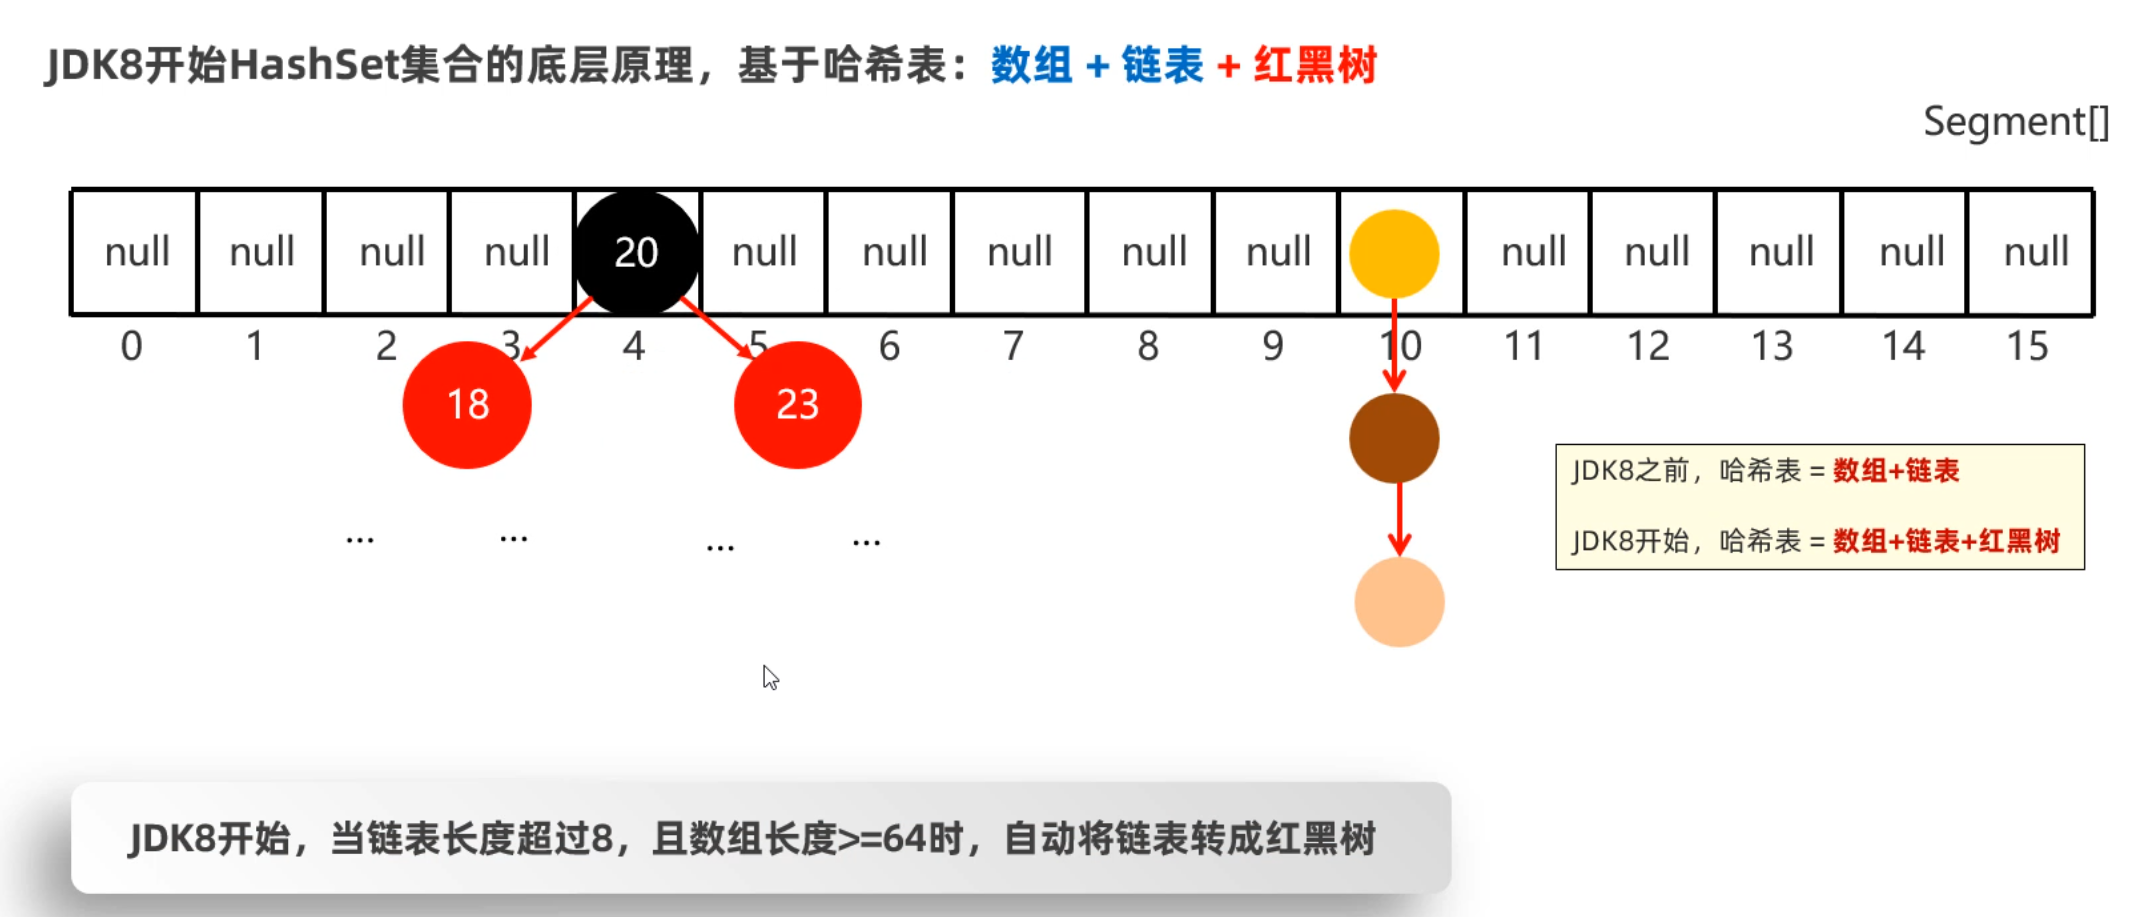
- JDK8以后:哈希表 = 数组+链表+红黑树
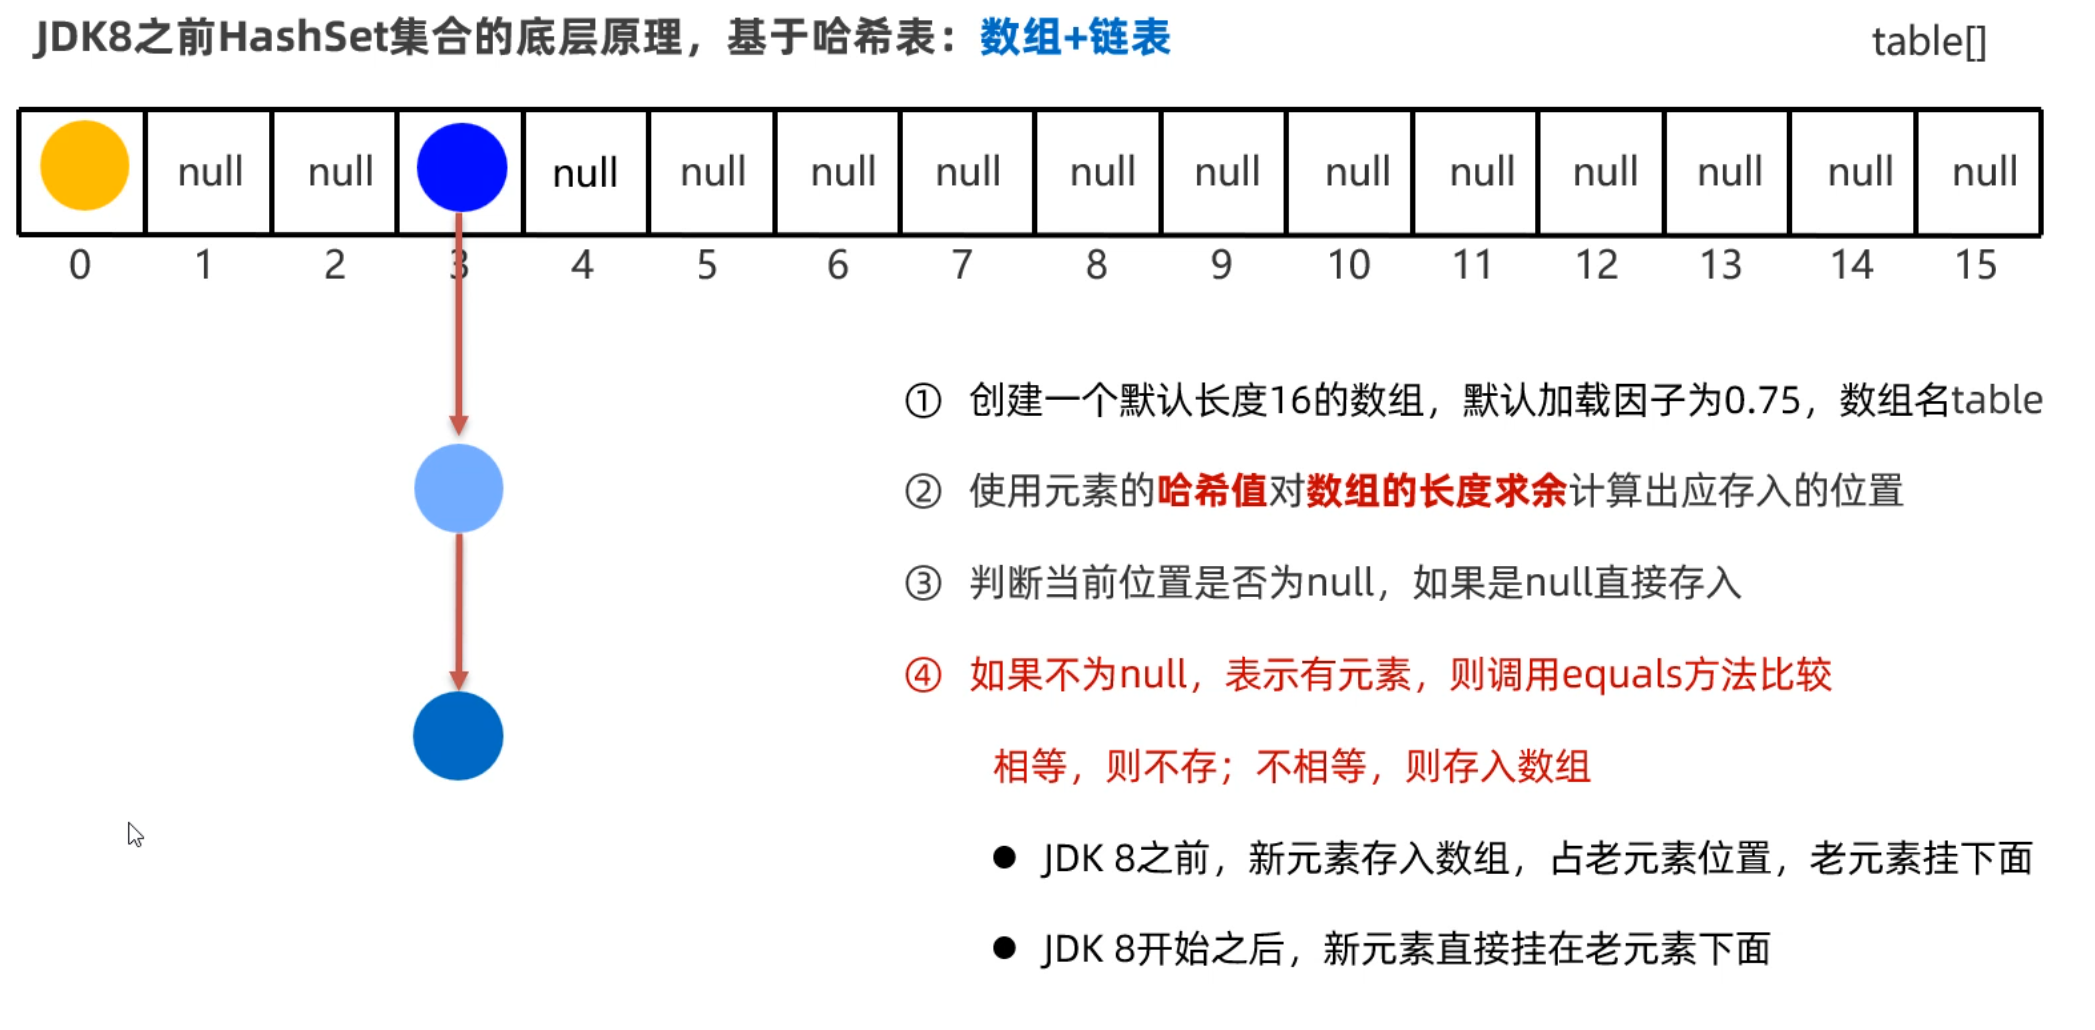
我们发现往HashSet集合中存储元素时,底层调用了元素的两个方法:一个是hashCode方法获取元素的hashCode值(哈希值);另一个是调用了元素的equals方法,用来比较新添加的元素和集合中已有的元素是否相同。
- 只有新添加元素的hashCode值和集合中以后元素的hashCode值相同、新添加的元素调用equals方法和集合中已有元素比较结果为true, 才认为元素重复。
- 如果hashCode值相同,equals比较不同,则以链表的形式连接在数组的同一个索引为位置(如上图所示)
在JDK8开始后,为了提高性能,当链表的长度超过8时,就会把链表转换为红黑树,如下图所示:
1.3 HashSet去重原理
前面我们学习了HashSet存储元素的原理,依赖于两个方法:一个是hashCode方法用来确定在底层数组中存储的位置,另一个是用equals方法判断新添加的元素是否和集合中已有的元素相同。
要想保证在HashSet集合中没有重复元素,我们需要重写元素类的hashCode和equals方法。比如以下面的Student类为例,假设把Student类的对象作为HashSet集合的元素,想要让学生的姓名和年龄相同,就认为元素重复。
1
2
3
4
5
6
7
8
9
10
11
12
13
14
15
16
17
18
19
20
21
22
23
24
25
26
27
28
29
30
31
32
33
34
35
36
37
38
39
40
| public class Student{
private String name;
private int age;
private double height;
public Student(){}
public Student(String name, int age, double height){
this.name=name;
this.age=age;
this.height=height;
}
@Override
public boolean equals(Object o) {
if (this == o) return true;
if (o == null || getClass() != o.getClass()) return false;
Student student = (Student) o;
if (age != student.age) return false;
if (Double.compare(student.height, height) != 0) return false;
return name != null ? name.equals(student.name) : student.name == null;
}
@Override
public int hashCode() {
int result;
long temp;
result = name != null ? name.hashCode() : 0;
result = 31 * result + age;
temp = Double.doubleToLongBits(height);
result = 31 * result + (int) (temp ^ (temp >>> 32));
return result;
}
}
|
接着,写一个测试类,往HashSet集合中存储Student对象。
1
2
3
4
5
6
7
8
9
10
11
12
13
14
15
16
17
18
| public class Test{
public static void main(String[] args){
Set<Student> students = new HashSet<>();
Student s1 = new Student("至尊宝",20, 169.6);
Student s2 = new Student("蜘蛛精",23, 169.6);
Student s3 = new Student("蜘蛛精",23, 169.6);
Student s4 = new Student("牛魔王",48, 169.6);
students.add(s1);
students.add(s2);
students.add(s3);
students.add(s4);
for(Student s : students){
System.out.println(s);
}
}
}
|
打印结果如下,我们发现存了两个蜘蛛精,当时实际打印出来只有一个,而且是无序的。
1
2
3
| Student{name='牛魔王', age=48, height=169.6}
Student{name='至尊宝', age=20, height=169.6}
Student{name='蜘蛛精', age=23, height=169.6}
|
1.4 LinkedHashSet底层原理
接下来,我们再学习一个HashSet的子类LinkedHashSet类。LinkedHashSet它底层采用的是也是哈希表结构,只不过额外新增了一个双向链表来维护元素的存取顺序。如下下图所示:
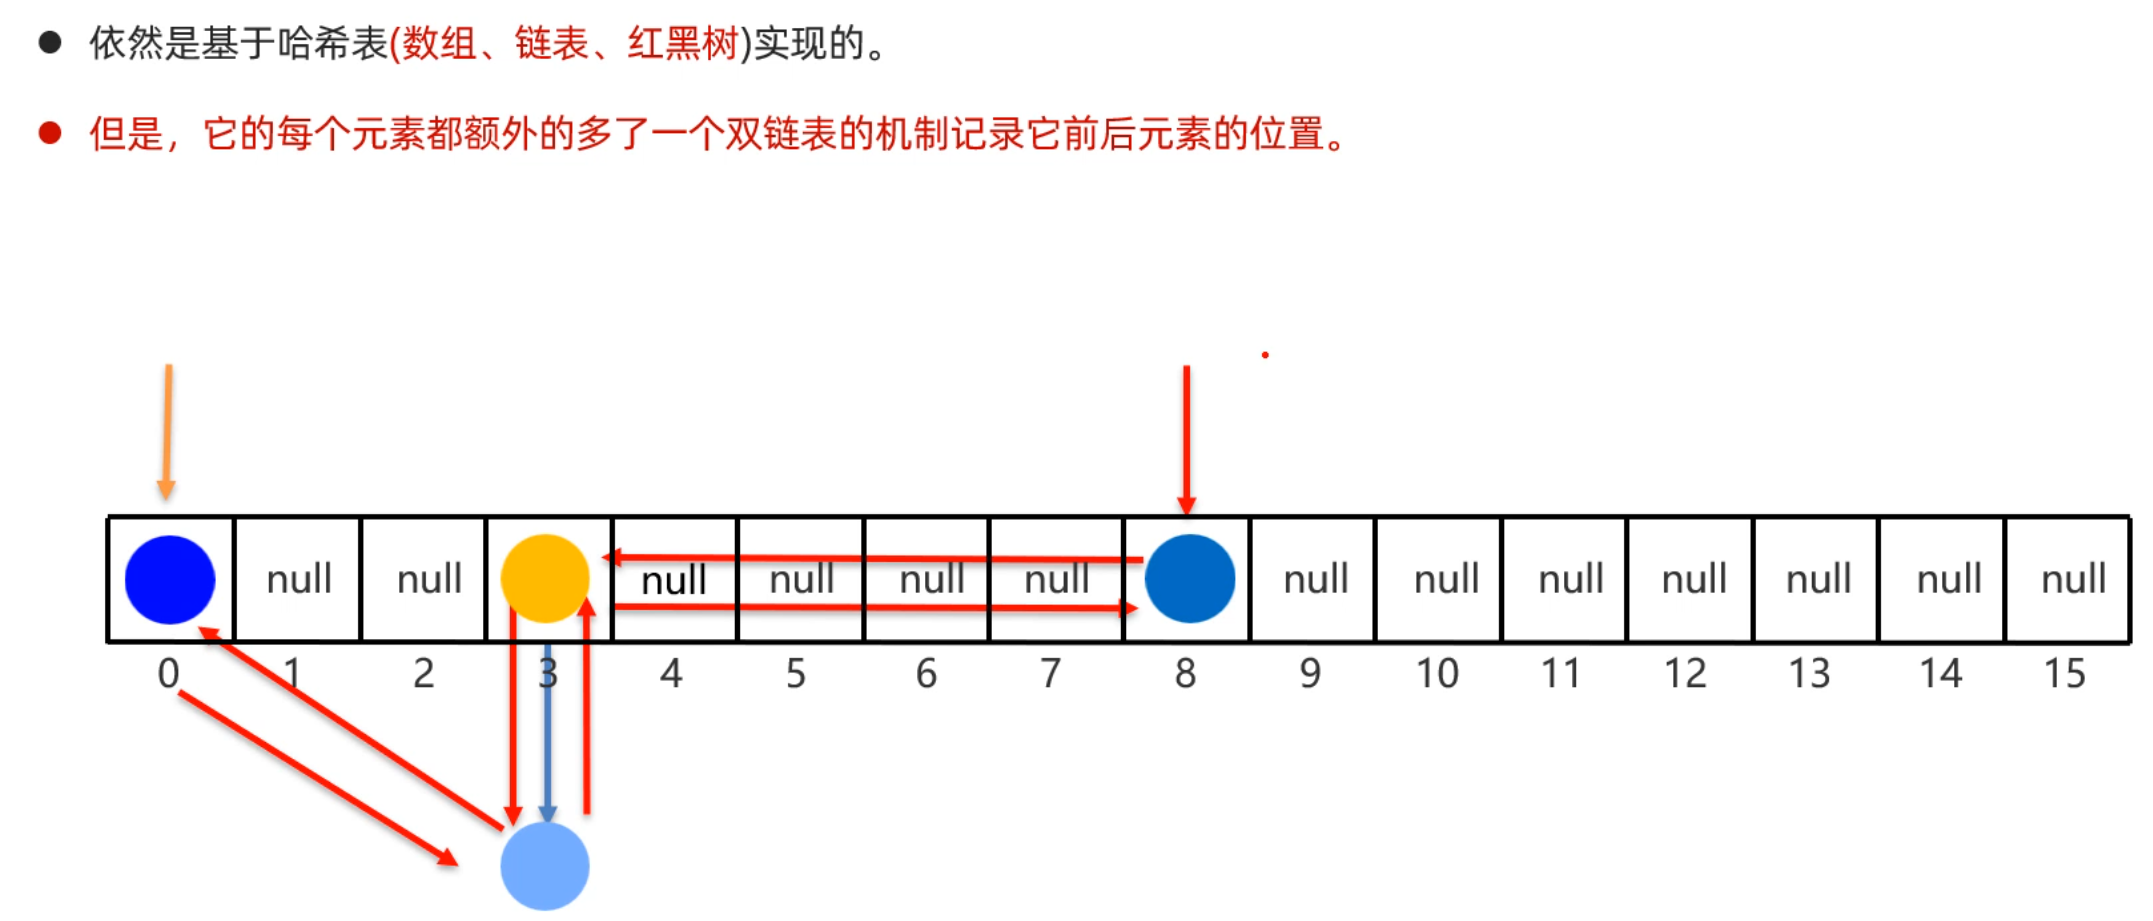
每次添加元素,就和上一个元素用双向链表连接一下。第一个添加的元素是双向链表的头节点,最后一个添加的元素是双向链表的尾节点。
把上个案例中的集合改成LinkedList集合,我们观察效果怎样
1
2
3
4
5
6
7
8
9
10
11
12
13
14
15
16
17
18
| public class Test{
public static void main(String[] args){
Set<Student> students = new LinkedHashSet<>();
Student s1 = new Student("至尊宝",20, 169.6);
Student s2 = new Student("蜘蛛精",23, 169.6);
Student s3 = new Student("蜘蛛精",23, 169.6);
Student s4 = new Student("牛魔王",48, 169.6);
students.add(s1);
students.add(s2);
students.add(s3);
students.add(s4);
for(Student s : students){
System.out.println(s);
}
}
}
|
打印结果如下
1
2
3
| Student{name='至尊宝', age=20, height=169.6}
Student{name='蜘蛛精', age=23, height=169.6}
Student{name='牛魔王', age=48, height=169.6}
|
1.5 TreeSet集合
最后,我们学习一下TreeSet集合。TreeSet集合的特点是可以对元素进行排序,但是必须指定元素的排序规则。
如果往集合中存储String类型的元素,或者Integer类型的元素,它们本身就具备排序规则,所以直接就可以排序。
1
2
3
4
5
6
7
8
9
10
11
12
13
14
15
16
17
18
19
20
| Set<Integer> set1= new TreeSet<>();
set1.add(8);
set1.add(6);
set1.add(4);
set1.add(3);
set1.add(7);
set1.add(1);
set1.add(5);
set1.add(2);
System.out.println(set1);
Set<Integer> set2= new TreeSet<>();
set2.add("a");
set2.add("c");
set2.add("e");
set2.add("b");
set2.add("d");
set2.add("f");
set2.add("g");
System.out.println(set1);
|
如果往TreeSet集合中存储自定义类型的元素,比如说Student类型,则需要我们自己指定排序规则,否则会出现异常。
1
2
3
4
5
6
7
8
9
10
11
12
13
14
15
|
Set<Student> students = new TreeSet<>();
Student s1 = new Student("至尊宝",20, 169.6);
Student s2 = new Student("紫霞",23, 169.8);
Student s3 = new Student("蜘蛛精",23, 169.6);
Student s4 = new Student("牛魔王",48, 169.6);
students.add(s1);
students.add(s2);
students.add(s3);
students.add(s4);
System.out.println(students);
|
此时运行代码,会直接报错。原因是TreeSet不知道按照什么条件对Student对象来排序。

我们想要告诉TreeSet集合按照指定的规则排序,有两种办法:
第一种:让元素的类实现Comparable接口,重写compareTo方法
第二种:在创建TreeSet集合时,通过构造方法传递Compartor比较器对象
1
2
3
4
5
6
7
8
9
10
11
12
13
14
15
16
17
18
19
20
21
22
23
24
25
26
27
28
29
30
|
public class Student implements Comparable<Student>{
private String name;
private int age;
private double height;
public Student(){}
public Student(String name, int age, double height){
this.name=name;
this.age=age;
this.height=height;
}
@Override
public int compareTo(Student o) {
return this.age-o.age;
}
}
|
此时,再运行测试类,结果如下
1
2
3
4
| Student{name='至尊宝', age=20, height=169.6}
Student{name='紫霞', age=20, height=169.8}
Student{name='蜘蛛精', age=23, height=169.6}
Student{name='牛魔王', age=48, height=169.6}
|
1
2
3
4
5
6
7
8
9
10
11
12
13
14
15
16
17
18
19
20
21
22
23
24
25
|
Set<Student> students = new TreeSet<>(new Comparator<Student>{
@Override
public int compare(Student o1, Student o2){
return Double.compare(o1,o2);
}
});
Student s1 = new Student("至尊宝",20, 169.6);
Student s2 = new Student("紫霞",23, 169.8);
Student s3 = new Student("蜘蛛精",23, 169.6);
Student s4 = new Student("牛魔王",48, 169.6);
students.add(s1);
students.add(s2);
students.add(s3);
students.add(s4);
System.out.println(students);
|
1.6 总结Collection集合
最后,将所有的Collection集合总结一下,要求大家掌握每一种集合的特点,以及他们的体系结构。
好了,关于Collection集合,到这里就学习完了。
1.7 并发修改异常
学完Collection集合后,还有一个小问题需要给同学们补充说明一下,那就是在使用迭代器遍历集合时,可能存在并发修改异常。
我们先把这个异常用代码演示出来,再解释一下为什么会有这个异常产生
1
2
3
4
5
6
7
8
9
10
11
12
13
14
15
16
17
18
| List<String> list = new ArrayList<>();
list.add("王麻子");
list.add("小李子");
list.add("李爱花");
list.add("张全蛋");
list.add("晓李");
list.add("李玉刚");
System.out.println(list);
Iterator<String> it = list.iterator();
while(it.hasNext()){
String name = it.next();
if(name.contains("李")){
list.remove(name);
}
}
System.out.println(list);
|
运行上面的代码,会出现下面的异常。这就是并发修改异常

为什么会出现这个异常呢?那是因为迭代器遍历机制,规定迭代器遍历集合的同时,不允许集合自己去增删元素,否则就会出现这个异常。
怎么解决这个问题呢?不使用集合的删除方法,而是使用迭代器的删除方法,代码如下:
1
2
3
4
5
6
7
8
9
10
11
12
13
14
15
16
17
18
19
| List<String> list = new ArrayList<>();
list.add("王麻子");
list.add("小李子");
list.add("李爱花");
list.add("张全蛋");
list.add("晓李");
list.add("李玉刚");
System.out.println(list);
Iterator<String> it = list.iterator();
while(it.hasNext()){
String name = it.next();
if(name.contains("李")){
it.remove();
}
}
System.out.println(list);
|
二、Collection的其他操作
各位同学,前面我们已经把Collection家族的集合都学习完了。为了更加方便的对Collection集合进行操作,今天我们还要学习一个操作Collection集合的工具类,叫做Collections。但是Collections工具类中需要用到一个没有学过的小知识点,叫做可变参数,所以必须先学习这个前置知识可变参数,再学习Collections工具类,最后再利用这个工具类做一个综合案例。
2.1 可变参数
首先,我们来学习一下可变参数。关于可变参数我们首先要知道它是什么,然后要知道它的本质。搞清楚这两个问题,可变参数就算你学明白了。
接下来,我们编写代码来演示一下
1
2
3
4
5
6
7
8
9
10
11
12
13
14
15
16
17
18
19
20
| public class ParamTest{
public static void main(String[] args){
test();
test(10,20,30);
int[] arr = new int[]{10,20,30,40}
test(arr);
}
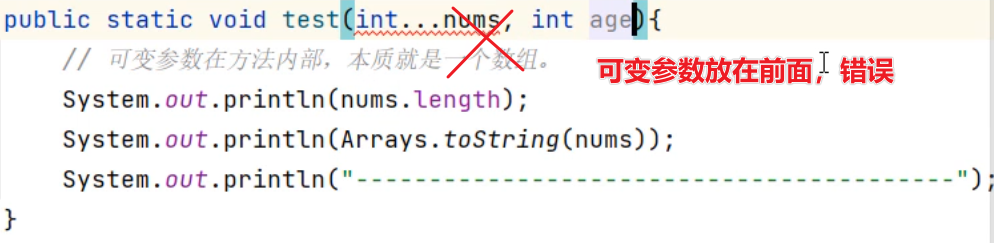
public static void test(int...nums){
System.out.println(nums.length);
System.out.println(Arrays.toString(nums));
System.out.println("----------------");
}
}
|
最后还有一些错误写法,需要让大家写代码时注意一下,不要这么写哦!!!

2.2 Collections工具类
有了可变参数的基础,我们再学习Collections这个工具类就好理解了,因为这个工具类的方法中会用到可变参数。
注意Collections并不是集合,它比Collection多了一个s,一般后缀为s的类很多都是工具类。这里的Collections是用来操作Collection的工具类。它提供了一些好用的静态方法,如下
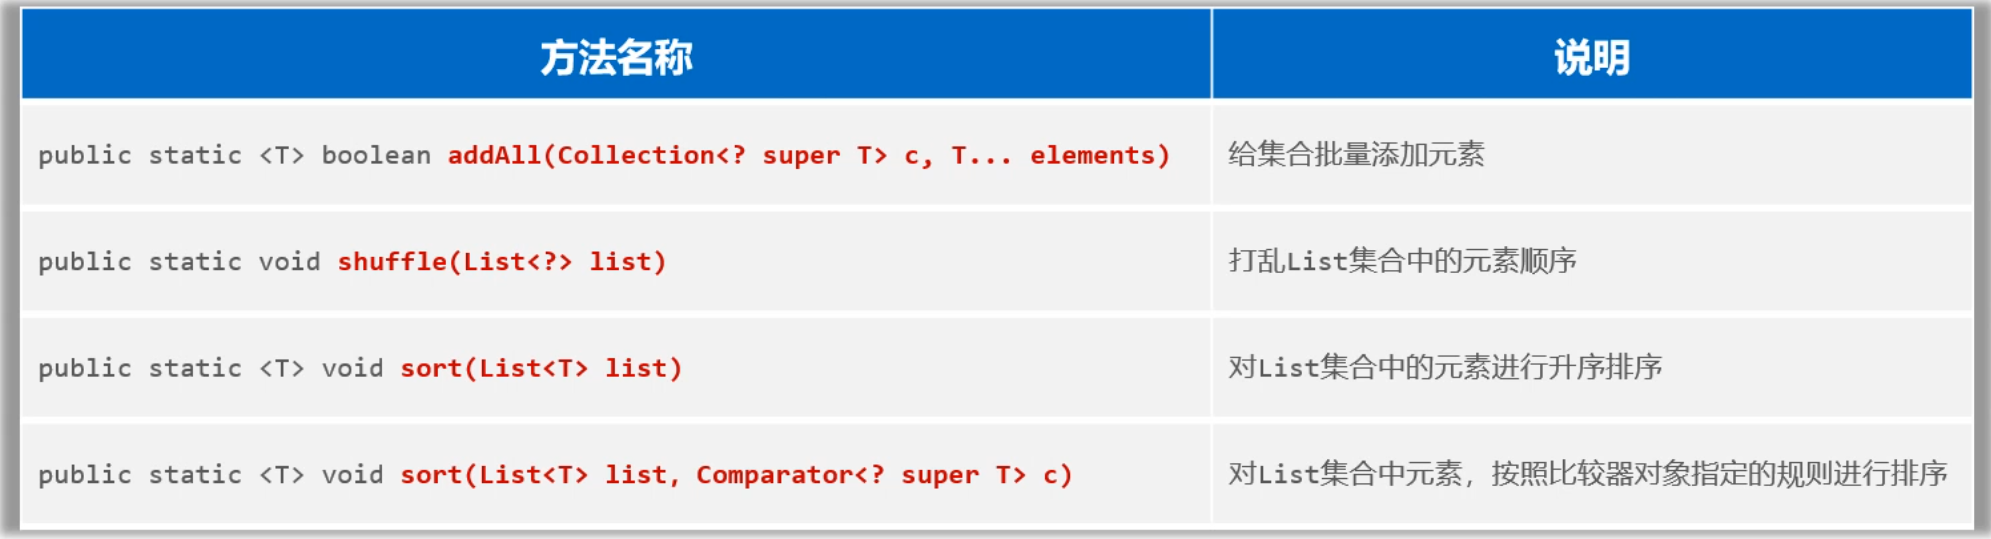
我们把这些方法用代码来演示一下:
1
2
3
4
5
6
7
8
9
10
11
12
13
14
15
16
17
18
19
20
| public class CollectionsTest{
public static void main(String[] args){
List<String> names = new ArrayList<>();
Collections.addAll(names, "张三","王五","李四", "张麻子");
System.out.println(names);
Collections.shuffle(names);
System.out.println(names);
List<Integer> list = new ArrayList<>();
list.add(3);
list.add(5);
list.add(2);
Collections.sort(list);
System.out.println(list);
}
}
|
上面我们往集合中存储的元素要么是Stirng类型,要么是Integer类型,他们本来就有一种自然顺序所以可以直接排序。但是如果我们往List集合中存储Student对象,这个时候想要对List集合进行排序自定义比较规则的。指定排序规则有两种方式,如下:
排序方式1:让元素实现Comparable接口,重写compareTo方法
比如现在想要往集合中存储Studdent对象,首先需要准备一个Student类,实现Comparable接口。
1
2
3
4
5
6
7
8
9
10
11
12
13
14
15
16
17
| public class Student implements Comparable<Student>{
private String name;
private int age;
private double height;
@Override
public int compareTo(Student o){
return this.age - o.age;
}
}
|
然后再使用Collections.sort(list集合)对List集合排序,如下:
1
2
3
4
5
6
7
8
9
10
11
12
13
14
15
16
|
List<Student> students = new ArrayList<>();
students.add(new Student("蜘蛛精",23,169.7));
students.add(new Student("紫霞",22,169.8));
students.add(new Student("紫霞",22,169.8));
students.add(new Student("至尊宝",26,169.5));
Collections.sort(students);
System.out.println(students);
|
排序方式2:使用调用sort方法是,传递比较器
1
2
3
4
5
6
7
8
9
10
11
12
13
14
|
Collections.sort(students, new Comparator<Student>(){
@Override
public int compare(Student o1, Student o2){
return o1.getAge()-o2.getAge();
}
});
System.out.println(students);
|
2.3 斗地主案例
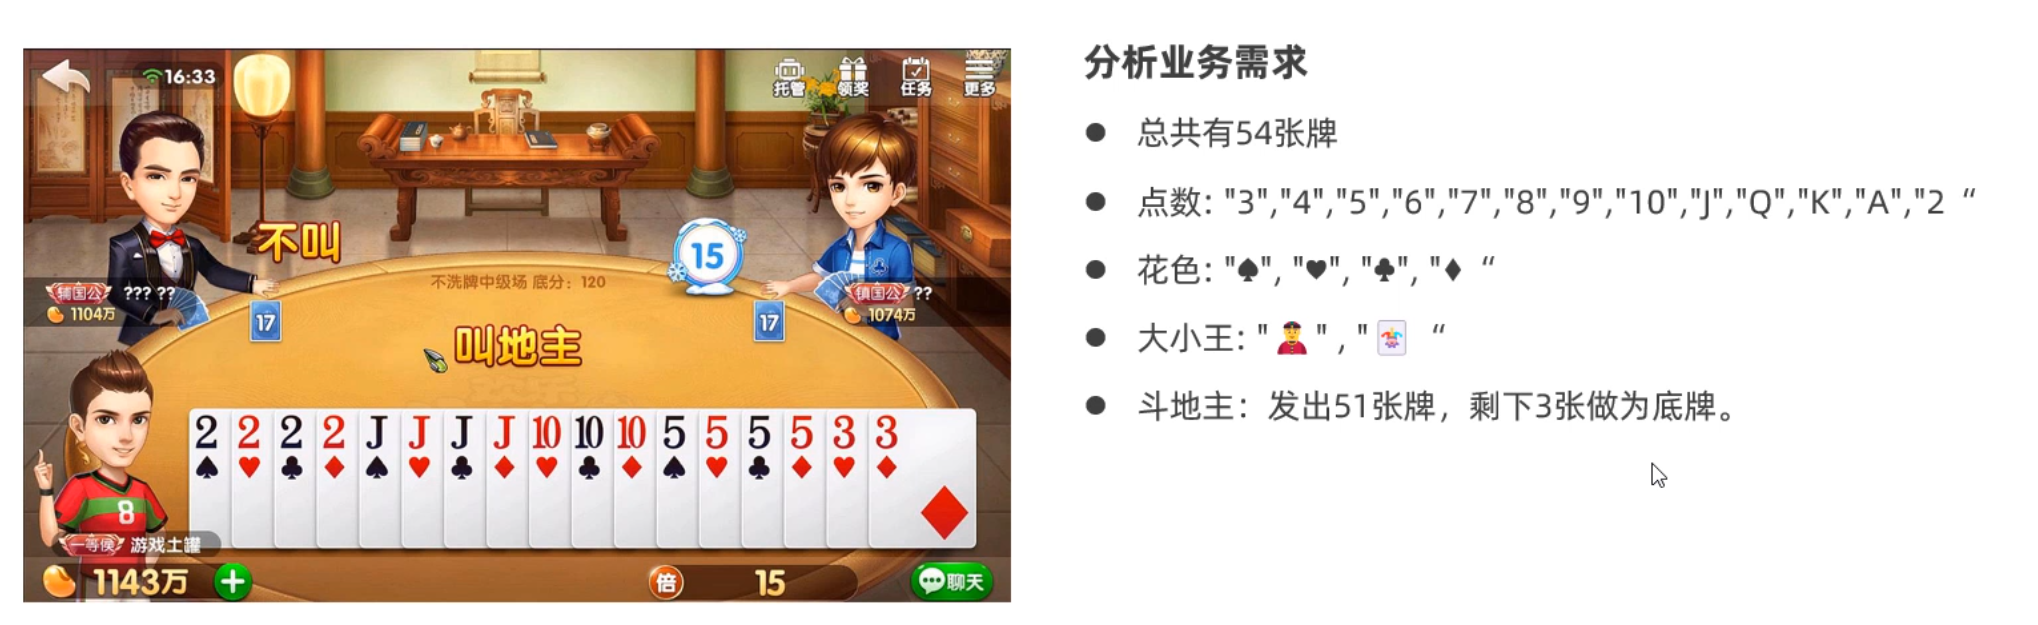
我们先分析一下业务需求:
- 总共有54张牌,每一张牌有花色和点数两个属性、为了排序还可以再加一个序号
- 点数可以是:
“3”,"4","5","6","7","8","9","10","J","Q","K","A","2"
- 花色可以是:
“♣”,"♠","♥","♦"
- 斗地主时:三个玩家没人手里17张牌,剩余3张牌作为底牌
1
2
3
| 第一步:为了表示每一张牌有哪些属性,首先应该新建一个扑克牌的类
第二步:启动游戏时,就应该提前准备好54张牌
第三步:接着再完全洗牌、发牌、捋牌、看牌的业务逻辑
|
先来完成第一步,定义一个扑克类Card
1
2
3
4
5
6
7
8
9
10
11
12
13
14
15
16
17
18
19
20
21
22
23
24
25
26
27
28
29
30
31
32
33
34
35
36
37
38
39
40
41
42
43
44
| public class Card {
private String number;
private String color;
private int size;
public Card() {
}
public Card(String number, String color, int size) {
this.number = number;
this.color = color;
this.size = size;
}
public String getNumber() {
return number;
}
public void setNumber(String number) {
this.number = number;
}
public String getColor() {
return color;
}
public void setColor(String color) {
this.color = color;
}
public int getSize() {
return size;
}
public void setSize(int size) {
this.size = size;
}
@Override
public String toString() {
return color + number ;
}
}
|
再完成第二步,定义一个房间类,初始化房间时准备好54张牌
1
2
3
4
5
6
7
8
9
10
11
12
13
14
15
16
17
18
19
20
21
22
23
24
25
26
27
28
| public class Room {
private List<Card> allCards = new ArrayList<>();
public Room(){
String[] numbers = {"3","4","5","6","7","8","9","10","J","Q","K","A","2"};
String[] colors = {"♠", "♥", "♣", "♦"};
int size = 0;
for (String number : numbers) {
size++;
for (String color : colors) {
Card c = new Card(number, color, size);
allCards.add(c);
}
}
Card c1 = new Card("", "🃏" , ++size);
Card c2 = new Card("", "👲" , ++size);
Collections.addAll(allCards, c1, c2);
System.out.println("新牌:" + allCards);
}
}
|
最后完成第三步,定义一个启动游戏的方法,完成洗牌、发牌、捋牌、看牌的业务逻辑
1
2
3
4
5
6
7
8
9
10
11
12
13
14
15
16
17
18
19
20
21
22
23
24
25
26
27
28
29
30
31
32
33
34
35
36
37
38
39
40
41
42
43
44
45
46
47
48
49
50
51
52
53
54
55
56
57
58
|
public void start() {
Collections.shuffle(allCards);
System.out.println("洗牌后:" + allCards);
List<Card> linHuChong = new ArrayList<>();
List<Card> jiuMoZhi = new ArrayList<>();
List<Card> renYingYing = new ArrayList<>();
for (int i = 0; i < allCards.size() - 3; i++) {
Card c = allCards.get(i);
if(i % 3 == 0){
linHuChong.add(c);
}else if(i % 3 == 1){
jiuMoZhi.add(c);
}else if(i % 3 == 2){
renYingYing.add(c);
}
}
sortCards(linHuChong);
sortCards(jiuMoZhi);
sortCards(renYingYing);
System.out.println("啊冲:" + linHuChong);
System.out.println("啊鸠:" + jiuMoZhi);
System.out.println("盈盈:" + renYingYing);
List<Card> lastThreeCards = allCards.subList(allCards.size() - 3, allCards.size());
System.out.println("底牌:" + lastThreeCards);
jiuMoZhi.addAll(lastThreeCards);
sortCards(jiuMoZhi);
System.out.println("啊鸠抢到地主后:" + jiuMoZhi);
}
private void sortCards(List<Card> cards) {
Collections.sort(cards, new Comparator<Card>() {
@Override
public int compare(Card o1, Card o2) {
return o2.getSize() - o1.getSize();
}
});
}
|
不要忘记了写测试类了,
1
2
3
4
5
6
7
8
9
| public class GameDemo {
public static void main(String[] args) {
Room m = new Room();
m.start();
}
}
|
三、Map集合
3.1 Map概述体系
各位同学,前面我们已经把单列集合学习完了,接下来我们要学习的是双列集合。首先我们还是先认识一下什么是双列集合。
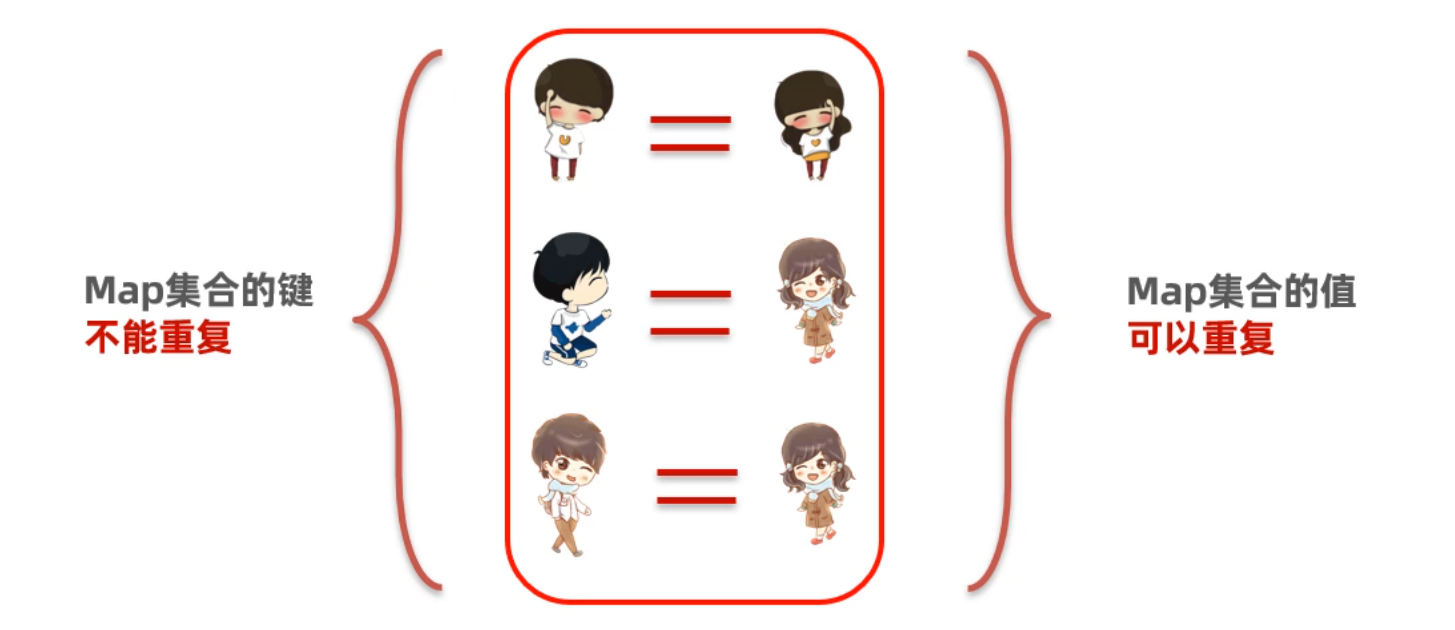
所谓双列集合,就是说集合中的元素是一对一对的。Map集合中的每一个元素是以key=value的形式存在的,一个key=value就称之为一个键值对,而且在Java中有一个类叫Entry类,Entry的对象用来表示键值对对象。
所有的Map集合有如下的特点:键不能重复,值可以重复,每一个键只能找到自己对应的值。
下面我们先写一个Map集合,保存几个键值对,体验一下Map集合的特点
1
2
3
4
5
6
7
8
9
10
11
12
13
14
15
16
17
18
19
| public class MapTest1 {
public static void main(String[] args) {
Map<String, Integer> map = new LinkedHashMap<>();
map.put("手表", 100);
map.put("手表", 220);
map.put("手机", 2);
map.put("Java", 2);
map.put(null, null);
System.out.println(map);
Map<Integer, String> map1 = new TreeMap<>();
map1.put(23, "Java");
map1.put(23, "MySQL");
map1.put(19, "李四");
map1.put(20, "王五");
System.out.println(map1);
}
}
|
Map集合也有很多种,在Java中使用不同的类来表示的,每一种Map集合其键的特点是有些差异的,值是键的一个附属值,所以我们只关注键的特点就可以了。
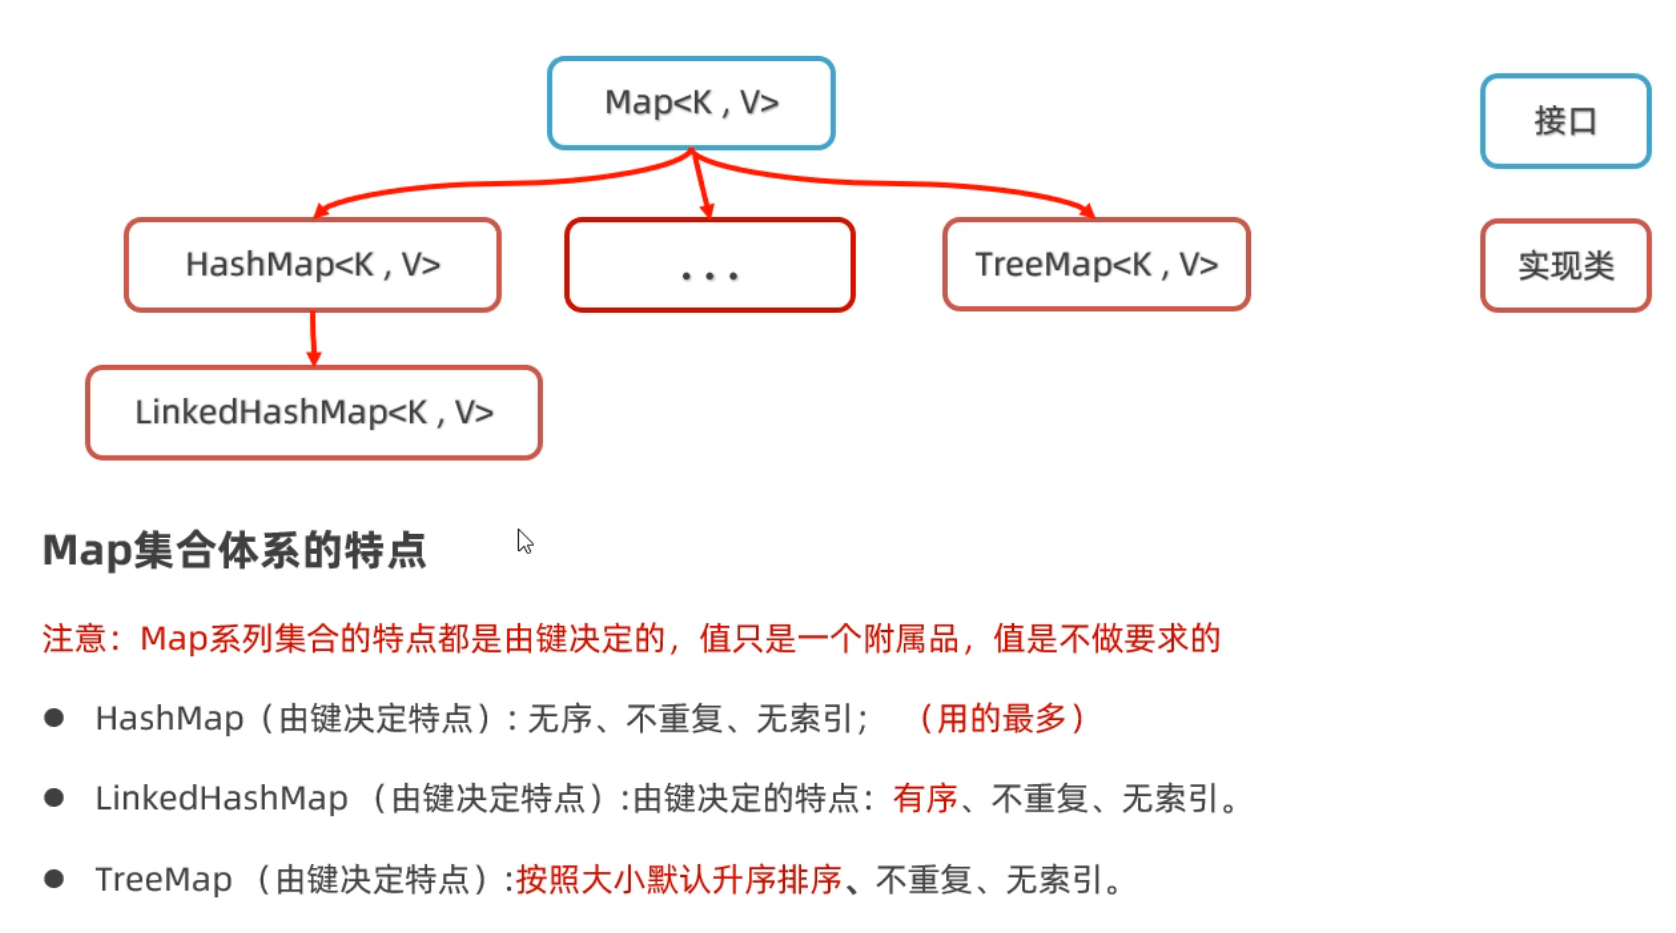
关于Map集合是什么,以及Map集合的体系我们先了解到这里,接下来就具体学习一下Map集合的通用方法。
3.2 Map集合的常用方法
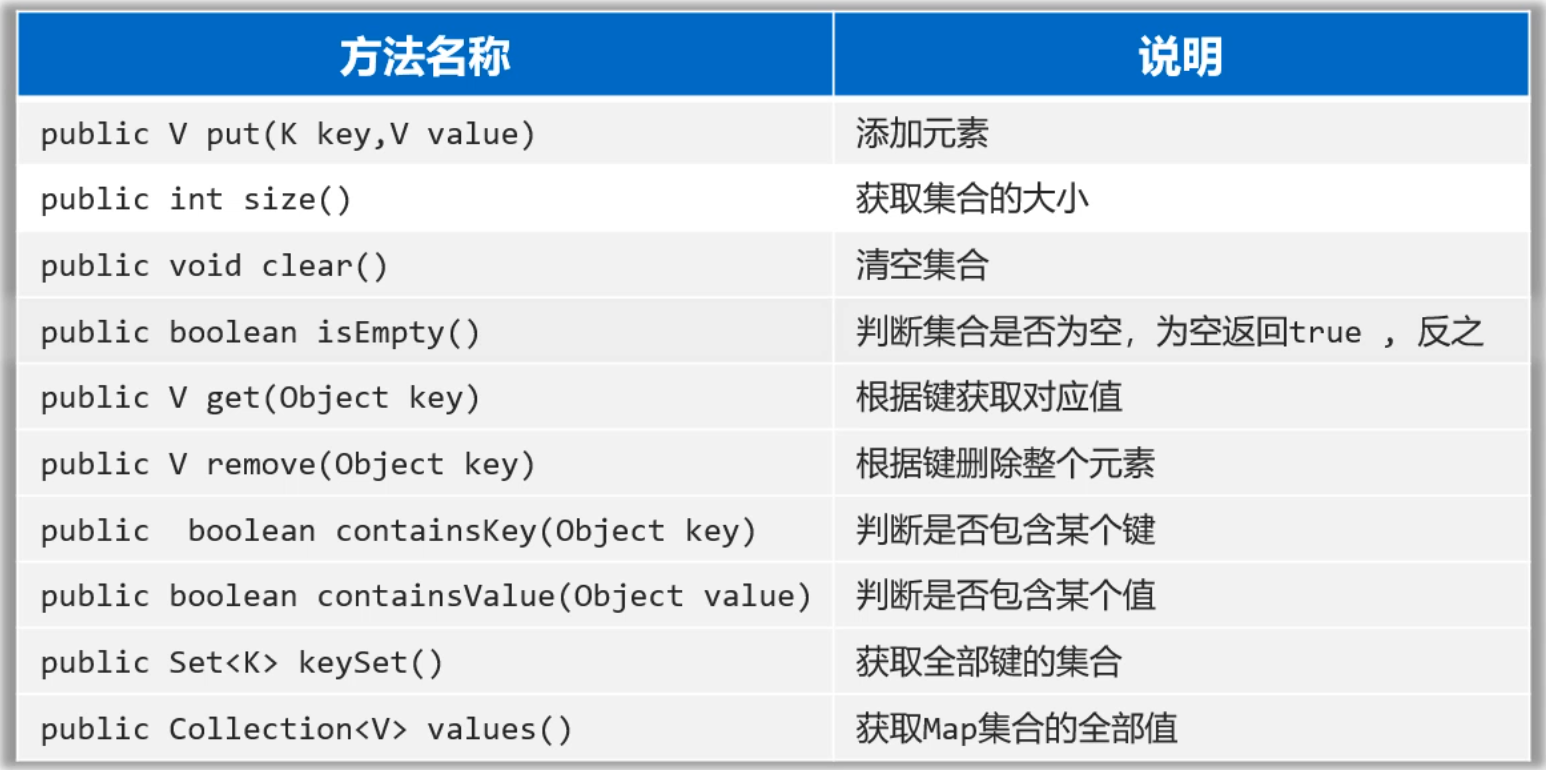
各位同学,上节课我们已经认识了Map集合,接下来我们学习一下Map集合提供了那些方法供我们使用。由于Map是所有双列集合的父接口,所以我们只需要学习Map接口中每一个方法是什么含义,那么所有的Map集合方法你就都会用了。
1
2
3
4
5
6
7
8
9
10
11
12
13
14
15
16
17
18
19
20
21
22
23
24
25
26
27
28
29
30
31
32
33
34
35
36
37
38
39
40
41
42
43
44
45
46
47
48
49
50
51
52
53
54
55
56
57
58
59
60
61
62
| public class MapTest2 {
public static void main(String[] args) {
Map<String, Integer> map = new HashMap<>();
map.put("手表", 100);
map.put("手表", 220);
map.put("手机", 2);
map.put("Java", 2);
map.put(null, null);
System.out.println(map);
System.out.println(map.size());
System.out.println(map.isEmpty());
int v1 = map.get("手表");
System.out.println(v1);
System.out.println(map.get("手机"));
System.out.println(map.get("张三"));
System.out.println(map.remove("手表"));
System.out.println(map);
System.out.println(map.containsKey("手表"));
System.out.println(map.containsKey("手机"));
System.out.println(map.containsKey("java"));
System.out.println(map.containsKey("Java"));
System.out.println(map.containsValue(2));
System.out.println(map.containsValue("2"));
Set<String> keys = map.keySet();
System.out.println(keys);
Collection<Integer> values = map.values();
System.out.println(values);
Map<String, Integer> map1 = new HashMap<>();
map1.put("java1", 10);
map1.put("java2", 20);
Map<String, Integer> map2 = new HashMap<>();
map2.put("java3", 10);
map2.put("java2", 222);
map1.putAll(map2);
System.out.println(map1);
System.out.println(map2);
}
}
|
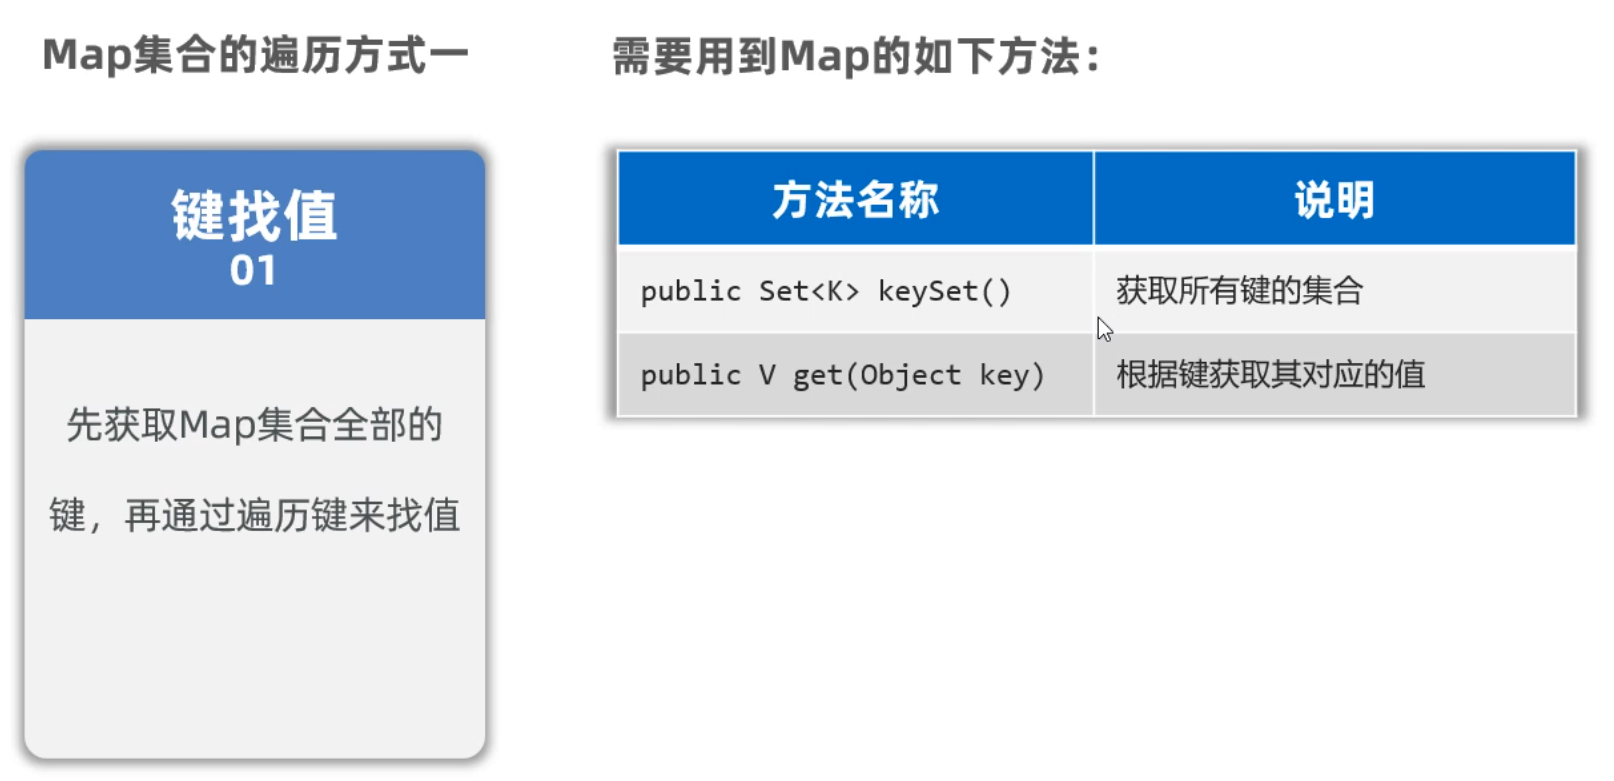
3.3 Map集合遍历方式1
Map集合一共有三种遍历方式,我们先来学习第一种,他需要用到下面的两个方法
1
2
3
4
5
6
7
8
9
10
11
12
13
14
15
16
17
18
19
20
21
22
23
24
25
26
27
28
|
public class MapTest1 {
public static void main(String[] args) {
Map<String, Double> map = new HashMap<>();
map.put("蜘蛛精", 162.5);
map.put("蜘蛛精", 169.8);
map.put("紫霞", 165.8);
map.put("至尊宝", 169.5);
map.put("牛魔王", 183.6);
System.out.println(map);
Set<String> keys = map.keySet();
for (String key : keys) {
double value = map.get(key);
System.out.println(key + "=====>" + value);
}
}
}
|
3.4 Map集合遍历方式2
各位同学,接下来我们学习Map集合的第二种遍历方式,这种遍历方式更加符合面向对象的思维。
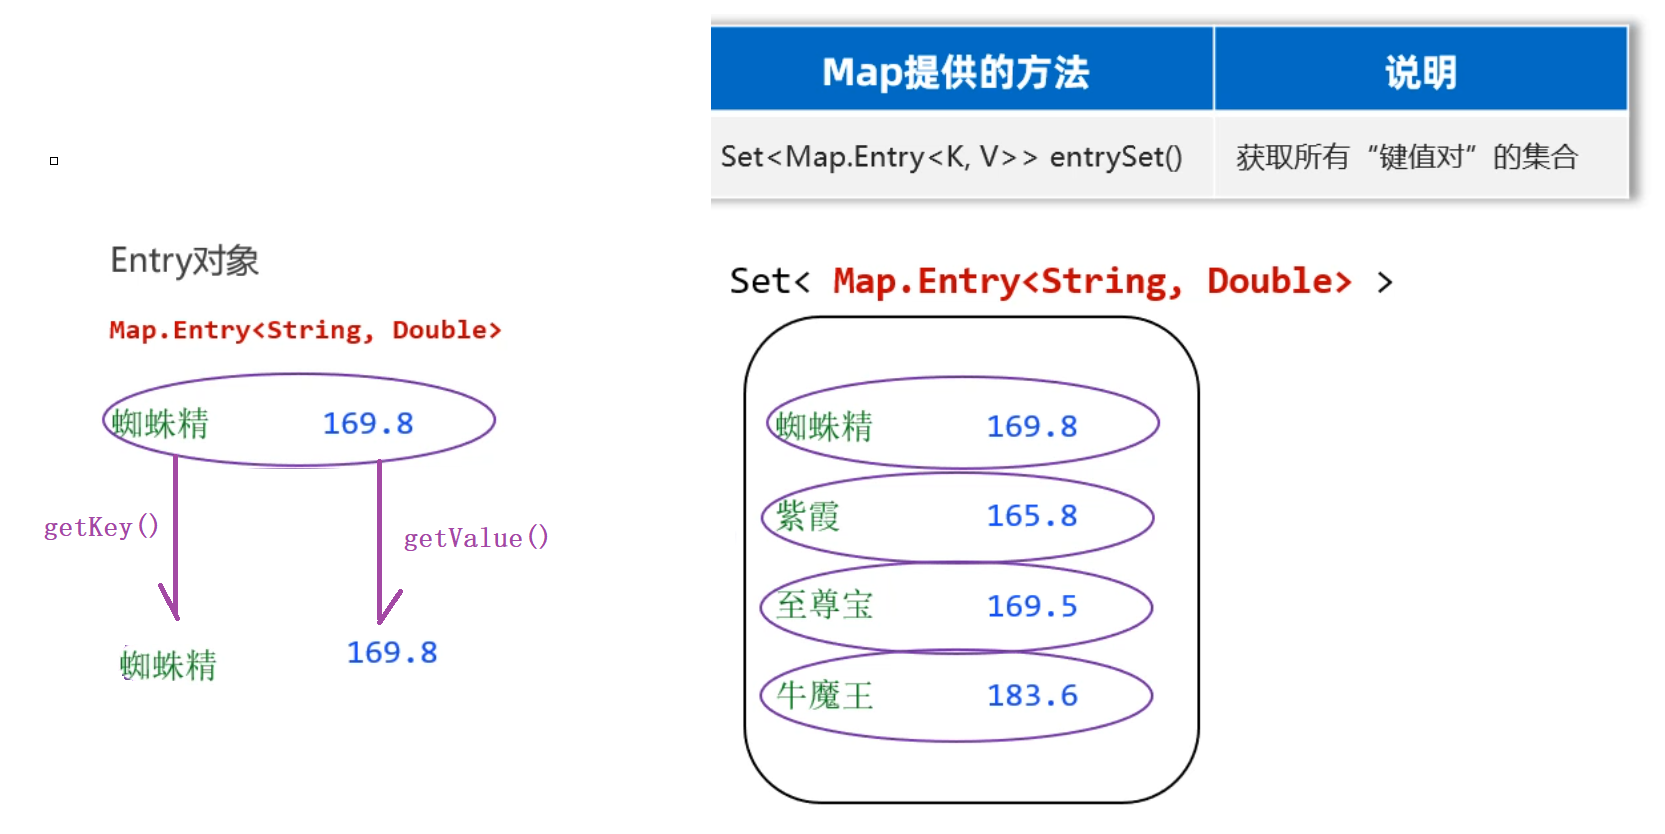
前面我们给大家介绍过,Map集合是用来存储键值对的,而每一个键值对实际上是一个Entry对象。
这里Map集合的第二种方式,是直接获取每一个Entry对象,把Entry存储扫Set集合中去,再通过Entry对象获取键和值。
1
2
3
4
5
6
7
8
9
10
11
12
13
14
15
16
17
18
19
20
21
22
23
24
25
26
|
public class MapTest2 {
public static void main(String[] args) {
Map<String, Double> map = new HashMap<>();
map.put("蜘蛛精", 169.8);
map.put("紫霞", 165.8);
map.put("至尊宝", 169.5);
map.put("牛魔王", 183.6);
System.out.println(map);
Set<Map.Entry<String, Double>> entries = map.entrySet();
for (Map.Entry<String, Double> entry : entries) {
String key = entry.getKey();
double value = entry.getValue();
System.out.println(key + "---->" + value);
}
}
}
|
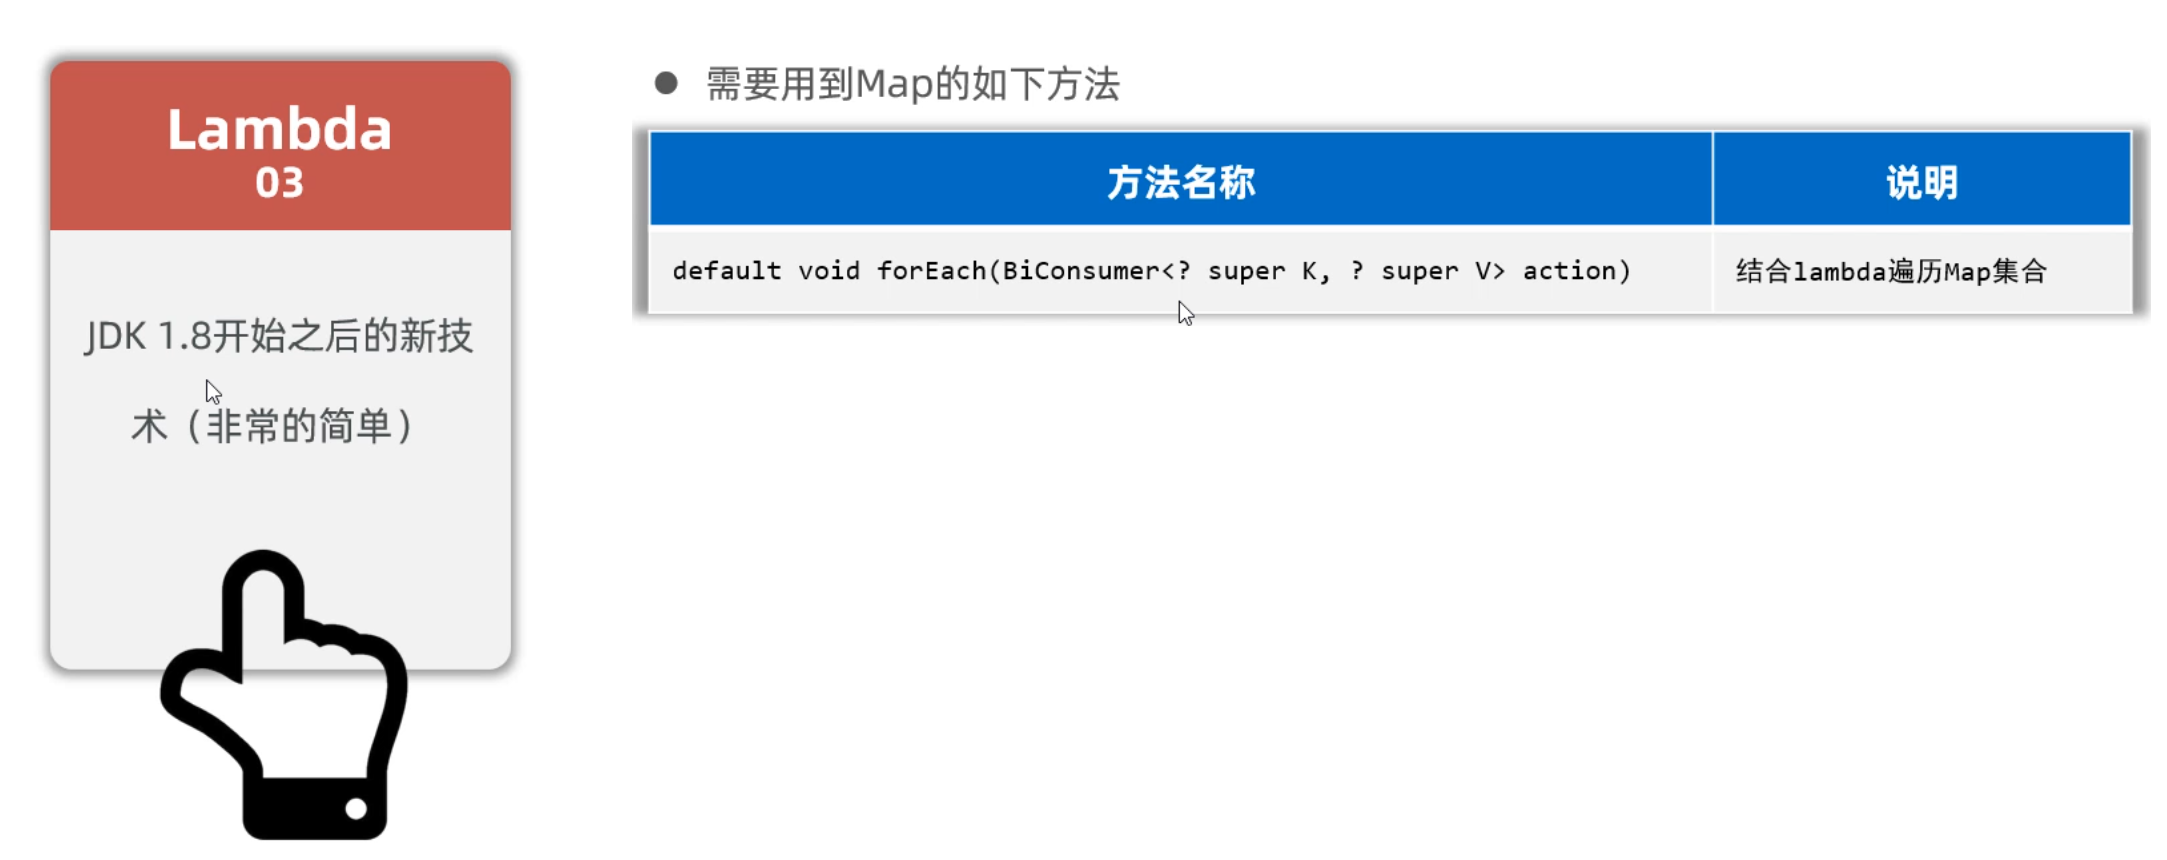
3.5 Map集合遍历方式3
Map集合的第三种遍历方式,需要用到下面的一个方法forEach,而这个方法是JDK8版本以后才有的。调用起来非常简单,最好是结合的lambda表达式一起使用。
1
2
3
4
5
6
7
8
9
10
11
12
13
14
15
16
17
18
19
20
21
22
23
24
25
26
27
|
public class MapTest3 {
public static void main(String[] args) {
Map<String, Double> map = new HashMap<>();
map.put("蜘蛛精", 169.8);
map.put("紫霞", 165.8);
map.put("至尊宝", 169.5);
map.put("牛魔王", 183.6);
System.out.println(map);
map.forEach(new BiConsumer<String, Double>() {
@Override
public void accept(String k, Double v) {
System.out.println(k + "---->" + v);
}
});
map.forEach(( k, v) -> {
System.out.println(k + "---->" + v);
});
}
}
|
3.6 Map集合案例
学习完Map集合的基本用法之后,接下来我们做一个综合案例,将Map集合运用一下。

先分析需求,再考虑怎么用代码实现
1
2
3
4
5
| 1.首先可以将80个学生选择的景点放到一个集合中去(也就是说,集合中的元素是80个任意的ABCD元素)
2.准备一个Map集合用来存储景点,以及景点被选择的次数
3.遍历80个学生选择景点的集合,得到每一个景点,判断Map集合中是否包含该景点
如果不包含,则存储"景点=1"
如果包含,则存获取该景点原先的值,再存储"景点=原来的值+1"; 此时新值会覆盖旧值
|
1
2
3
4
5
6
7
8
9
10
11
12
13
14
15
16
17
18
19
20
21
22
23
24
25
26
27
28
29
30
31
32
33
34
|
public class MapDemo4 {
public static void main(String[] args) {
List<String> data = new ArrayList<>();
String[] selects = {"A", "B", "C", "D"};
Random r = new Random();
for (int i = 1; i <= 80; i++) {
int index = r.nextInt(4);
data.add(selects[index]);
}
System.out.println(data);
Map<String, Integer> result = new HashMap<>();
for (String s : data) {
if(result.containsKey(s)){
result.put(s, result.get(s) + 1);
}else {
result.put(s, 1);
}
}
System.out.println(result);
}
}
|