程序员波特的个人博客

一个小而美的程序员编程资料站

0%

【硅谷课堂】第九天、点播管理模块(三)

一、点播管理模块-课程统计

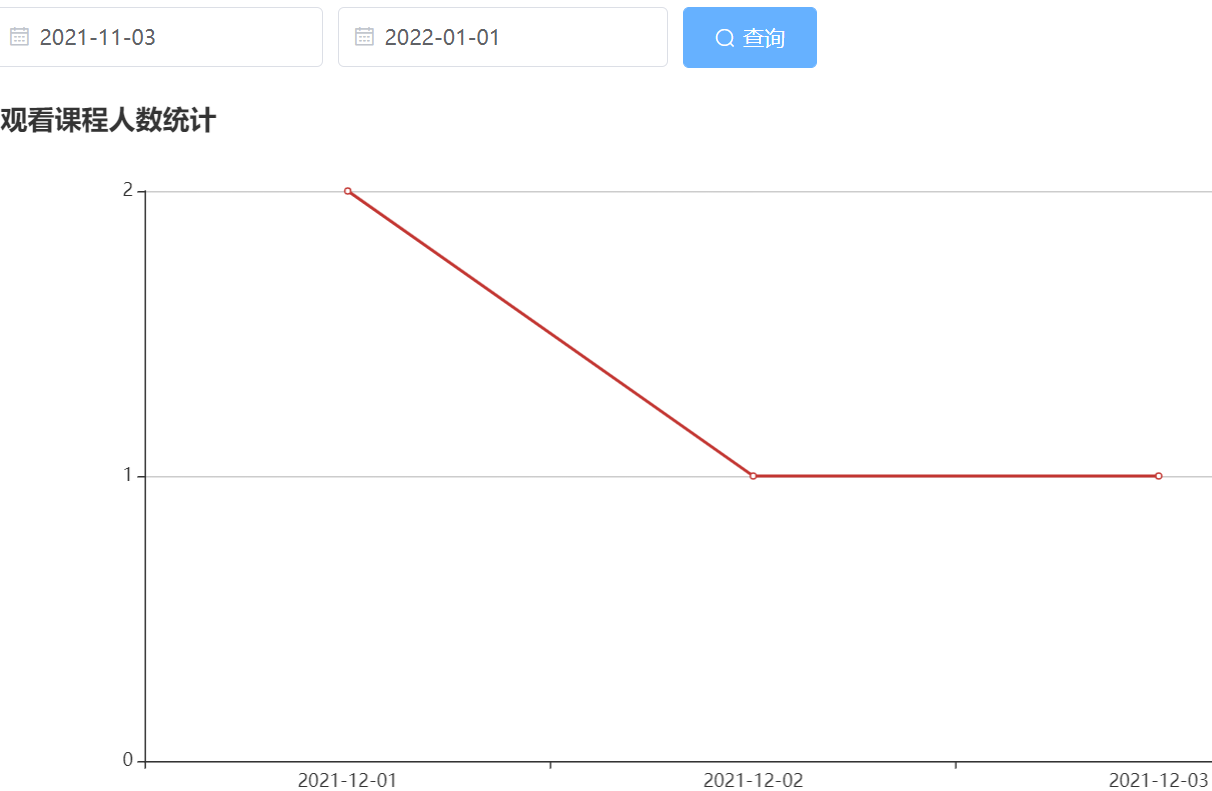
1、课程统计需求

image-20220226111640538

image-20220425154754897

2、课程统计接口

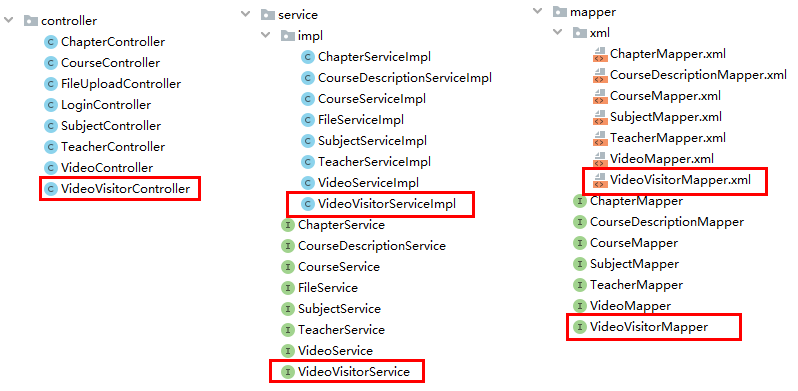
2.1、创建相关代码

image-20220226112411192

2.2、编写Controller

VideoVisitorController添加

1
2
3
4
5
6
7
8
9
10
11
12
13
14
15
16
17
18
19
20
@Api(value = "VideoVisitor管理", tags = "VideoVisitor管理")
@RestController
@RequestMapping(value="/admin/vod/videoVisitor")
@CrossOrigin
public class VideoVisitorController {

@Autowired
private VideoVisitorService videoVisitorService;

@ApiOperation("显示统计数据")
@GetMapping("findCount/{courseId}/{startDate}/{endDate}")
public Result showChart(
@ApiParam("开始时间") @PathVariable Long courseId,
@ApiParam("开始时间") @PathVariable String startDate,
@ApiParam("结束时间") @PathVariable String endDate){

Map<String, Object> map = videoVisitorService.findCount(courseId, startDate, endDate);
return Result.ok(map);
}
}
2.3、编写Service和实现

VideoVisitorService和VideoVisitorServiceImpl

1
2
3
4
5
6
7
8
9
10
11
12
13
14
15
16
17
18
19
20
21
22
23
24
25
@Service
public class VideoVisitorServiceImpl extends ServiceImpl<VideoVisitorMapper, VideoVisitor> implements VideoVisitorService {

//课程统计的接口
@Override
public Map<String, Object> findCount(Long courseId, String startDate, String endDate) {
//调用mapper的方法
List<VideoVisitorCountVo> videoVisitorVoList =
baseMapper.findCount(courseId,startDate,endDate);
//创建map集合
Map<String, Object> map = new HashMap<>();
//创建两个list集合,一个代表所有日期,一个代表日期对应数量
//封装数据 代表所有日期
List<String> dateList =
videoVisitorVoList.stream().map(VideoVisitorCountVo::getJoinTime).
collect(Collectors.toList());
//代表日期对应数量
List<Integer> countList = videoVisitorVoList.stream().map(VideoVisitorCountVo::getUserCount)
.collect(Collectors.toList());
//放到map集合
map.put("xData", dateList);
map.put("yData", countList);
return map;
}
}
2.4、编写Mapper

(1)VideoVisitorMapper

1
2
3
4
public interface VideoVisitorMapper extends BaseMapper<VideoVisitor> {
////显示统计数据
List<VideoVisitorCountVo> findCount(Long courseId, String startDate, String endDate);
}

(2)VideoVisitorMapper.xml文件

1
2
3
4
5
6
7
8
9
10
11
12
13
14
15
16
17
18
19
20
21
<?xml version="1.0" encoding="UTF-8"?>
<!DOCTYPE mapper PUBLIC "-//mybatis.org//DTD Mapper 3.0//EN" "http://mybatis.org/dtd/mybatis-3-mapper.dtd">
<mapper namespace="com.atguigu.ggkt.vod.mapper.VideoVisitorMapper">
<select id="findCount" resultType="com.atguigu.ggkt.vo.vod.VideoVisitorCountVo">
SELECT
DATE(join_time) AS joinTime,
COUNT(*) AS userCount
FROM video_visitor
<where>
<if test="startDate != null and startDate != ''">
AND DATE(join_time) >= #{startDate}
</if>
<if test="endDate != null and endDate != ''">
AND DATE(join_time) &lt;= #{endDate}
</if>
and course_id=#{courseId}
</where>
GROUP BY DATE(join_time)
ORDER BY DATE(join_time)
</select>
</mapper>

3、课程统计前端

3.1、定义接口

创建videoVisitor.js定义接口

1
2
3
4
5
6
7
8
9
10
11
12
13
import request from '@/utils/request'

const api_name = '/admin/vod/videoVisitor'

export default {

findCount(courseId, startDate, endDate) {
return request({
url: `${api_name}/findCount/${courseId}/${startDate}/${endDate}`,
method: 'get'
})
}
}
3.2、安装ECharts组件

ECharts是百度的一个项目,后来百度把Echart捐给apache,用于图表展示,提供了常规的折线图柱状图散点图饼图K线图,用于统计的盒形图,用于地理数据可视化的地图热力图线图,用于关系数据可视化的关系图treemap旭日图,多维数据可视化的平行坐标,还有用于 BI 的漏斗图仪表盘,并且支持图与图之间的混搭。

官方网站:https://echarts.apache.org/zh/index.html

1
npm install --save echarts@4.1.0
3.3、编写页面

创建chart.vue页面

image-20220226113552427

1
2
3
4
5
6
7
8
9
10
11
12
13
14
15
16
17
18
19
20
21
22
23
24
25
26
27
28
29
30
31
32
33
34
35
36
37
38
39
40
41
42
43
44
45
46
47
48
49
50
51
52
53
54
55
56
57
58
59
60
61
62
63
64
65
66
67
68
69
70
71
72
73
74
75
76
77
78
79
80
81
82
83
84
85
86
87
88
89
90
91
92
93
94
95
96
97
98
99
<template>
<div class="app-container">
<!--表单-->
<el-form :inline="true" class="demo-form-inline">
<el-form-item>
<el-date-picker
v-model="startDate"
type="date"
placeholder="选择开始日期"
value-format="yyyy-MM-dd" />
</el-form-item>
<el-form-item>
<el-date-picker
v-model="endDate"
type="date"
placeholder="选择截止日期"
value-format="yyyy-MM-dd" />
</el-form-item>
<el-button
:disabled="btnDisabled"
type="primary"
icon="el-icon-search"
@click="showChart()">查询</el-button>
</el-form>
<div id="chart" class="chart" style="height:500px;" />
</div>
</template>
<script>
import echarts from 'echarts'
import api from '@/api/vod/videoVisitor'

export default {
data() {
return {
courseId: '',
startDate: '',
endDate: '',
btnDisabled: false
}
},
created() {
this.courseId = this.$route.params.id
// 初始化最近十天数据
let currentDate = new Date();
this.startDate = this.dateFormat(new Date(currentDate.getTime()-7*24*3600*1000))
this.endDate = this.dateFormat(currentDate)
this.showChart()
},
methods: {
showChart() {
api.findCount(this.courseId, this.startDate, this.endDate).then(response => {
this.setChartData(response.data)
})
},
setChartData(data) {
// 基于准备好的dom,初始化echarts实例
var myChart = echarts.init(document.getElementById('chart'))
// 指定图表的配置项和数据
var option = {
title: {
text: '观看课程人数统计'
},
xAxis: {
data: data.xData
},
yAxis: {
minInterval: 1
},
series: [{
type: 'line',
data: data.yData
}]
}
// 使用刚指定的配置项和数据显示图表。
myChart.setOption(option)
},
dateFormat(date) {
let fmt = 'YYYY-mm-dd'
let ret;
const opt = {
"Y+": date.getFullYear().toString(), // 年
"m+": (date.getMonth() + 1).toString(), // 月
"d+": date.getDate().toString(), // 日
"H+": date.getHours().toString(), // 时
"M+": date.getMinutes().toString(), // 分
"S+": date.getSeconds().toString() // 秒
// 有其他格式化字符需求可以继续添加,必须转化成字符串
};
for (let k in opt) {
ret = new RegExp("(" + k + ")").exec(fmt);
if (ret) {
fmt = fmt.replace(ret[1], (ret[1].length == 1) ? (opt[k]) : (opt[k].padStart(ret[1].length, "0")))
};
};
return fmt;
}
}
}
</script>

二、整合腾讯云点播

1、功能需求介绍

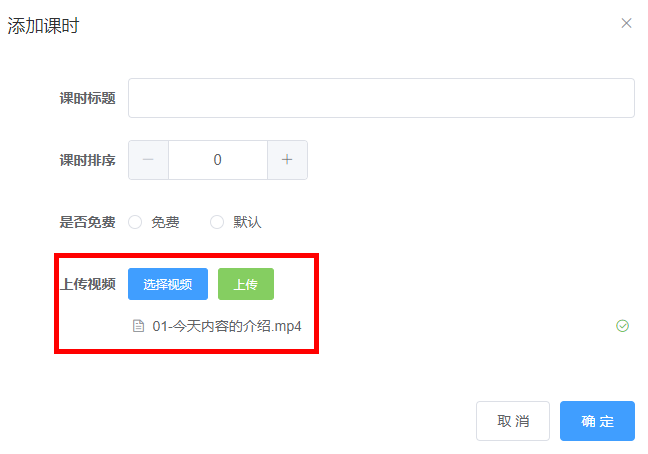
1.1、上传视频

在发布课程时候,需要添加课时并且上传课程视频,这个时候需要使用到腾讯云点播服务进行上传视频管理

image-20220226145705765

1.2、删除视频

(1)添加小节,上传课程视频

(2)删除小节时候,需要删除视频

(3)删除课程时候,需要删除课程,章节,小节和视频

1.3、视频播放(后续完成)

2、腾讯云点播介绍

腾讯云点播(Video on Demand,VOD)基于腾讯多年技术积累与基础设施建设,为有音视频应用相关需求的客户提供包括音视频存储管理、音视频转码处理、音视频加速播放和音视频通信服务的一站式解决方案。

image-20220329202923484

文档中心:https://cloud.tencent.com/document/product/266

2.1、开通”云点播”服务

image-20220329203029217

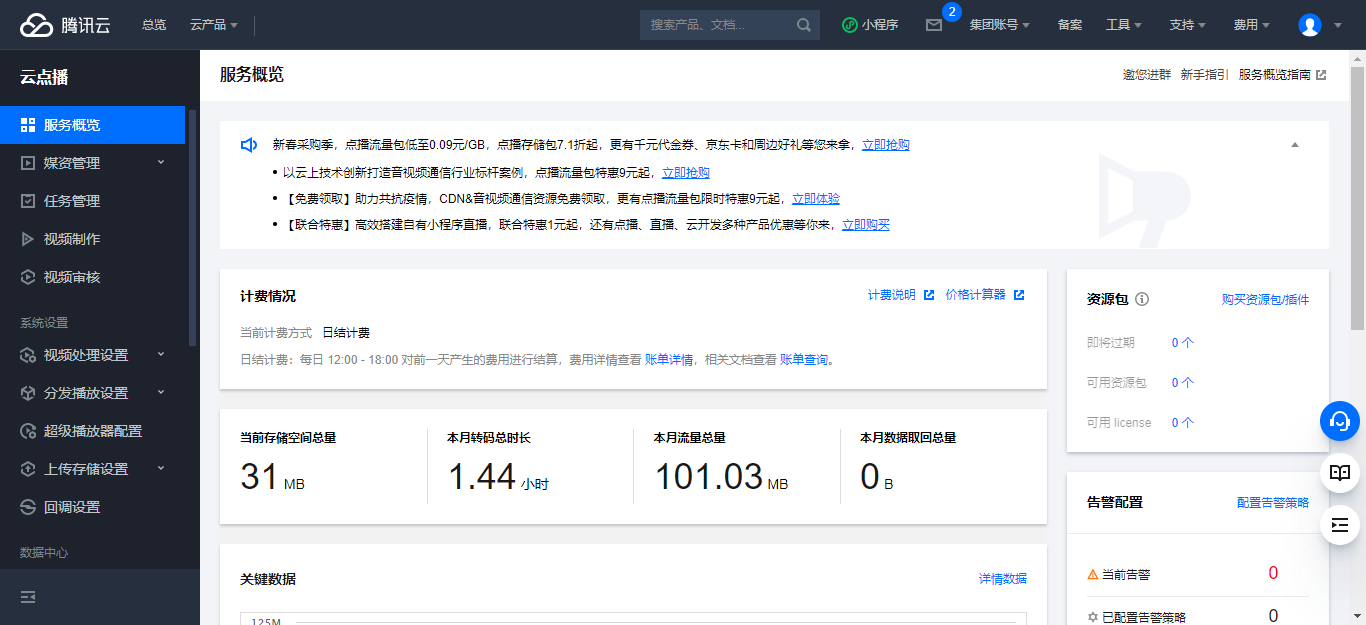
2.2、管理控制台

image-20220329094244590

2.3、上传视频

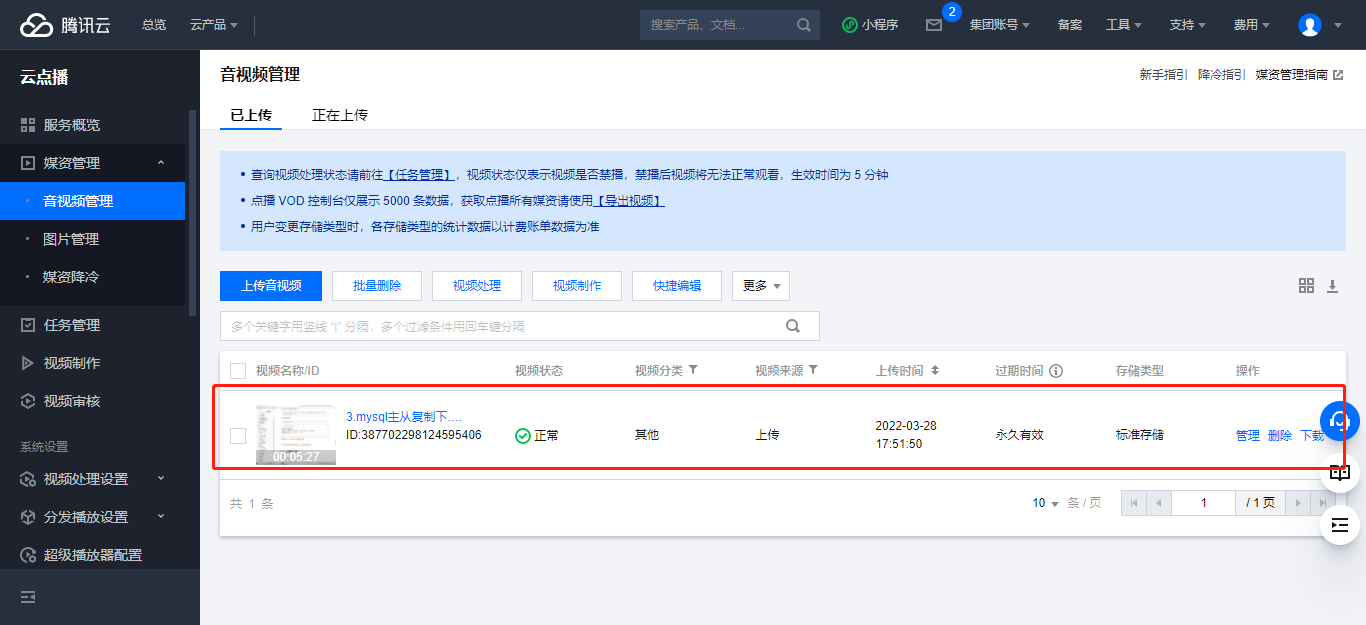
上传视频可将视频上传到云点播的存储中,以进行后续的处理和分发等。

  • 单击左侧菜单栏【媒资管理 > 视频管理】,默认展示【已上传】标签页;
  • 点击【上传视频】按钮;
  • 单击【选择视频】,选择本地视频文件;
  • 单击【开始上传】;
  • 页面将自动跳转至【正在上传】标签页, 本地文件所在行【状态】栏为“上传成功”时,单击【已上传】标签页,可见完成上传的视频;

image-20220329094517904

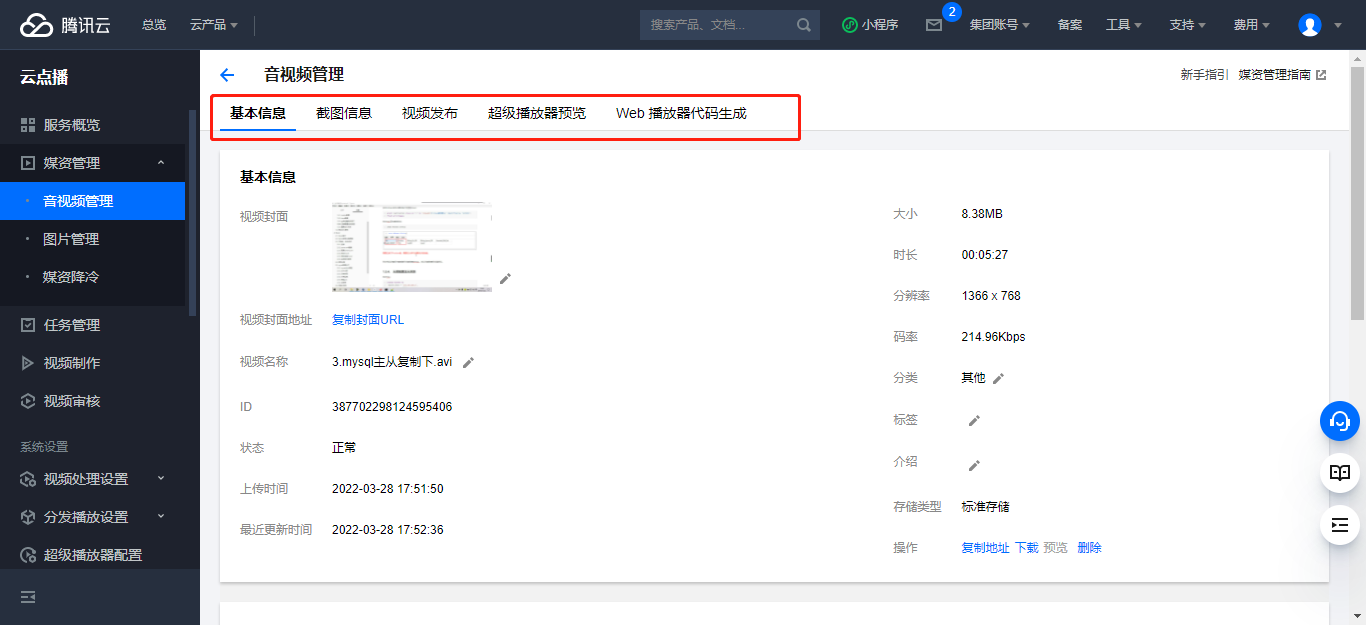
单击【管理】,可以查看视频详情;

image-20220329101358914

2.4、前端集成

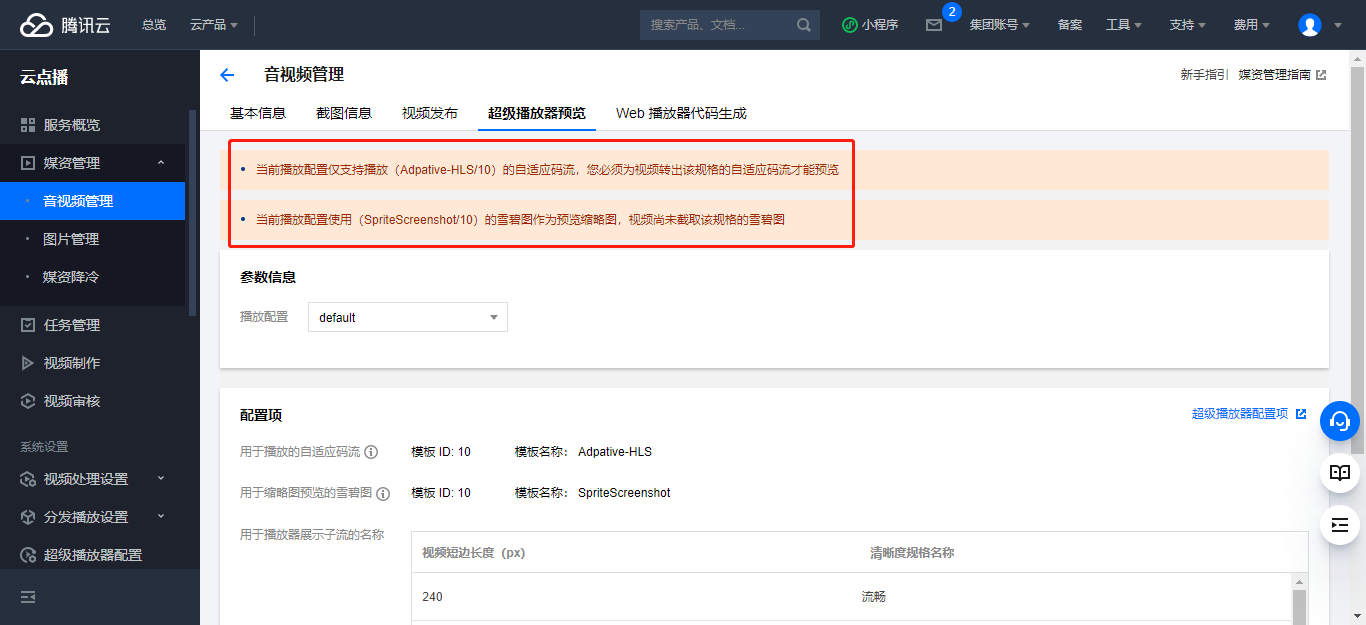
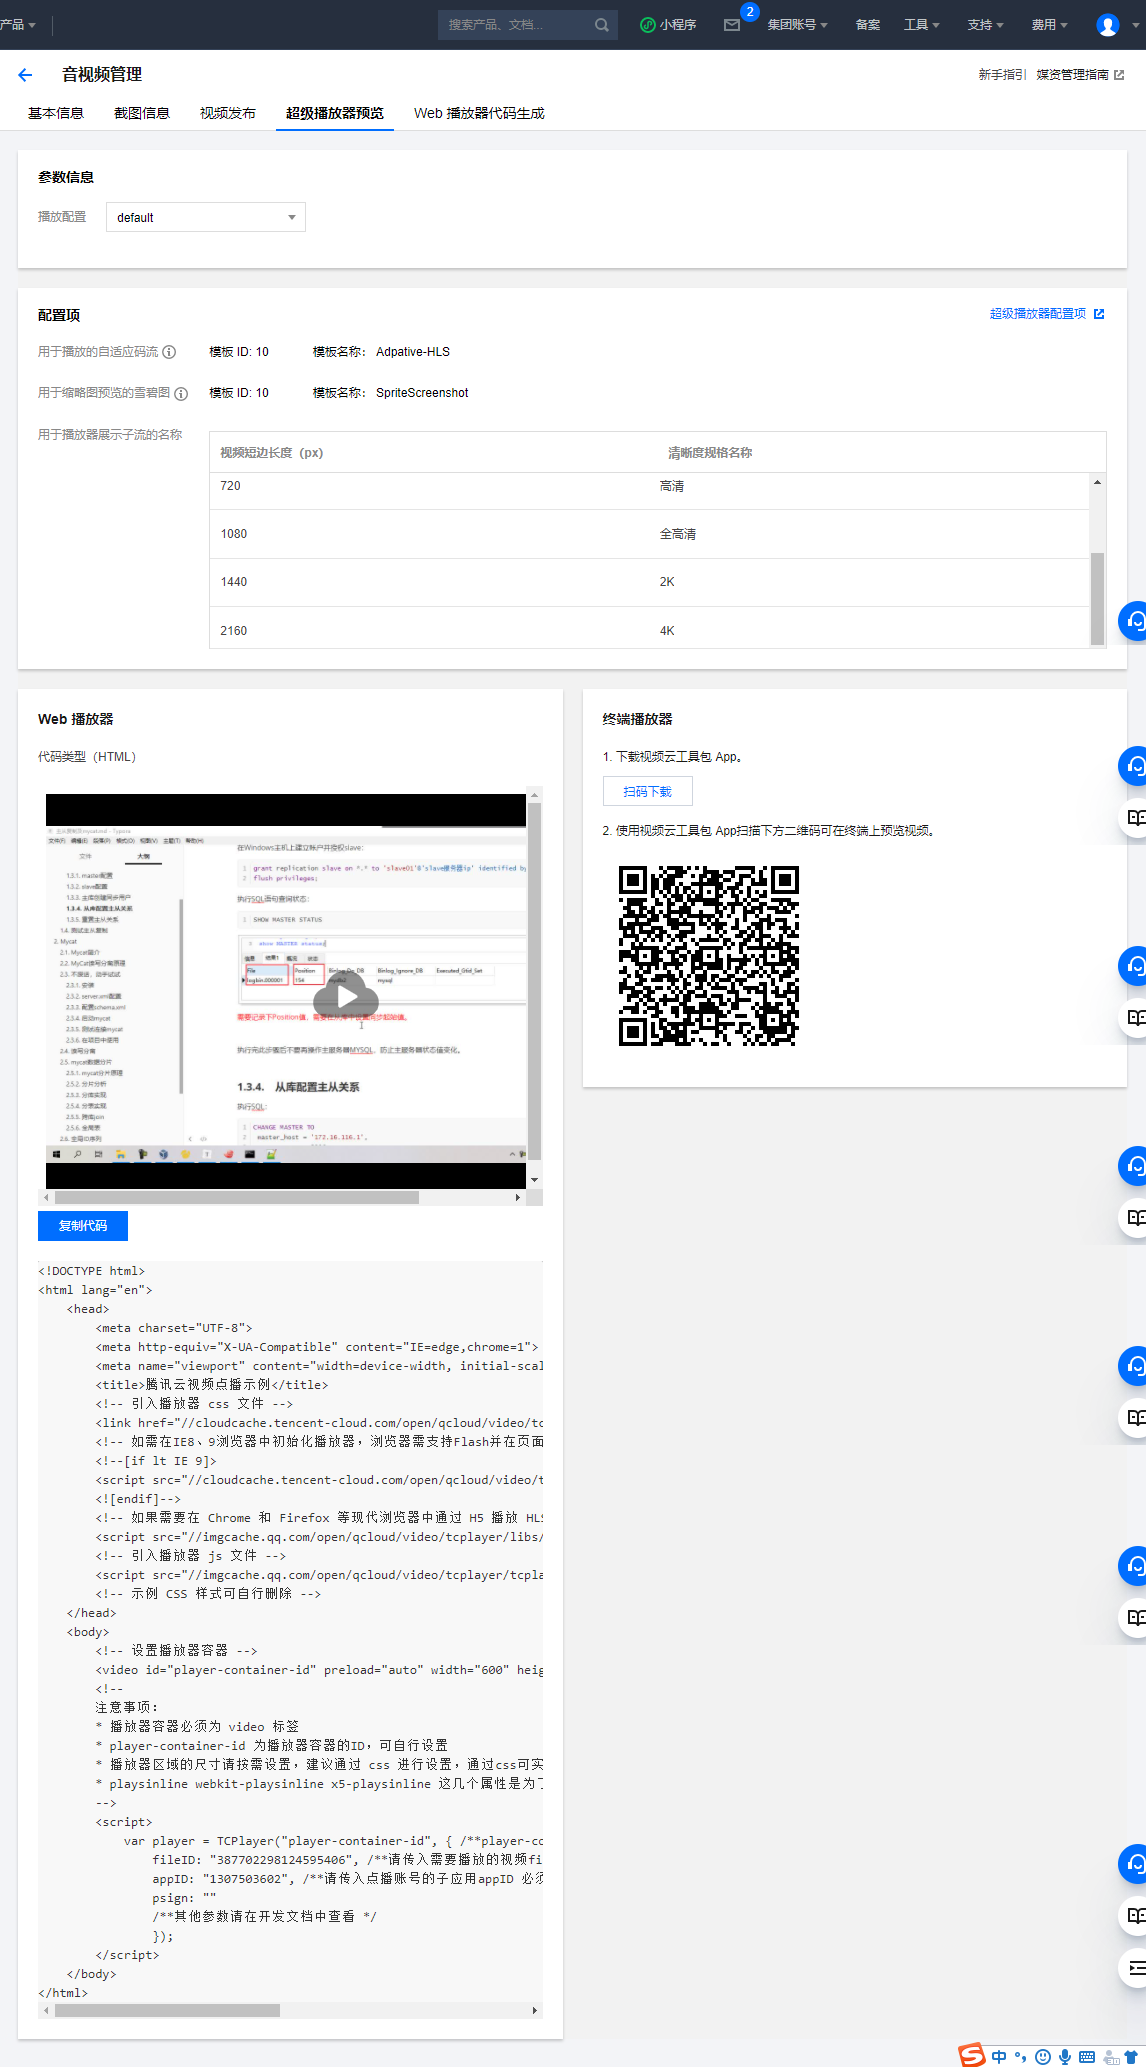
前端集成有两种方式,使用“超级播放器预览”与“web播放器预览”,或者代码已经不更新,推荐使用前者,因此“web播放器预览”仅做了解。

1、查看“web播放器预览”;

image-20220329102937651

说明:需要将视频进行转码,才能支持超级播放器播放,转码为:自适应码流

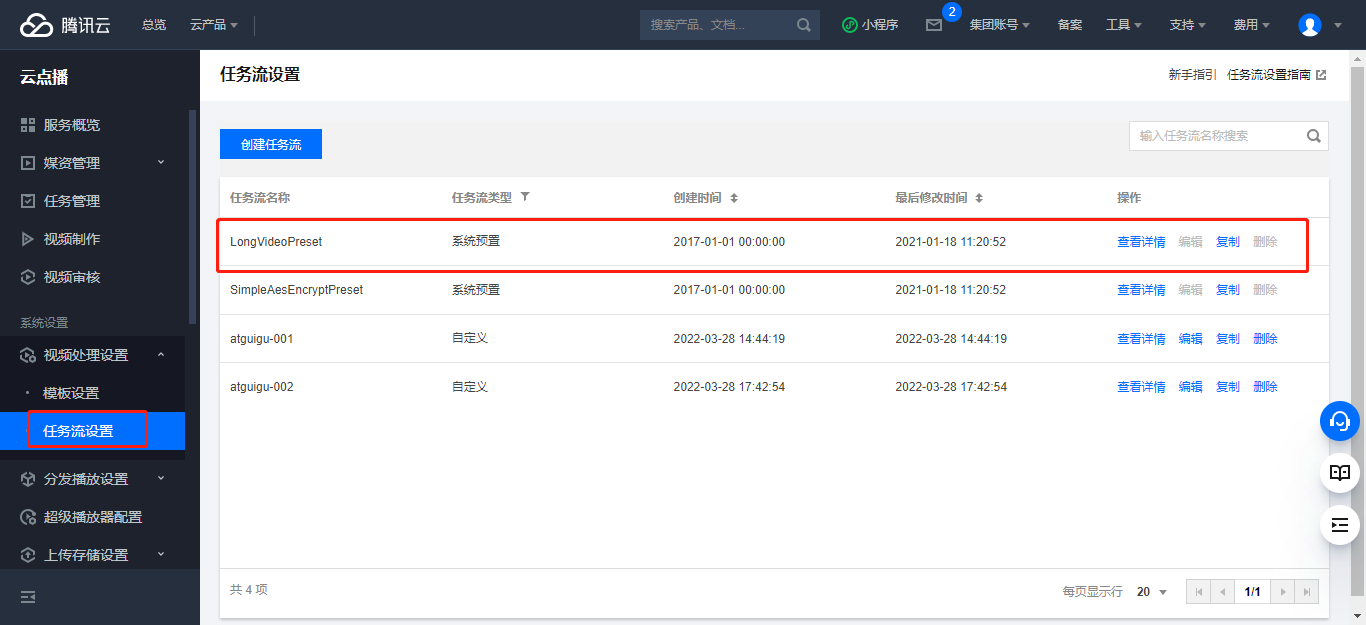
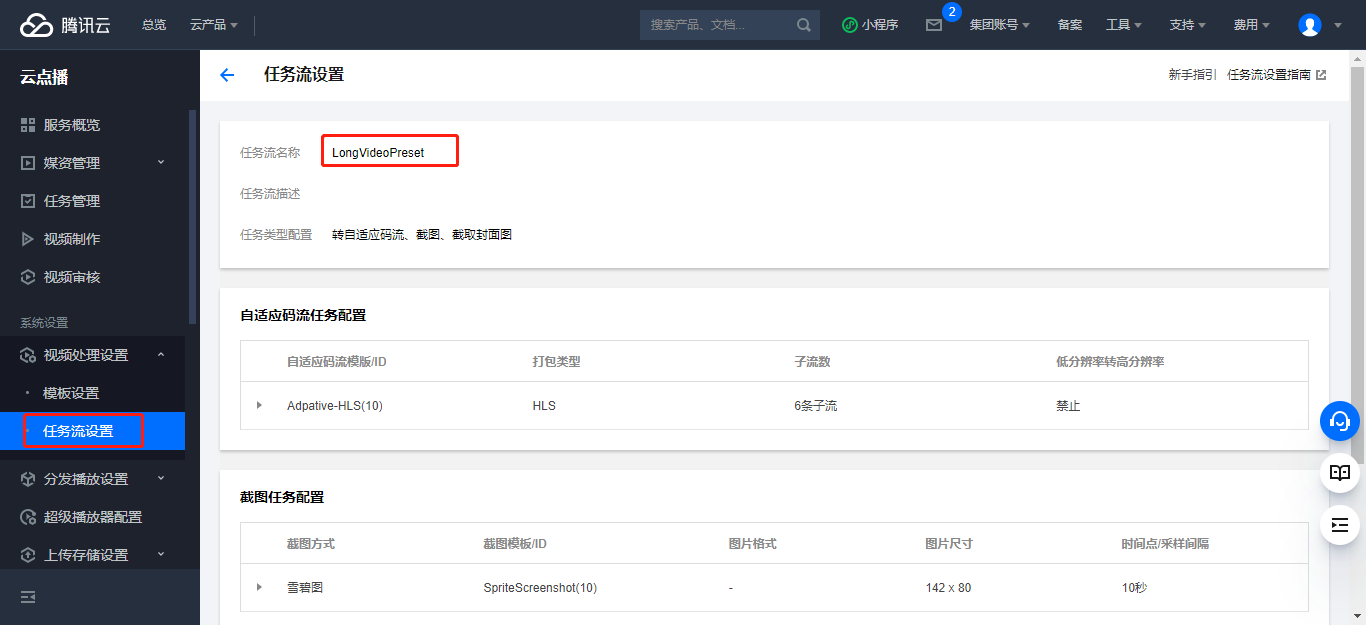
2、查看“任务流设置”

image-20220329103422004

3、查看详情

image-20220329103525763

当前任务流就是系统默认的“自适应码流”任务流

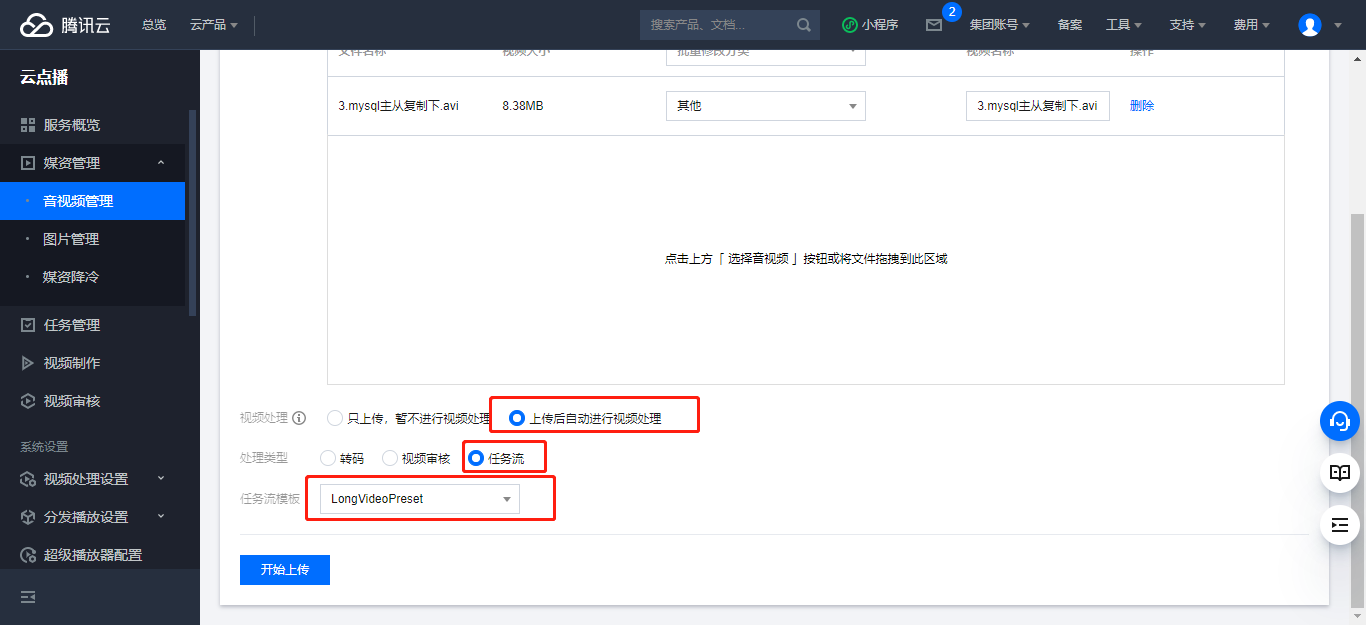
4、在【音视频管理】重新上传视频

image-20220329104112975

5、查看详情

image-20220329104232054

6、复制代码index.html到项目,即可播放

3、编写视频点播接口

3.1、创建相关类

image-20220226141431594

3.2、引入相关依赖

(1)在service_vod模块引入

1
2
3
4
5
6
7
8
9
10
11
<dependency>
<groupId>com.qcloud</groupId>
<artifactId>vod_api</artifactId>
<version>2.1.4</version>
<exclusions>
<exclusion>
<groupId>org.slf4j</groupId>
<artifactId>slf4j-log4j12</artifactId>
</exclusion>
</exclusions>
</dependency>
3.3、编写Controller

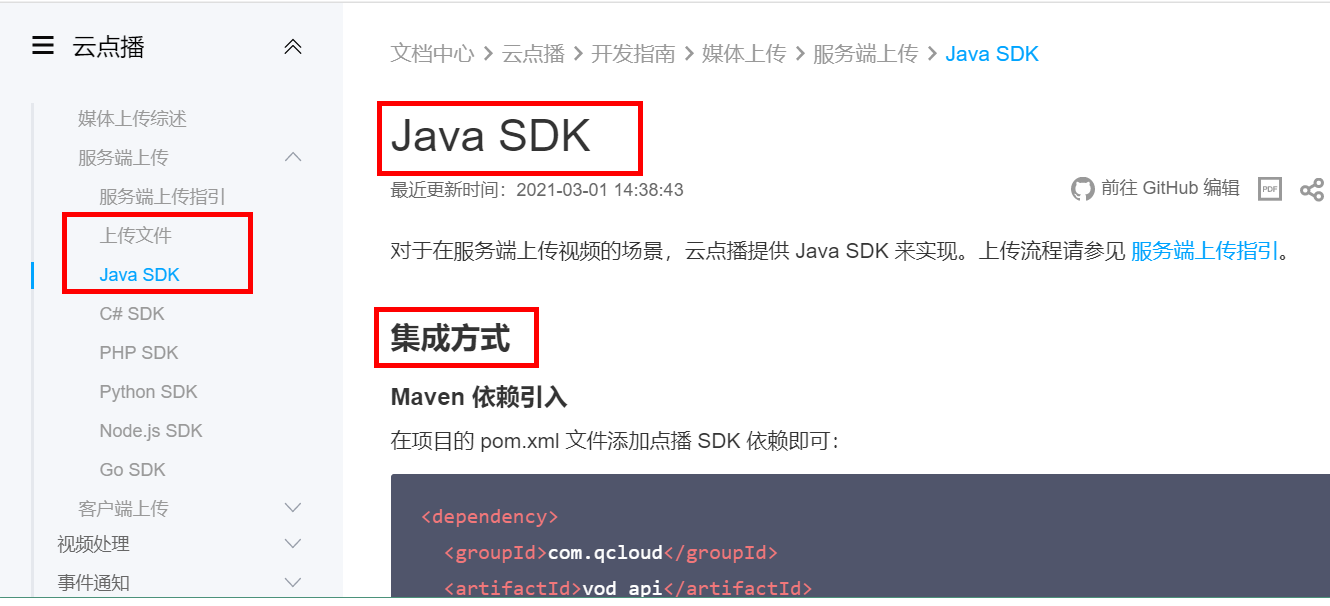
**(1)上传视频集成方案:**https://cloud.tencent.com/document/product/266/10276

image-20220329213039030

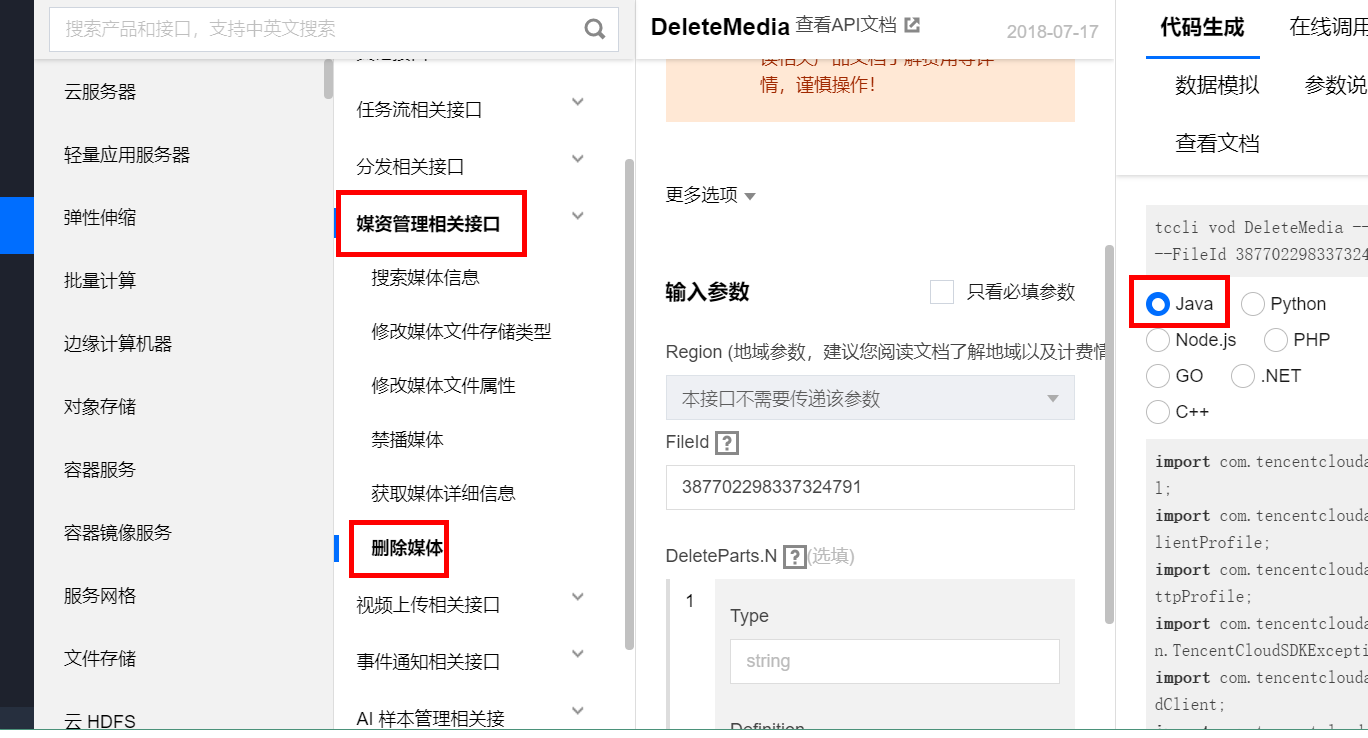
(2)删除视频

可在线生成代码:

地址:https://console.cloud.tencent.com/api/explorer?Product=vod&Version=2018-07-17&Action=DescribeMediaInfos&SignVersion=

image-20220329213613764

1
2
3
4
5
6
7
8
9
10
11
12
13
14
15
16
17
18
19
20
21
22
23
24
25
26
27
@Api(tags = "腾讯云点播")
@RestController
@RequestMapping("/admin/vod")
@CrossOrigin
public class VodController {

@Autowired
private VodService vodService;

//上传视频
@PostMapping("upload")
public Result uploadVideo(
@ApiParam(name = "file", value = "文件", required = true)
@RequestParam("file") MultipartFile file) throws IOException {
InputStream inputStream = file.getInputStream();
String originalFilename = file.getOriginalFilename();
String videoId = vodService.uploadVideo(inputStream, originalFilename);
return Result.ok(videoId);
}

//删除视频
@DeleteMapping("remove/{videoSourceId}")
public Result removeVideo( @PathVariable String videoSourceId) {
vodService.removeVideo(videoSourceId);
return Result.ok();
}
}
3.4、编写Service

(1)VodService定义方法

1
2
3
4
5
6
public interface VodService {
//上传视频
String uploadVideo(InputStream inputStream, String originalFilename);
//删除视频
void removeVideo(String videoSourceId);
}

(2)VodServiceImpl实现方法

1
2
3
4
5
6
7
8
9
10
11
12
13
14
15
16
17
18
19
20
21
22
23
24
25
26
27
28
29
30
31
32
33
34
35
36
37
38
39
40
41
42
43
44
45
46
47
48
49
@Service
public class VodServiceImpl implements VodService {

//上传视频
@Override
public String uploadVideo(InputStream inputStream, String originalFilename) {
try {
VodUploadClient client =
new VodUploadClient(ConstantPropertiesUtil.ACCESS_KEY_ID,
ConstantPropertiesUtil.ACCESS_KEY_SECRET);
VodUploadRequest request = new VodUploadRequest();
//视频本地地址
request.setMediaFilePath("D:\\001.mp4");
//指定任务流
request.setProcedure("LongVideoPreset");
//调用上传方法,传入接入点地域及上传请求。
VodUploadResponse response = client.upload("ap-guangzhou", request);
//返回文件id保存到业务表,用于控制视频播放
String fileId = response.getFileId();
System.out.println("Upload FileId = {}"+response.getFileId());
return fileId;
} catch (Exception e) {
System.out.println(e.toString());
}
return null;
}

//删除视频
@Override
public void removeVideo(String videoSourceId) {
try{
// 实例化一个认证对象,入参需要传入腾讯云账户secretId,secretKey,此处还需注意密钥对的保密
Credential cred =
new Credential(ConstantPropertiesUtil.ACCESS_KEY_ID,
ConstantPropertiesUtil.ACCESS_KEY_SECRET);
// 实例化要请求产品的client对象,clientProfile是可选的
VodClient client = new VodClient(cred, "");
// 实例化一个请求对象,每个接口都会对应一个request对象
DeleteMediaRequest req = new DeleteMediaRequest();
req.setFileId(videoSourceId);
// 返回的resp是一个DeleteMediaResponse的实例,与请求对象对应
DeleteMediaResponse resp = client.DeleteMedia(req);
// 输出json格式的字符串回包
System.out.println(DeleteMediaResponse.toJsonString(resp));
} catch (TencentCloudSDKException e) {
System.out.println(e.toString());
}
}
}

4、完善上传视频功能

4.1、定义接口

创建vod.js定义接口

1
2
3
4
5
6
7
8
9
10
11
import request from '@/utils/request'

export default {
//删除视频
removeByVodId(id) {
return request({
url: `/admin/vod/remove/${id}`,
method: 'delete'
})
}
}
4.1、添加上传视频

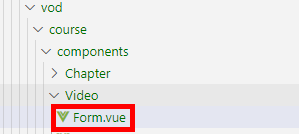
(1)修改Video -> Form.vue页面

image-20220226144609946

1
2
3
4
5
6
7
8
9
10
11
12
13
14
15
16
17
18
19
20
21
22
23
24
25
26
27
28
29
30
31
32
33
34
35
36
37
38
39
40
41
42
43
44
45
46
47
48
49
50
51
52
53
54
55
56
57
58
59
60
61
62
63
64
65
66
67
68
69
70
71
72
73
74
75
76
77
78
79
80
81
82
83
84
85
86
87
88
89
90
91
92
93
94
95
96
97
98
99
100
101
102
103
104
105
106
107
108
109
110
111
112
113
114
115
116
117
118
119
120
121
122
123
124
125
126
127
128
129
130
131
132
133
134
135
136
137
138
139
140
141
142
143
144
145
146
147
148
149
150
151
152
<template>
<!-- 添加和修改课时表单 -->
<el-dialog :visible="dialogVisible" title="添加课时" @close="close()">
<el-form :model="video" label-width="120px">
<el-form-item label="课时标题">
<el-input v-model="video.title"/>
</el-form-item>
<el-form-item label="课时排序">
<el-input-number v-model="video.sort" :min="0" />
</el-form-item>
<el-form-item label="是否免费">
<el-radio-group v-model="video.isFree">
<el-radio :label="0">免费</el-radio>
<el-radio :label="1">默认</el-radio>
</el-radio-group>
</el-form-item>
<!-- 上传视频 -->
<el-form-item label="上传视频">
<el-upload
ref="upload"
:auto-upload="false"
:on-success="handleUploadSuccess"
:on-error="handleUploadError"
:on-exceed="handleUploadExceed"
:file-list="fileList"
:limit="1"
:before-remove="handleBeforeRemove"
:on-remove="handleOnRemove"
:action="BASE_API+'/admin/vod/upload'">
<el-button slot="trigger" size="small" type="primary">选择视频</el-button>
<el-button
:disabled="uploadBtnDisabled"
style="margin-left: 10px;"
size="small"
type="success"
@click="submitUpload()">上传</el-button>
</el-upload>
</el-form-item>
</el-form>
<div slot="footer" class="dialog-footer">
<el-button @click="close()">取 消</el-button>
<el-button type="primary" @click="saveOrUpdate()">确 定</el-button>
</div>
</el-dialog>
</template>
<script>
import videoApi from '@/api/vod/video'
import vodApi from '@/api/vod/vod'
export default {
data() {
return {
BASE_API: 'http://localhost:8301',
dialogVisible: false,
video: {
sort: 0,
free: false
},
fileList: [], // 上传文件列表
uploadBtnDisabled: false
}
},
methods: {
open(chapterId, videoId) {
this.dialogVisible = true
this.video.chapterId = chapterId
if (videoId) {
videoApi.getById(videoId).then(response => {
this.video = response.data
// 回显
if (this.video.videoOriginalName) {
this.fileList = [{ 'name': this.video.videoOriginalName }]
}
})
}
},
close() {
this.dialogVisible = false
// 重置表单
this.resetForm()
},
resetForm() {
this.video = {
sort: 0,
free: false
}
this.fileList = [] // 重置视频上传列表
},
saveOrUpdate() {
if (!this.video.id) {
this.save()
} else {
this.update()
}
},
save() {
this.video.courseId = this.$parent.$parent.courseId
videoApi.save(this.video).then(response => {
this.$message.success(response.message)
// 关闭组件
this.close()
// 刷新列表
this.$parent.fetchNodeList()
})
},
update() {
videoApi.updateById(this.video).then(response => {
this.$message.success(response.message)
// 关闭组件
this.close()
// 刷新列表
this.$parent.fetchNodeList()
})
},
// 上传多于一个视频
handleUploadExceed(files, fileList) {
this.$message.warning('想要重新上传视频,请先删除已上传的视频')
},
// 上传
submitUpload() {
this.uploadBtnDisabled = true
this.$refs.upload.submit() // 提交上传请求
},
// 视频上传成功的回调
handleUploadSuccess(response, file, fileList) {
this.uploadBtnDisabled = false
this.video.videoSourceId = response.data
this.video.videoOriginalName = file.name
},
// 失败回调
handleUploadError() {
this.uploadBtnDisabled = false
this.$message.error('上传失败2')
},
// 删除视频文件确认
handleBeforeRemove(file, fileList) {
return this.$confirm(`确定移除 ${file.name}?`)
},
// 执行视频文件的删除
handleOnRemove(file, fileList) {
if (!this.video.videoSourceId) {
return
}
vodApi.removeByVodId(this.video.videoSourceId).then(response => {
this.video.videoSourceId = ''
this.video.videoOriginalName = ''
videoApi.updateById(this.video)
this.$message.success(response.message)
})
}
}
}
</script>

5、腾讯云上传视频其他方式

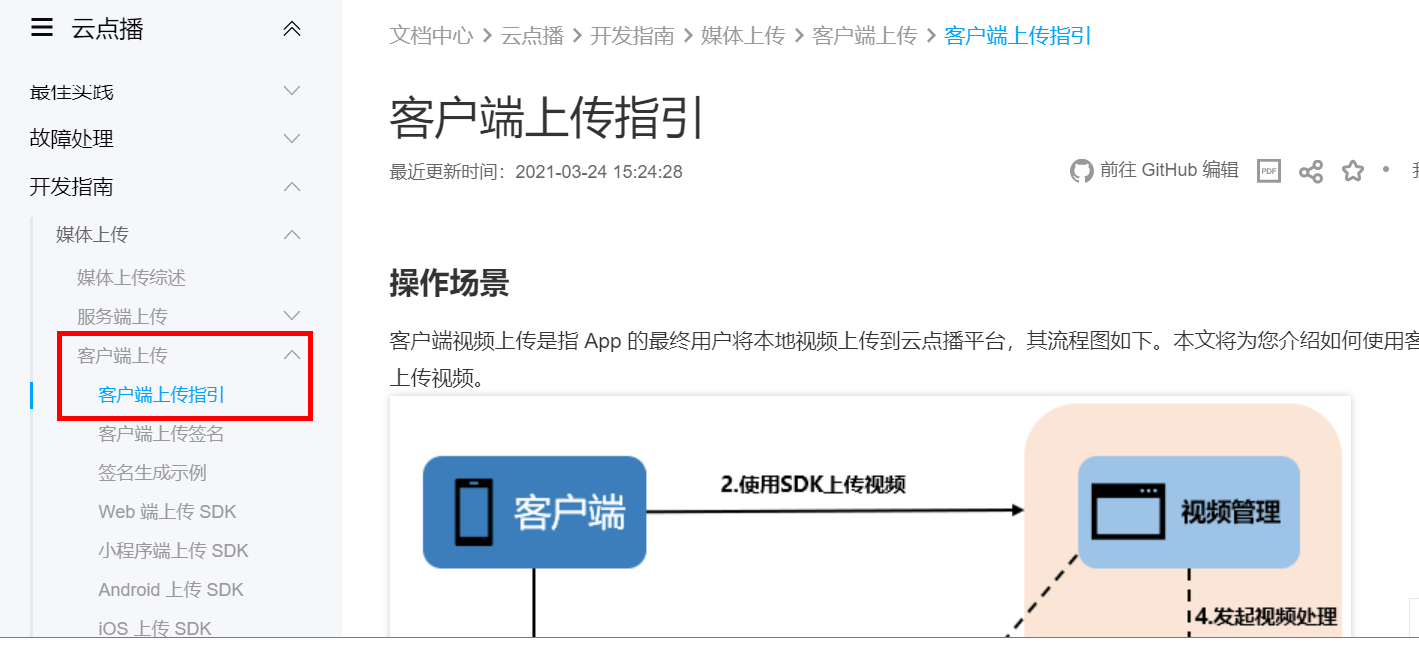
5.1、客户端上传视频

image-20220426102756442

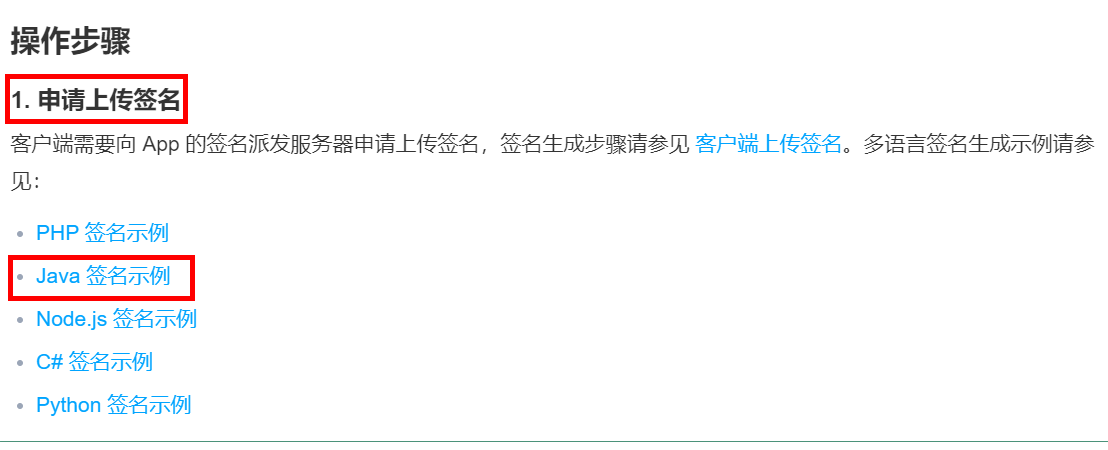
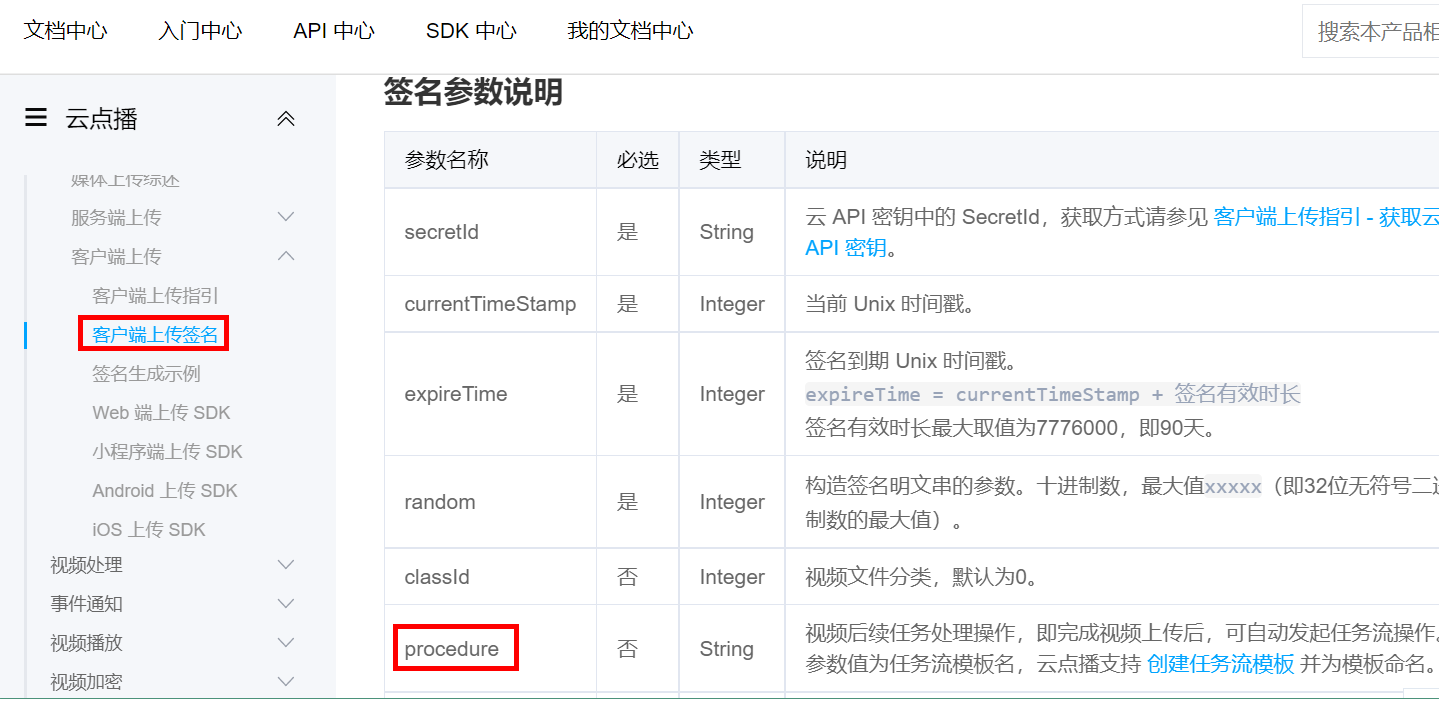
5.2、操作步骤一(申请上传签名)
(1)找到Java签名示例

image-20220426102929098

image-20220426104049094

(2)VodController编写签名接口

Signature类

1
2
3
4
5
6
7
8
9
10
11
12
13
14
15
16
17
18
19
20
21
22
23
24
25
26
27
28
29
30
31
32
33
34
35
36
37
38
39
40
41
42
43
44
45
46
47
48
49
50
51
52
53
54
55
56
57
58
59
60
61
62
63
64
65
import java.util.Random;
import javax.crypto.Mac;
import javax.crypto.spec.SecretKeySpec;
import sun.misc.BASE64Encoder;

public class Signature {
private String secretId;
private String secretKey;
private long currentTime;
private int random;
private int signValidDuration;
private static final String HMAC_ALGORITHM = "HmacSHA1"; //签名算法
private static final String CONTENT_CHARSET = "UTF-8";
public static byte[] byteMerger(byte[] byte1, byte[] byte2) {
byte[] byte3 = new byte[byte1.length + byte2.length];
System.arraycopy(byte1, 0, byte3, 0, byte1.length);
System.arraycopy(byte2, 0, byte3, byte1.length, byte2.length);
return byte3;
}
// 获取签名
public String getUploadSignature() throws Exception {
String strSign = "";
String contextStr = "";
// 生成原始参数字符串
long endTime = (currentTime + signValidDuration);
contextStr += "secretId=" + java.net.URLEncoder.encode(secretId, "utf8");
contextStr += "&currentTimeStamp=" + currentTime;
contextStr += "&expireTime=" + endTime;
contextStr += "&random=" + random;
//设置转码任务流
contextStr += "&procedure=LongVideoPreset";

try {
Mac mac = Mac.getInstance(HMAC_ALGORITHM);
SecretKeySpec secretKey = new SecretKeySpec(this.secretKey.getBytes(CONTENT_CHARSET), mac.getAlgorithm());
mac.init(secretKey);
byte[] hash = mac.doFinal(contextStr.getBytes(CONTENT_CHARSET));
byte[] sigBuf = byteMerger(hash, contextStr.getBytes("utf8"));
strSign = base64Encode(sigBuf);
strSign = strSign.replace(" ", "").replace("\n", "").replace("\r", "");
} catch (Exception e) {
throw e;
}
return strSign;
}
private String base64Encode(byte[] buffer) {
BASE64Encoder encoder = new BASE64Encoder();
return encoder.encode(buffer);
}
public void setSecretId(String secretId) {
this.secretId = secretId;
}
public void setSecretKey(String secretKey) {
this.secretKey = secretKey;
}
public void setCurrentTime(long currentTime) {
this.currentTime = currentTime;
}
public void setRandom(int random) {
this.random = random;
}
public void setSignValidDuration(int signValidDuration) {
this.signValidDuration = signValidDuration;
}
}

VodController类

1
2
3
4
5
6
7
8
9
10
11
12
13
14
15
16
17
18
19
@GetMapping("sign")
public Result sign() {
Signature sign = new Signature();
// 设置 App 的云 API 密钥
sign.setSecretId(ConstantPropertiesUtil.ACCESS_KEY_ID);
sign.setSecretKey(ConstantPropertiesUtil.ACCESS_KEY_SECRET);
sign.setCurrentTime(System.currentTimeMillis() / 1000);
sign.setRandom(new Random().nextInt(java.lang.Integer.MAX_VALUE));
sign.setSignValidDuration(3600 * 24 * 2); // 签名有效期:2天
try {
String signature = sign.getUploadSignature();
System.out.println("signature : " + signature);
return Result.ok(signature);
} catch (Exception e) {
System.out.print("获取签名失败");
e.printStackTrace();
return Result.fail(null);
}
}
5.3、操作步骤二(SDK上传)

image-20220426103357870

5.4、下载Demo源码修改

image-20220426103455851

(1)html文件测试上传

image-20220426103916665

1
2
3
4
5
6
7
8
9
10
11
12
13
14
15
16
17
18
19
20
21
22
23
24
25
26
27
28
29
30
31
32
33
34
35
36
37
38
39
40
41
42
43
44
45
46
47
48
49
50
51
52
53
54
55
56
57
58
59
60
61
62
63
64
65
66
67
68
69
70
71
72
73
74
75
76
77
78
79
80
81
82
83
84
85
86
87
88
89
90
91
92
93
94
95
96
97
98
99
100
101
102
103
104
105
106
107
108
109
110
111
112
113
114
115
116
117
118
119
120
121
122
123
124
125
126
127
128
129
130
131
132
133
134
135
136
137
138
139
140
141
142
143
144
145
146
147
148
149
150
151
152
153
154
155
156
157
158
159
160
161
162
163
164
165
166
167
168
169
170
171
172
173
174
175
176
177
178
179
180
181
182
183
184
185
186
187
188
189
190
191
192
193
194
195
196
197
198
199
200
201
202
203
204
205
206
207
208
209
210
<!DOCTYPE html>
<html>
<head>
<meta charset="utf-8">
<meta http-equiv="Content-Type" content="text/html; charset=UTF-8" />
<meta http-equiv="X-UA-Compatible" content="IE=edge">
<meta name="viewport" content="width=device-width, initial-scale=1">
<title>QCloud VIDEO UGC UPLOAD SDK</title>
<link href="//cdnjs.cloudflare.com/ajax/libs/twitter-bootstrap/3.3.5/css/bootstrap.min.css" rel="stylesheet">
<style type="text/css">
.text-danger {
color: red;
}

.control-label {
text-align: left !important;
}

#resultBox {
width: 100%;
height: 300px;
border: 1px solid #888;
padding: 5px;
overflow: auto;
margin-bottom: 20px;
}

.uploaderMsgBox {
width: 100%;
border-bottom: 1px solid #888;
}

.cancel-upload {
text-decoration: none;
cursor: pointer;
}
</style>
</head>
<body>
<div id="content">
<div class="container">
<h1>UGC-Uploader</h1>
</div>
</div>
<div class="container" id="main-area">
<div class="row" style="padding:10px;">
<p>
示例1点击“直接上传视频”按钮即可上传视频。<br>
</p>
</div>
<form ref="vExample">
<input type="file" style="display:none;" ref="vExampleFile" @change="vExampleUpload" />
</form>
<div class="row" style="padding:10px;">
<h4>示例1:直接上传视频</h4>
<a href="javascript:void(0);" class="btn btn-default" @click="vExampleAdd">直接上传视频</a>
</div>
<!-- 上传信息组件 -->
<div class="uploaderMsgBox" v-for="uploaderInfo in uploaderInfos">
<div v-if="uploaderInfo.videoInfo">
视频名称:{{uploaderInfo.videoInfo.name + '.' + uploaderInfo.videoInfo.type}};
上传进度:{{Math.floor(uploaderInfo.progress * 100) + '%'}};
fileId:{{uploaderInfo.fileId}};
上传结果:{{uploaderInfo.isVideoUploadCancel ? '已取消' : uploaderInfo.isVideoUploadSuccess ? '上传成功' : '上传中'}};
<br>
地址:{{uploaderInfo.videoUrl}};
<a href="javascript:void(0);" class="cancel-upload" v-if="!uploaderInfo.isVideoUploadSuccess && !uploaderInfo.isVideoUploadCancel" @click="uploaderInfo.cancel()">取消上传</a><br>
</div>
<div v-if="uploaderInfo.coverInfo">
封面名称:{{uploaderInfo.coverInfo.name}};
上传进度:{{Math.floor(uploaderInfo.coverProgress * 100) + '%'}};
上传结果:{{uploaderInfo.isCoverUploadSuccess ? '上传成功' : '上传中'}};
<br>
地址:{{uploaderInfo.coverUrl}};
<br>
</div>
</div>
</div>
<script src="https://cdn.jsdelivr.net/npm/es6-promise@4/dist/es6-promise.auto.js"></script>
<script src="//cdnjs.cloudflare.com/ajax/libs/vue/2.5.21/vue.js"></script>
<script src="//cdnjs.cloudflare.com/ajax/libs/axios/0.18.0/axios.js"></script>
<script src="https://cdn-go.cn/cdn/vod-js-sdk-v6/latest/vod-js-sdk-v6.js"></script>

<script type="text/javascript">

;(function () {

/**
* 计算签名。调用签名接口获取
**/
function getSignature() {
return axios.get("http://localhost:8301/admin/vod/user/sign").then(response =>{
return response.data.data
})
};
var app = new Vue({
el: '#main-area',
data: {
uploaderInfos: [],

vcExampleVideoName: '',
vcExampleCoverName: '',

cExampleFileId: '',
},
created: function () {
this.tcVod = new TcVod.default({
getSignature: getSignature
})
},
methods: {
/**
* vExample示例。添加视频
**/
vExampleAdd: function () {
this.$refs.vExampleFile.click()
},
/**
* vExample示例。上传视频过程。
**/
vExampleUpload: function () {
var self = this;
var mediaFile = this.$refs.vExampleFile.files[0]

var uploader = this.tcVod.upload({
mediaFile: mediaFile,
})
uploader.on('media_progress', function (info) {
uploaderInfo.progress = info.percent;
})
uploader.on('media_upload', function (info) {
uploaderInfo.isVideoUploadSuccess = true;
})

console.log(uploader, 'uploader')

var uploaderInfo = {
videoInfo: uploader.videoInfo,
isVideoUploadSuccess: false,
isVideoUploadCancel: false,
progress: 0,
fileId: '',
videoUrl: '',
cancel: function() {
uploaderInfo.isVideoUploadCancel = true;
uploader.cancel()
},
}

this.uploaderInfos.push(uploaderInfo)
uploader.done().then(function(doneResult) {
console.log('doneResult', doneResult)
uploaderInfo.fileId = doneResult.fileId;
return doneResult.video.url;
}).then(function (videoUrl) {
uploaderInfo.videoUrl = videoUrl
self.$refs.vExample.reset();
})
},
// cExample 上传过程
cExampleUpload: function() {
var self = this;
var coverFile = this.$refs.cExampleCover.files[0];

var uploader = this.tcVod.upload({
fileId: this.cExampleFileId,
coverFile: coverFile,
})
uploader.on('cover_progress', function(info) {
uploaderInfo.coverProgress = info.percent;
})
uploader.on('cover_upload', function(info) {
uploaderInfo.isCoverUploadSuccess = true;
})
console.log(uploader, 'uploader')

var uploaderInfo = {
coverInfo: uploader.coverInfo,
isCoverUploadSuccess: false,
coverProgress: 0,
coverUrl: '',
cancel: function () {
uploader.cancel()
},
}

this.uploaderInfos.push(uploaderInfo)

uploader.done().then(function (doneResult) {
console.log('doneResult', doneResult)
uploaderInfo.coverUrl = doneResult.cover.url;
self.$refs.cExample.reset();
})
},
},
})
})();

</script>
<!-- Global site tag (gtag.js) - Google Analytics -->
<script async src="https://www.googletagmanager.com/gtag/js?id=UA-26476625-7"></script>
<script>
// add by alsotang@gmail.com
window.dataLayer = window.dataLayer || [];
function gtag(){dataLayer.push(arguments);}
gtag('js', new Date());
gtag('config', 'UA-26476625-7');
</script>
</body>
</html>

6、完善删除视频功能

6.1、修改VideoController方法

修改删除小节方法

1
2
3
4
5
6
@ApiOperation(value = "删除")
@DeleteMapping("remove/{id}")
public Result remove(@PathVariable Long id) {
videoService.removeVideoById(id);
return Result.ok();
}
6.2、修改Service方法

修改VideoService和VideoServiceImpl

1
2
3
4
5
6
7
8
9
10
11
12
13
14
15
16
17
18
19
20
21
22
23
24
25
26
27
28
29
30
31
32
33
34
35
36
37
38
39
40
41
@Service
public class VideoServiceImpl extends ServiceImpl<VideoMapper, Video> implements VideoService {

@Autowired
private VodService vodService;

//根据课程id删除小节
@Override
public void removeVideoByCourseId(Long id) {
//1 删除小节中的视频
//根据课程id获取课程里面所有小节
QueryWrapper<Video> wrapper = new QueryWrapper<>();
wrapper.eq("course_id",id);
List<Video> videoList = baseMapper.selectList(wrapper);
//遍历获取每个小节中的视频id
for(Video video:videoList) {
String videoSourceId = video.getVideoSourceId();
//如果视频id不为空,调用方法删除
if(!StringUtils.isEmpty(videoSourceId)) {
vodService.removeVideo(videoSourceId);
}
}
//2 根据课程id删除小节
baseMapper.delete(wrapper);
}

//根据小节id删除小节删除视频
@Override
public void removeVideoById(Long id) {
//1 删除视频
Video video = baseMapper.selectById(id);
//获取视频id
String videoSourceId = video.getVideoSourceId();
//如果视频id不为空,调用方法删除
if(!StringUtils.isEmpty(videoSourceId)) {
vodService.removeVideo(videoSourceId);
}
//2 删除小节
baseMapper.deleteById(id);
}
}