程序员波特的个人博客

一个小而美的程序员编程资料站

0%

实操4、RabbitMQ的发布订阅模式

一、生产者代码

1
2
3
4
5
6
7
8
9
10
11
12
13
14
15
16
17
18
19
20
21
22
23
24
25
26
27
28
29
30
31
32
33
34
35
36
37
38
39
40
41
42
43
44
45
46
47
48
49
50
51
52
53
54
55
56
57
58
59
60
package com.atguigu.rabbitmq.fanout;  

import com.atguigu.rabbitmq.util.ConnectionUtil;
import com.rabbitmq.client.BuiltinExchangeType;
import com.rabbitmq.client.Channel;
import com.rabbitmq.client.Connection;
import com.rabbitmq.client.ConnectionFactory;

public class Producer {

public static void main(String[] args) throws Exception {

// 1、获取连接
Connection connection = ConnectionUtil.getConnection();

// 2、创建频道
Channel channel = connection.createChannel();

// 参数1. exchange:交换机名称
// 参数2. type:交换机类型
// DIRECT("direct"):定向
// FANOUT("fanout"):扇形(广播),发送消息到每一个与之绑定队列。
// TOPIC("topic"):通配符的方式
// HEADERS("headers"):参数匹配
// 参数3. durable:是否持久化
// 参数4. autoDelete:自动删除
// 参数5. internal:内部使用。一般false
// 参数6. arguments:其它参数
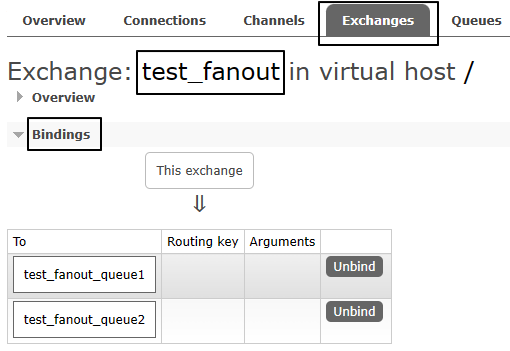
String exchangeName = "test_fanout";

// 3、创建交换机
channel.exchangeDeclare(exchangeName, BuiltinExchangeType.FANOUT,true,false,false,null);

// 4、创建队列
String queue1Name = "test_fanout_queue1";
String queue2Name = "test_fanout_queue2";

channel.queueDeclare(queue1Name,true,false,false,null);
channel.queueDeclare(queue2Name,true,false,false,null);

// 5、绑定队列和交换机
// 参数1. queue:队列名称
// 参数2. exchange:交换机名称
// 参数3. routingKey:路由键,绑定规则
// 如果交换机的类型为fanout,routingKey设置为""
channel.queueBind(queue1Name,exchangeName,"");
channel.queueBind(queue2Name,exchangeName,"");

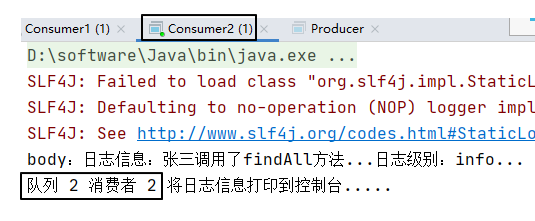
String body = "日志信息:张三调用了findAll方法...日志级别:info...";

// 6、发送消息
channel.basicPublish(exchangeName,"",null,body.getBytes());

// 7、释放资源
channel.close();
connection.close();

}

}

二、消费者代码

1、消费者1号

1
2
3
4
5
6
7
8
9
10
11
12
13
14
15
16
17
18
19
20
21
22
23
24
25
26
27
28
29
30
31
32
33
34
35
package com.atguigu.rabbitmq.fanout;  

import com.atguigu.rabbitmq.util.ConnectionUtil;
import com.rabbitmq.client.*;
import java.io.IOException;

public class Consumer1 {

public static void main(String[] args) throws Exception {

Connection connection = ConnectionUtil.getConnection();

Channel channel = connection.createChannel();

String queue1Name = "test_fanout_queue1";

channel.queueDeclare(queue1Name,true,false,false,null);

Consumer consumer = new DefaultConsumer(channel){

@Override
public void handleDelivery(String consumerTag, Envelope envelope, AMQP.BasicProperties properties, byte[] body) throws IOException {

System.out.println("body:"+new String(body));
System.out.println("队列 1 消费者 1 将日志信息打印到控制台.....");

}

};

channel.basicConsume(queue1Name,true,consumer);

}

}

2、消费者2号

1
2
3
4
5
6
7
8
9
10
11
12
13
14
15
16
17
18
19
20
21
22
23
24
25
26
27
28
29
30
31
32
33
34
35
package com.atguigu.rabbitmq.fanout;  

import com.atguigu.rabbitmq.util.ConnectionUtil;
import com.rabbitmq.client.*;
import java.io.IOException;

public class Consumer2 {

public static void main(String[] args) throws Exception {

Connection connection = ConnectionUtil.getConnection();

Channel channel = connection.createChannel();

String queue2Name = "test_fanout_queue2";

channel.queueDeclare(queue2Name,true,false,false,null);

Consumer consumer = new DefaultConsumer(channel){

@Override
public void handleDelivery(String consumerTag, Envelope envelope, AMQP.BasicProperties properties, byte[] body) throws IOException {

System.out.println("body:"+new String(body));
System.out.println("队列 2 消费者 2 将日志信息打印到控制台.....");

}

};

channel.basicConsume(queue2Name,true,consumer);

}

}

三、运行效果

还是先启动消费者,然后再运行生产者程序发送消息:

img

img

四、小结

交换机和队列的绑定关系如下图所示:

images

交换机需要与队列进行绑定,绑定之后;一个消息可以被多个消费者都收到。

发布订阅模式与工作队列模式的区别:

  • 工作队列模式本质上是绑定默认交换机
  • 发布订阅模式绑定指定交换机
  • 监听同一个队列的消费端程序彼此之间是竞争关系
  • 绑定同一个交换机的多个队列在发布订阅模式下,消息是广播的,每个队列都能接收到消息